In this part of the series, we will go through the process of adding a web user interface to our AppWrite Cloud platform. We’ll use the Next.js framework to create the frontend application, connect it to our AppWrite Cloud GraphQL API and deploy the app on top of Qovery.
Bootstrapping Frontend
In the first step, let’s create a scaffolding to our frontend application:
yarn create next-app --example with-tailwindcss frontend
We use Tailwind for styling, so the command above bootstraps a Next.js app with TailwindCSS already set up.
After the scaffolding is created, create a new remote Git repository on Github, Gitlab or Bitbucket with the application code.
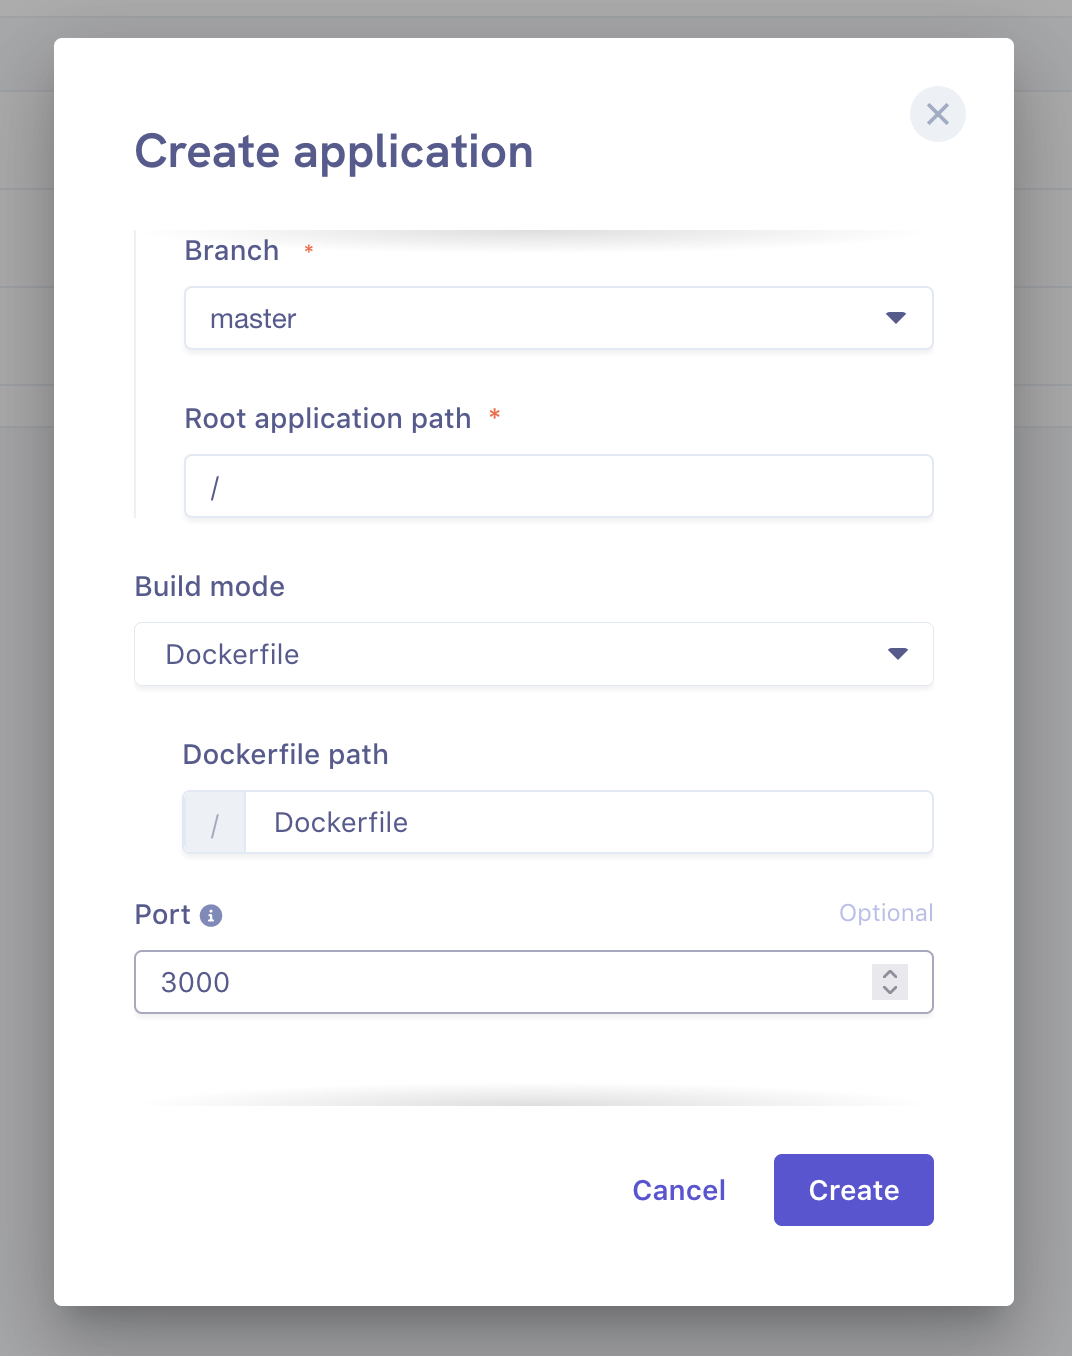
For building and deploying the app on Qovery, we’ll use Docker - to dockerize the application please add a Dockerfile with the following content:
# Install dependencies only when neededFROM node:alpine AS deps# Check https://github.com/nodejs/docker-node/tree/b4117f9333da4138b03a546ec926ef50a31506c3#nodealpine to understand why libc6-compat might be needed.RUN apk add --no-cache libc6-compatWORKDIR /appCOPY package.json yarn.lock ./RUN yarn install --frozen-lockfile# Rebuild the source code only when neededFROM node:alpine AS builderWORKDIR /appCOPY . .COPY --from=deps /app/node_modules ./node_modulesRUN yarn build && yarn install --production --ignore-scripts --prefer-offline# Production image, copy all the files and run nextFROM node:alpine AS runnerWORKDIR /appENV NODE_ENV productionRUN addgroup -g 1001 -S nodejsRUN adduser -S nextjs -u 1001# You only need to copy next.config.js if you are NOT using the default configuration# COPY --from=builder /app/next.config.js ./COPY --from=builder /app/public ./publicCOPY --from=builder --chown=nextjs:nodejs /app/.next ./.nextCOPY --from=builder /app/node_modules ./node_modulesCOPY --from=builder /app/package.json ./package.jsonUSER nextjsEXPOSE 3000# Next.js collects completely anonymous telemetry data about general usage.# Learn more here: https://nextjs.org/telemetry# Uncomment the following line in case you want to disable telemetry.# ENV NEXT_TELEMETRY_DISABLED 1CMD ["yarn", "start"]
The Dockerfile will let Qovery know how to build and run the application. After the Dockerfile is created, add a new application in the AppWrite Cloud project on Qovery with port 3000 and Docker build mode:
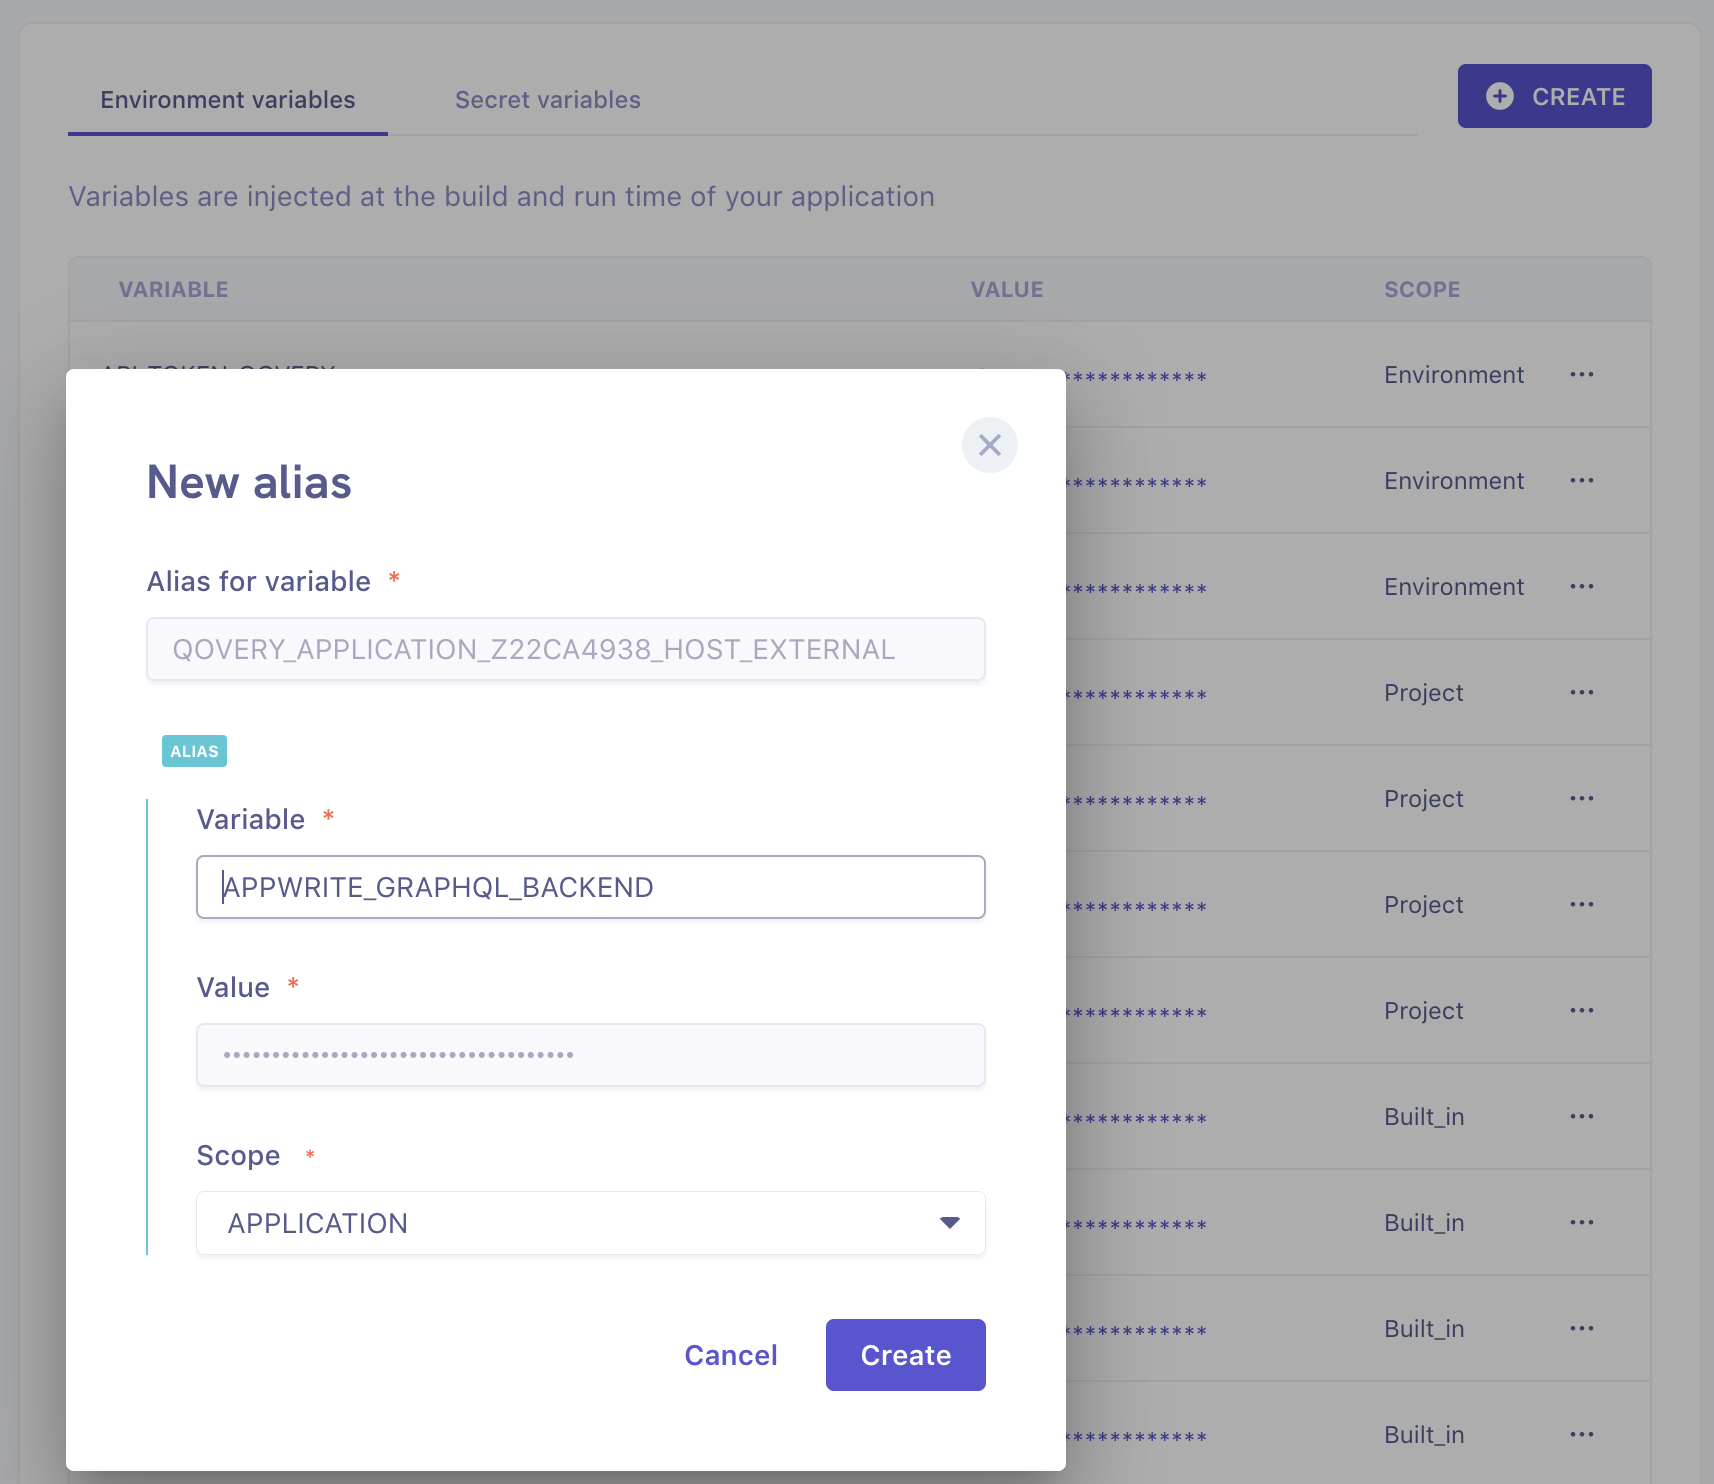
In the next step let’s add a APPWRITE_GRAPHQL_BACKEND env variable that we will, later on, use in our frontend. This variable will be an alias to the location of our Hasura application, so we can access its GraphQL API:
Connecting Backend
Now to quickly deploy the app and test the integration, let’s replace the content of index.tsx with the following:
import { Disclosure, Menu, Transition } from '@headlessui/react';import { BellIcon, MenuIcon, XIcon } from '@heroicons/react/outline';import axios from 'axios';import { Fragment, useState } from 'react';import { useMutation } from 'react-query';const anonymous = "eyJhbGciOiJIUzI1NiIsInR5cCI6IkpXVCJ9.eyJodHRwczovL2hhc3VyYS5pby9qd3QvY2xhaW1zIjp7IngtaGFzdXJhLXVzZXItaWQiOiI1IiwieC1oYXN1cmEtZGVmYXVsdC1yb2xlIjoiYW5vbnltb3VzIiwieC1oYXN1cmEtYWxsb3dlZC1yb2xlcyI6WyJhbm9ueW1vdXMiXX0sImV4cCI6MTY2NjA3NzAwNn0.Op7qVJAlMm3O2p1sSTMueuTUoUJls1K4pdmiusaz1R0"const user = {name: 'Tom Cook',imageUrl:'https://images.unsplash.com/photo-1472099645785-5658abf4ff4e?ixlib=rb-1.2.1&ixid=eyJhcHBfaWQiOjEyMDd9&auto=format&fit=facearea&facepad=2&w=256&h=256&q=80',};const navigation = [{ name: 'Dashboard', href: '#', current: true }];const userNavigation = [{ name: 'Your Profile', href: '#' },{ name: 'Settings', href: '#' },{ name: 'Sign out', href: '#' },];function classNames(...classes) {return classes.filter(Boolean).join(' ');}export default function Dashboard() {return (<div className="min-h-full"><div className="bg-gray-800 pb-32"><Disclosure as="nav" className="bg-gray-800">{({ open }) => (<><div className="max-w-7xl mx-auto sm:px-6 lg:px-8"><div className="border-b border-gray-700"><div className="flex items-center justify-between h-16 px-4 sm:px-0"><div className="flex items-center"><div className="flex-shrink-0"><imgclassName="h-8 w-8"src="https://tailwindui.com/img/logos/workflow-mark-indigo-500.svg"alt="Workflow"/></div><div className="hidden md:block"><div className="ml-10 flex items-baseline space-x-4">{navigation.map((item) => (<akey={item.name}href={item.href}className={classNames(item.current? 'bg-gray-900 text-white': 'text-gray-300 hover:bg-gray-700 hover:text-white','px-3 py-2 rounded-md text-sm font-medium')}aria-current={item.current ? 'page' : undefined}>{item.name}</a>))}</div></div></div><div className="hidden md:block"><div className="ml-4 flex items-center md:ml-6"><buttontype="button"className="bg-gray-800 p-1 text-gray-400 rounded-full hover:text-white focus:outline-none focus:ring-2 focus:ring-offset-2 focus:ring-offset-gray-800 focus:ring-white"><span className="sr-only">View notifications</span><BellIcon className="h-6 w-6" aria-hidden="true" /></button>{/* Profile dropdown */}<Menu as="div" className="ml-3 relative"><div><Menu.Button className="max-w-xs bg-gray-800 rounded-full flex items-center text-sm focus:outline-none focus:ring-2 focus:ring-offset-2 focus:ring-offset-gray-800 focus:ring-white"><span className="sr-only">Open user menu</span><imgclassName="h-8 w-8 rounded-full"src={user.imageUrl}alt=""/></Menu.Button></div><Transitionas={Fragment}enter="transition ease-out duration-100"enterFrom="transform opacity-0 scale-95"enterTo="transform opacity-100 scale-100"leave="transition ease-in duration-75"leaveFrom="transform opacity-100 scale-100"leaveTo="transform opacity-0 scale-95"><Menu.Items className="origin-top-right absolute right-0 mt-2 w-48 rounded-md shadow-lg py-1 bg-white ring-1 ring-black ring-opacity-5 focus:outline-none">{userNavigation.map((item) => (<Menu.Item key={item.name}>{({ active }) => (<ahref={item.href}className={classNames(active ? 'bg-gray-100' : '','block px-4 py-2 text-sm text-gray-700')}>{item.name}</a>)}</Menu.Item>))}</Menu.Items></Transition></Menu></div></div><div className="-mr-2 flex md:hidden">{/* Mobile menu button */}<Disclosure.Button className="bg-gray-800 inline-flex items-center justify-center p-2 rounded-md text-gray-400 hover:text-white hover:bg-gray-700 focus:outline-none focus:ring-2 focus:ring-offset-2 focus:ring-offset-gray-800 focus:ring-white"><span className="sr-only">Open main menu</span>{open ? (<XIconclassName="block h-6 w-6"aria-hidden="true"/>) : (<MenuIconclassName="block h-6 w-6"aria-hidden="true"/>)}</Disclosure.Button></div></div></div></div><Disclosure.Panel className="border-b border-gray-700 md:hidden"><div className="px-2 py-3 space-y-1 sm:px-3">{navigation.map((item) => (<Disclosure.Buttonkey={item.name}as="a"href={item.href}className={classNames(item.current? 'bg-gray-900 text-white': 'text-gray-300 hover:bg-gray-700 hover:text-white','block px-3 py-2 rounded-md text-base font-medium')}aria-current={item.current ? 'page' : undefined}>{item.name}</Disclosure.Button>))}</div><div className="pt-4 pb-3 border-t border-gray-700"><div className="flex items-center px-5"><div className="flex-shrink-0"><imgclassName="h-10 w-10 rounded-full"src={user.imageUrl}alt=""/></div><div className="ml-3"><div className="text-base font-medium leading-none text-white">{user.name}</div><div className="text-sm font-medium leading-none text-gray-400">{user.email}</div></div><buttontype="button"className="ml-auto bg-gray-800 flex-shrink-0 p-1 text-gray-400 rounded-full hover:text-white focus:outline-none focus:ring-2 focus:ring-offset-2 focus:ring-offset-gray-800 focus:ring-white"><span className="sr-only">View notifications</span><BellIcon className="h-6 w-6" aria-hidden="true" /></button></div><div className="mt-3 px-2 space-y-1">{userNavigation.map((item) => (<Disclosure.Buttonkey={item.name}as="a"href={item.href}className="block px-3 py-2 rounded-md text-base font-medium text-gray-400 hover:text-white hover:bg-gray-700">{item.name}</Disclosure.Button>))}</div></div></Disclosure.Panel></>)}</Disclosure><header className="py-10"><div className="max-w-7xl mx-auto px-4 sm:px-6 lg:px-8"><h1 className="text-3xl font-bold text-white">Dashboard</h1></div></header></div><main className="-mt-32"><div className="max-w-7xl mx-auto pb-12 px-4 sm:px-6 lg:px-8"><Signup /><Signin /><div className="bg-white rounded-lg shadow px-5 py-6 sm:px-6"><div className="border-4 border-dashed border-gray-200 rounded-lg h-96" /></div></div></main></div></>);}const Signin = (email, password) => {const mutation = useMutation((event) => {event.preventDefault();return axios({url: graphqlApiEndpoint,method: 'post',headers: { 'Authorization': 'Bearer ' + anonymous },data: {query: `query Singin {Singin(email: "${email}", password: "${password}") {accessToken}}`,},})});return <button onClick={(event) => mutation.mutate(event)}>Login</button>;};const Signup = (email, password) => {const mutation = useMutation((event) => {event.preventDefault();return axios({url: graphqlApiEndpoint,method: 'post',headers: { 'Authorization': 'Bearer ' + anonymous },data: {query: `query Signup {Signup(email: "${email}", password: "${password}") {accessToken}}`,},})});return <button onClick={(event) => mutation.mutate(event)}>Signup</button>;};
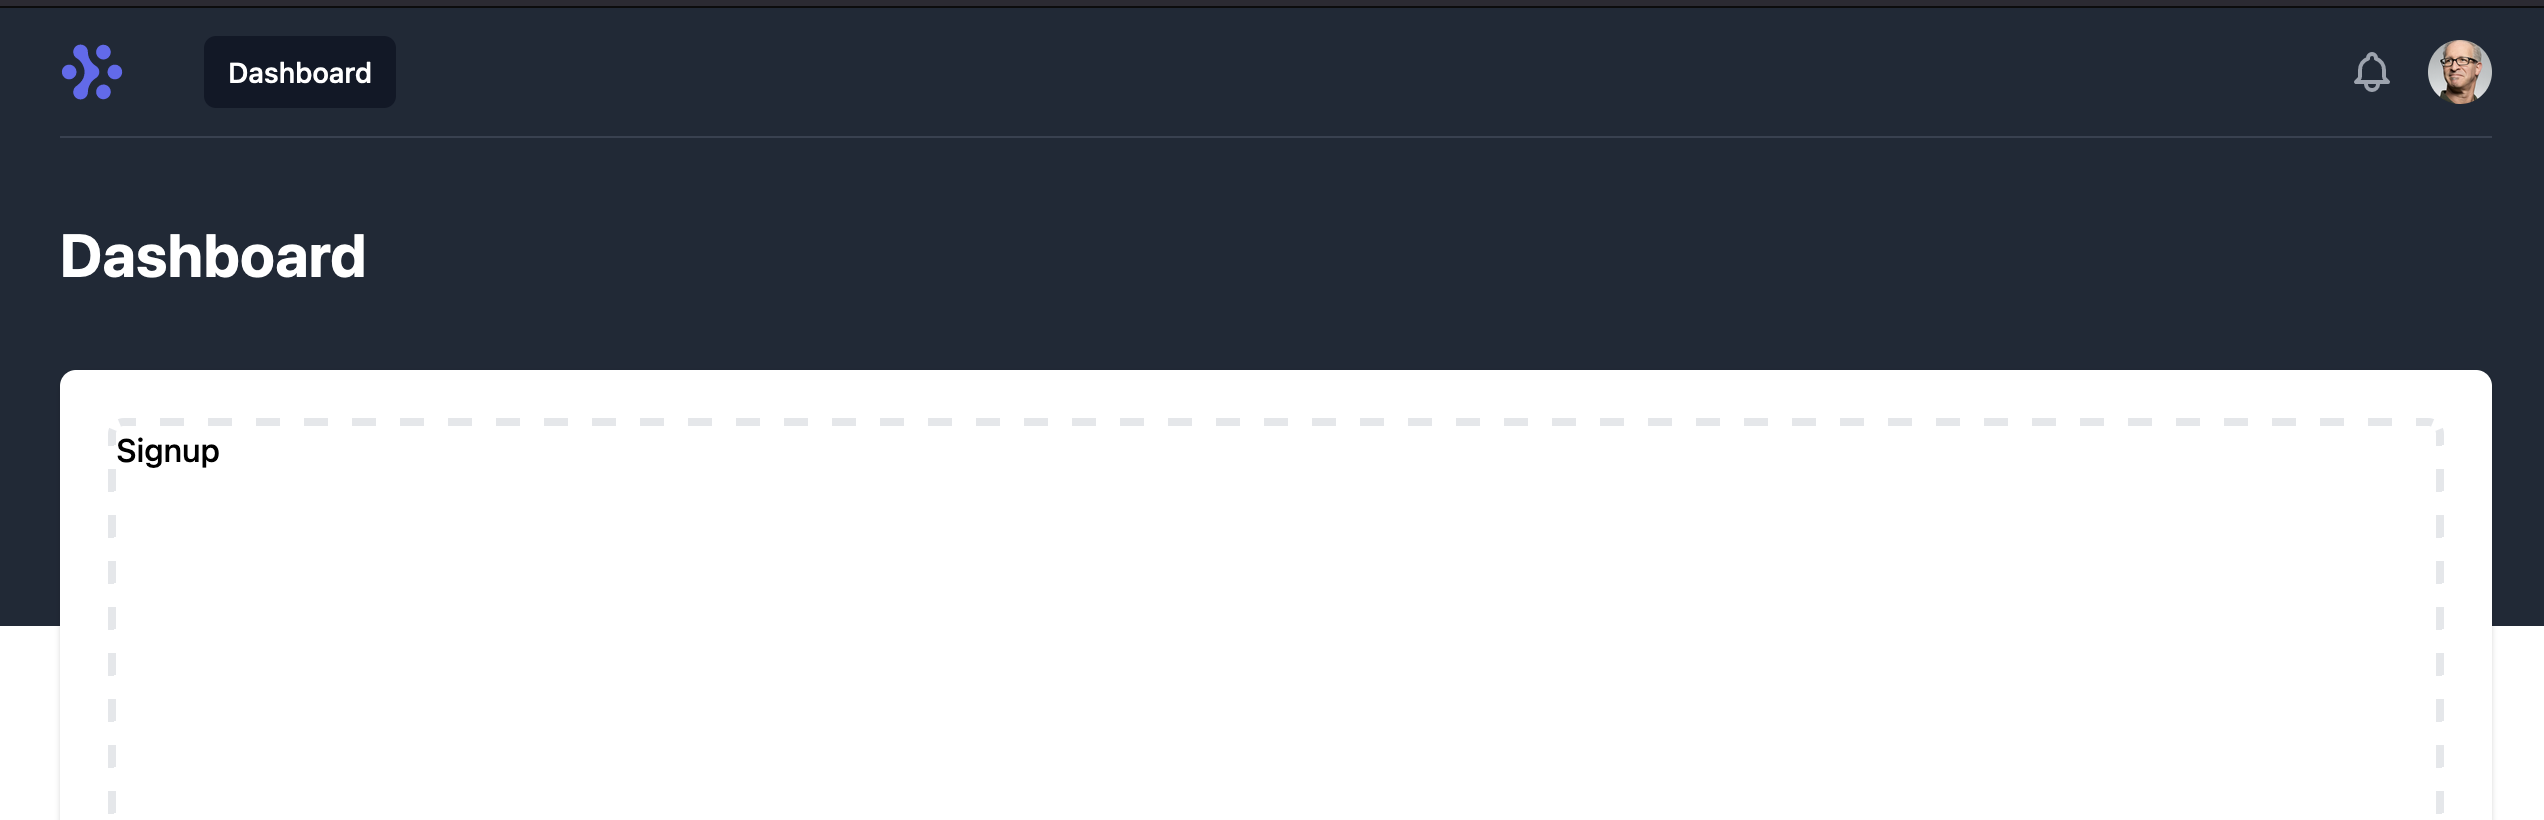
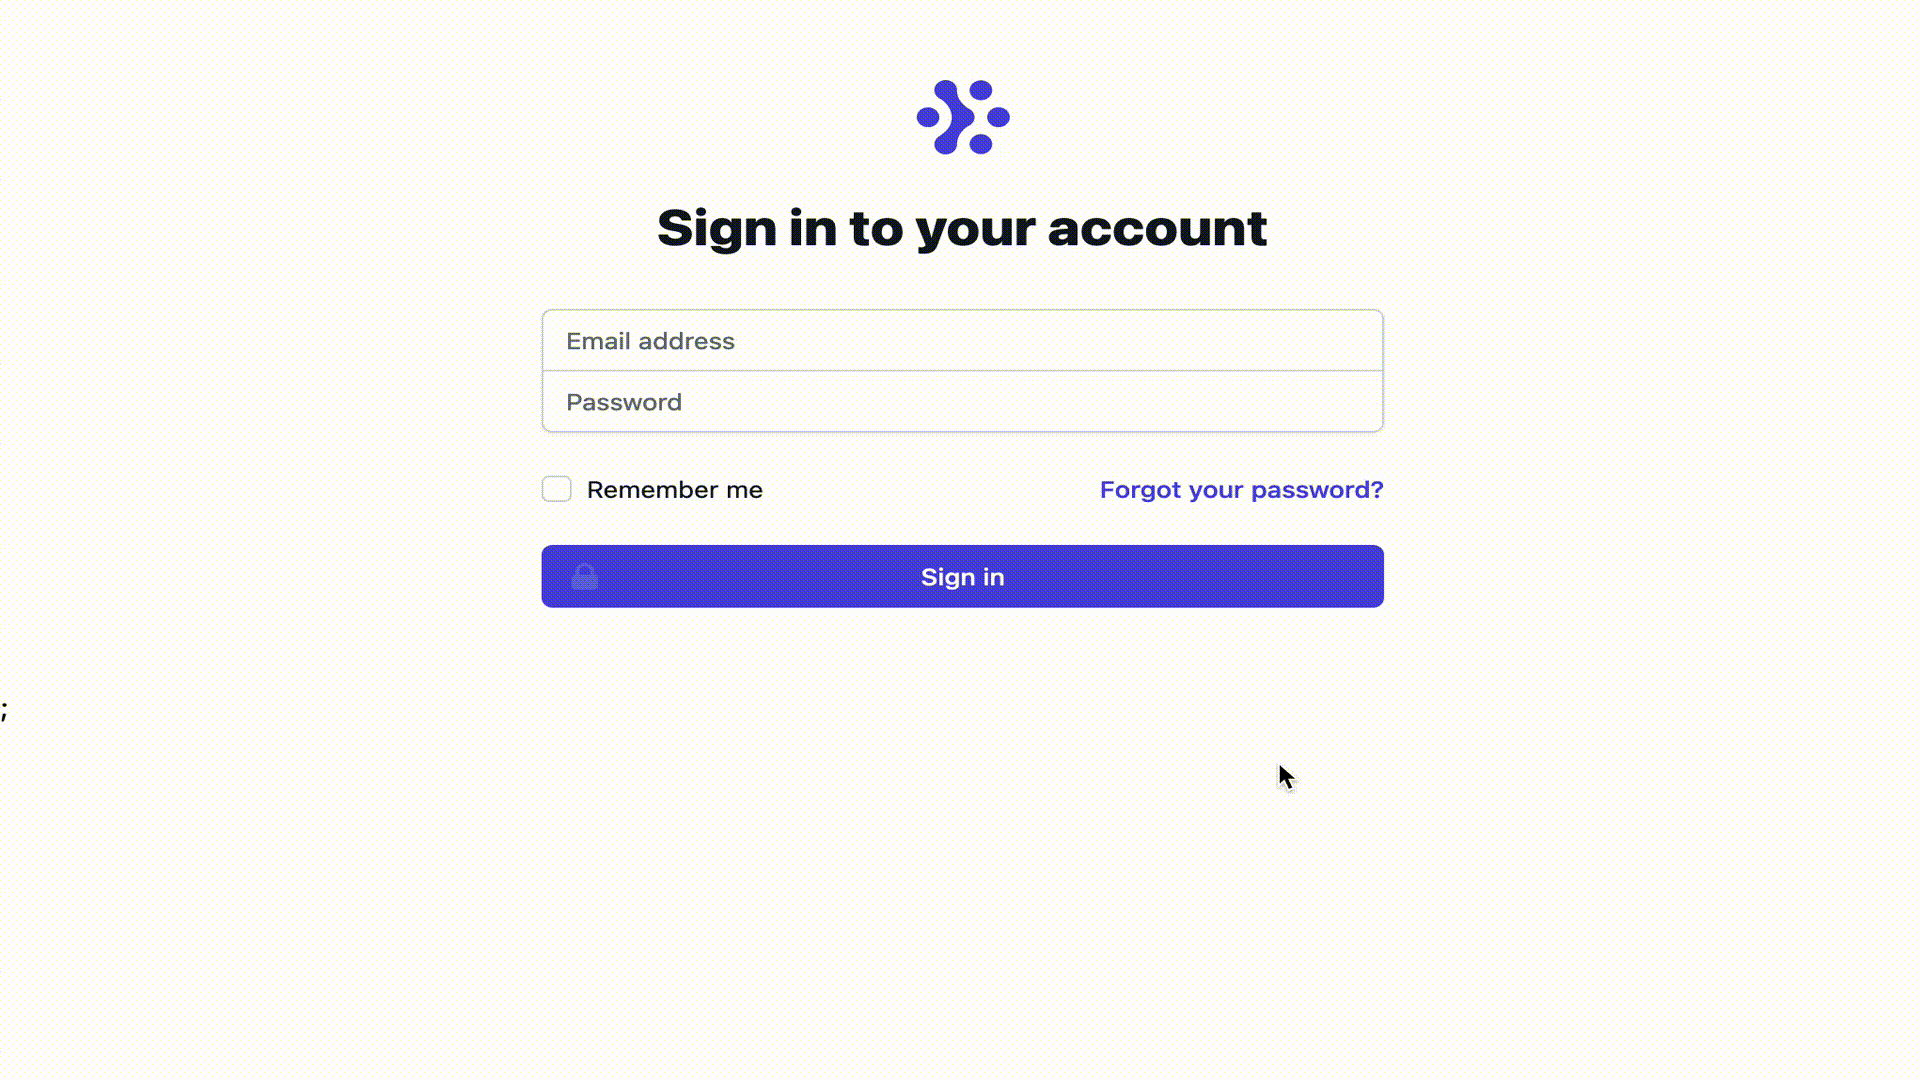
This makes the skeleton of our UI:
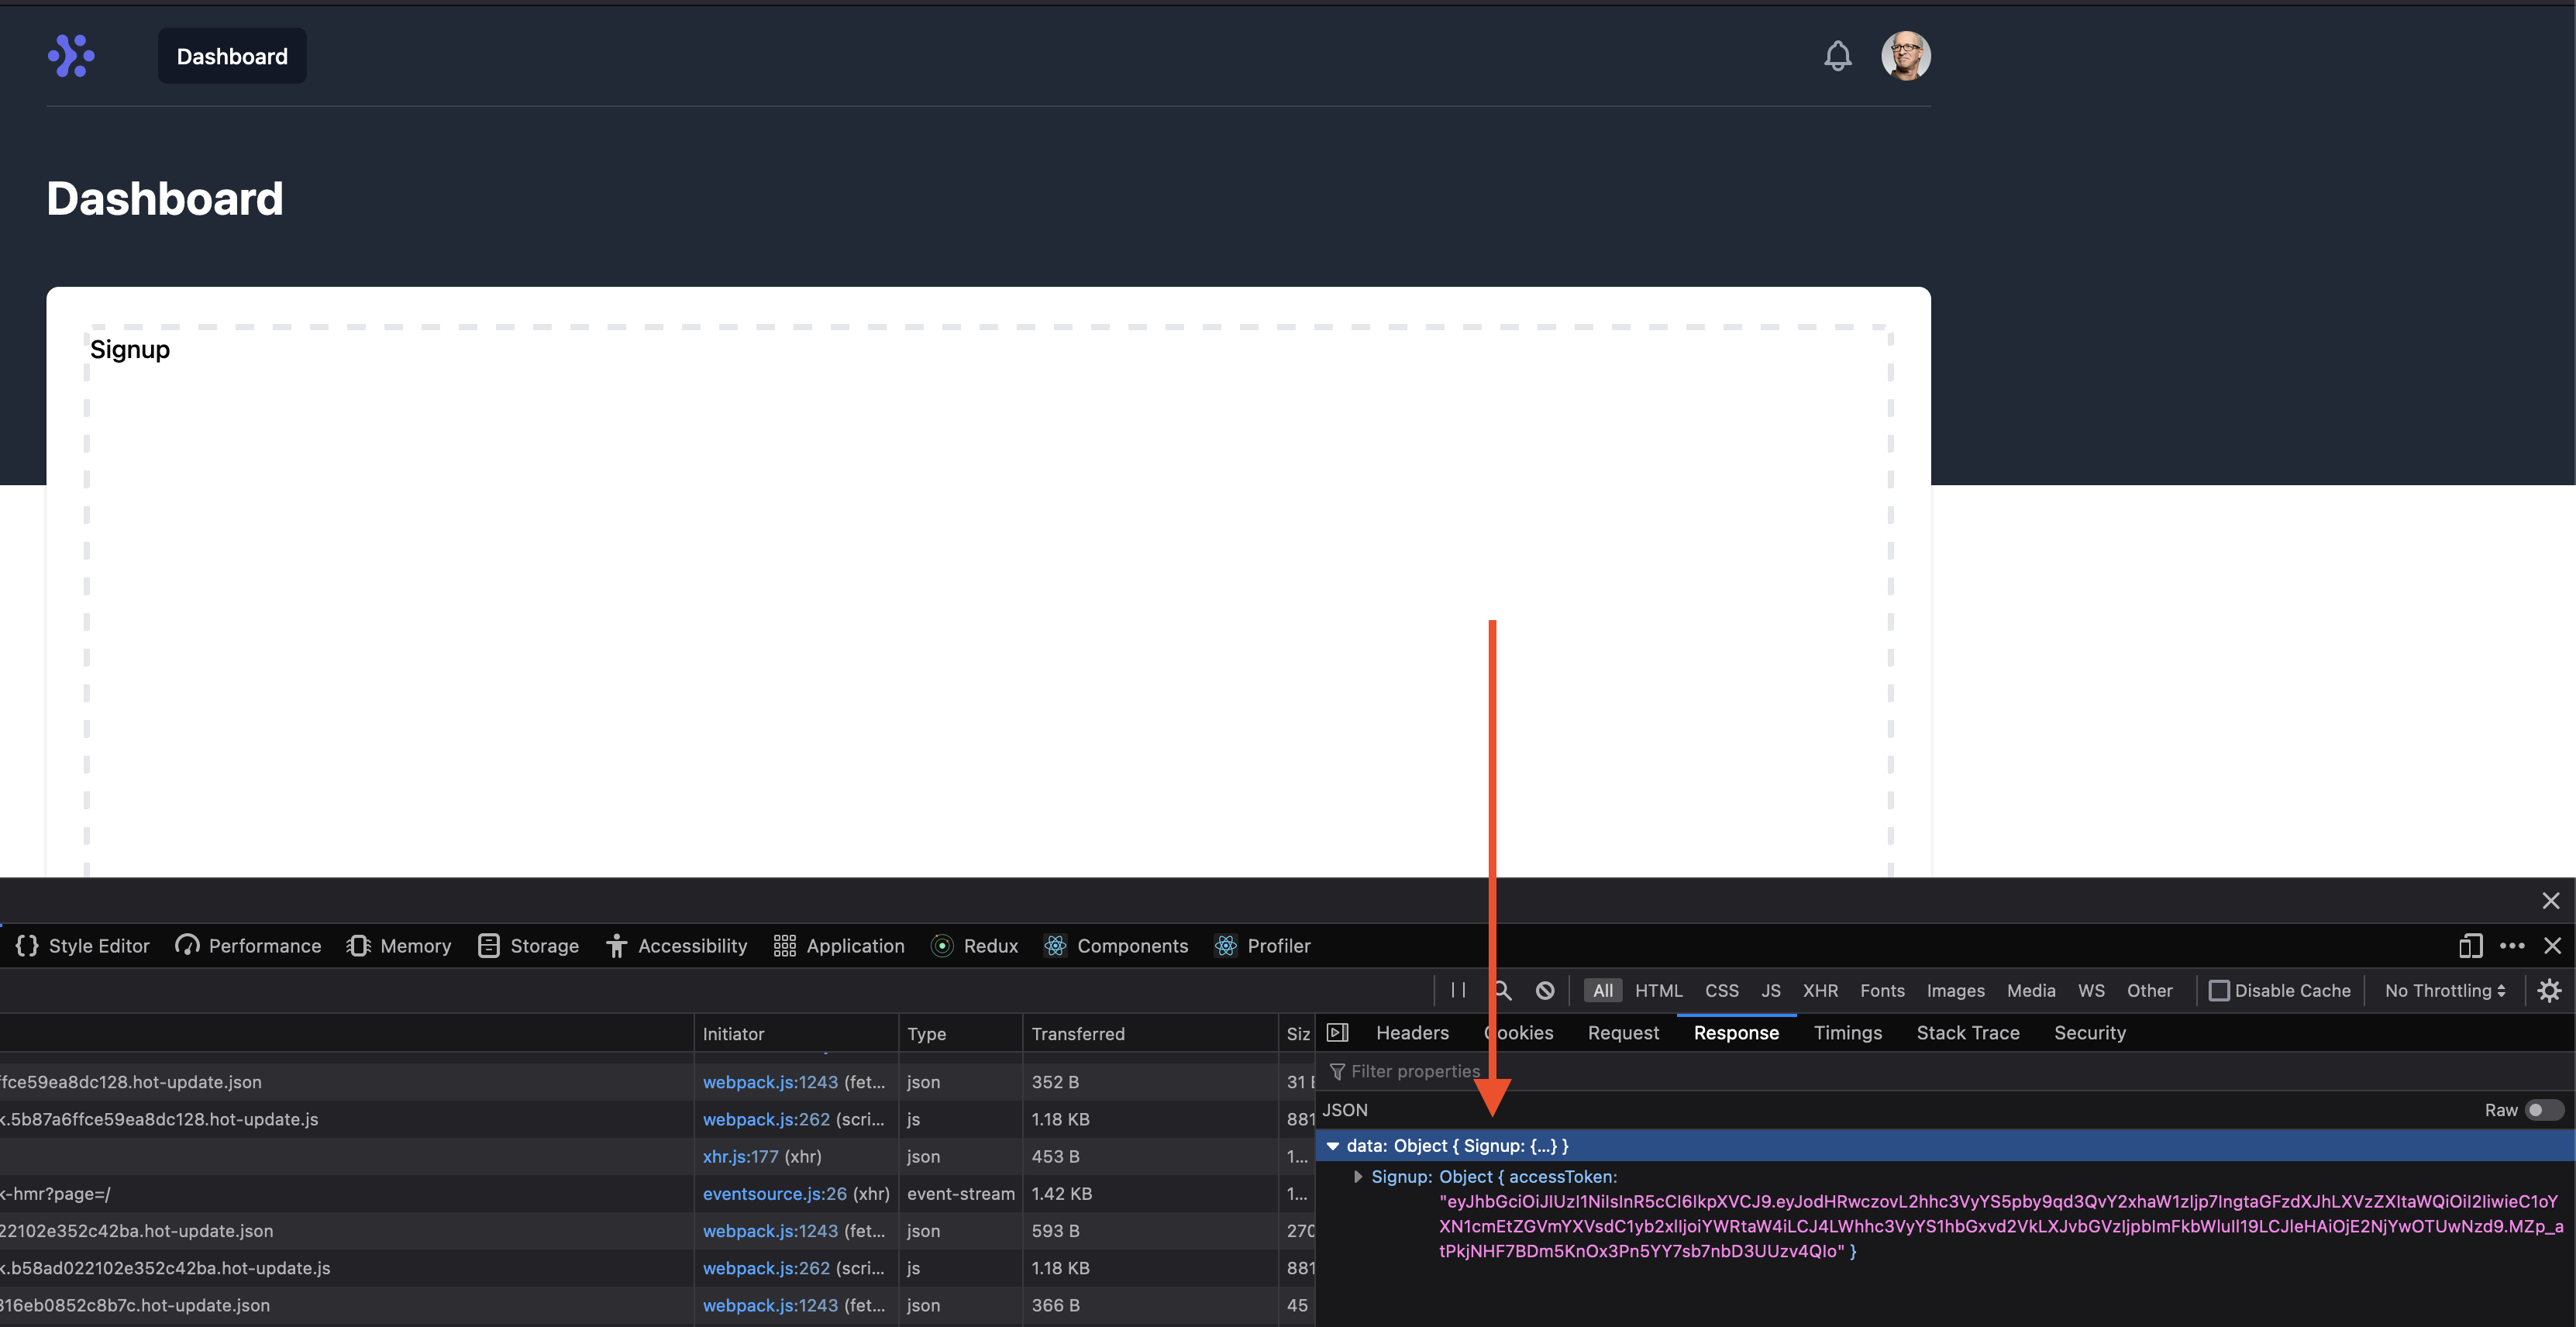
Clicking on the signup will send a test signup request to our backend - click Signup and see the response with an access token in the network tab of your browser:
To send the request, we use the following piece of code:
axios({url: graphqlApiEndpoint,method: 'post',headers: { Authorization: 'Bearer ' + anonymous },data: {query: `mutation {Signup(input: {email: "${email}", password: "${password}"}) {accessToken}}`,},}
We use axios HTTP library to send a POST request to our graphqlApiEndpoint (that uses the value of the environment variable we set previously) to run a GraphQL mutation that creates a new user with a given email and password in our AppWrite Cloud backend. In the response, we receive an access token that we can use in the name of the user to interact with the API.
The anonymous token sent in the request is a way to interact with unauthenticated endpoints in the Hasura backend.
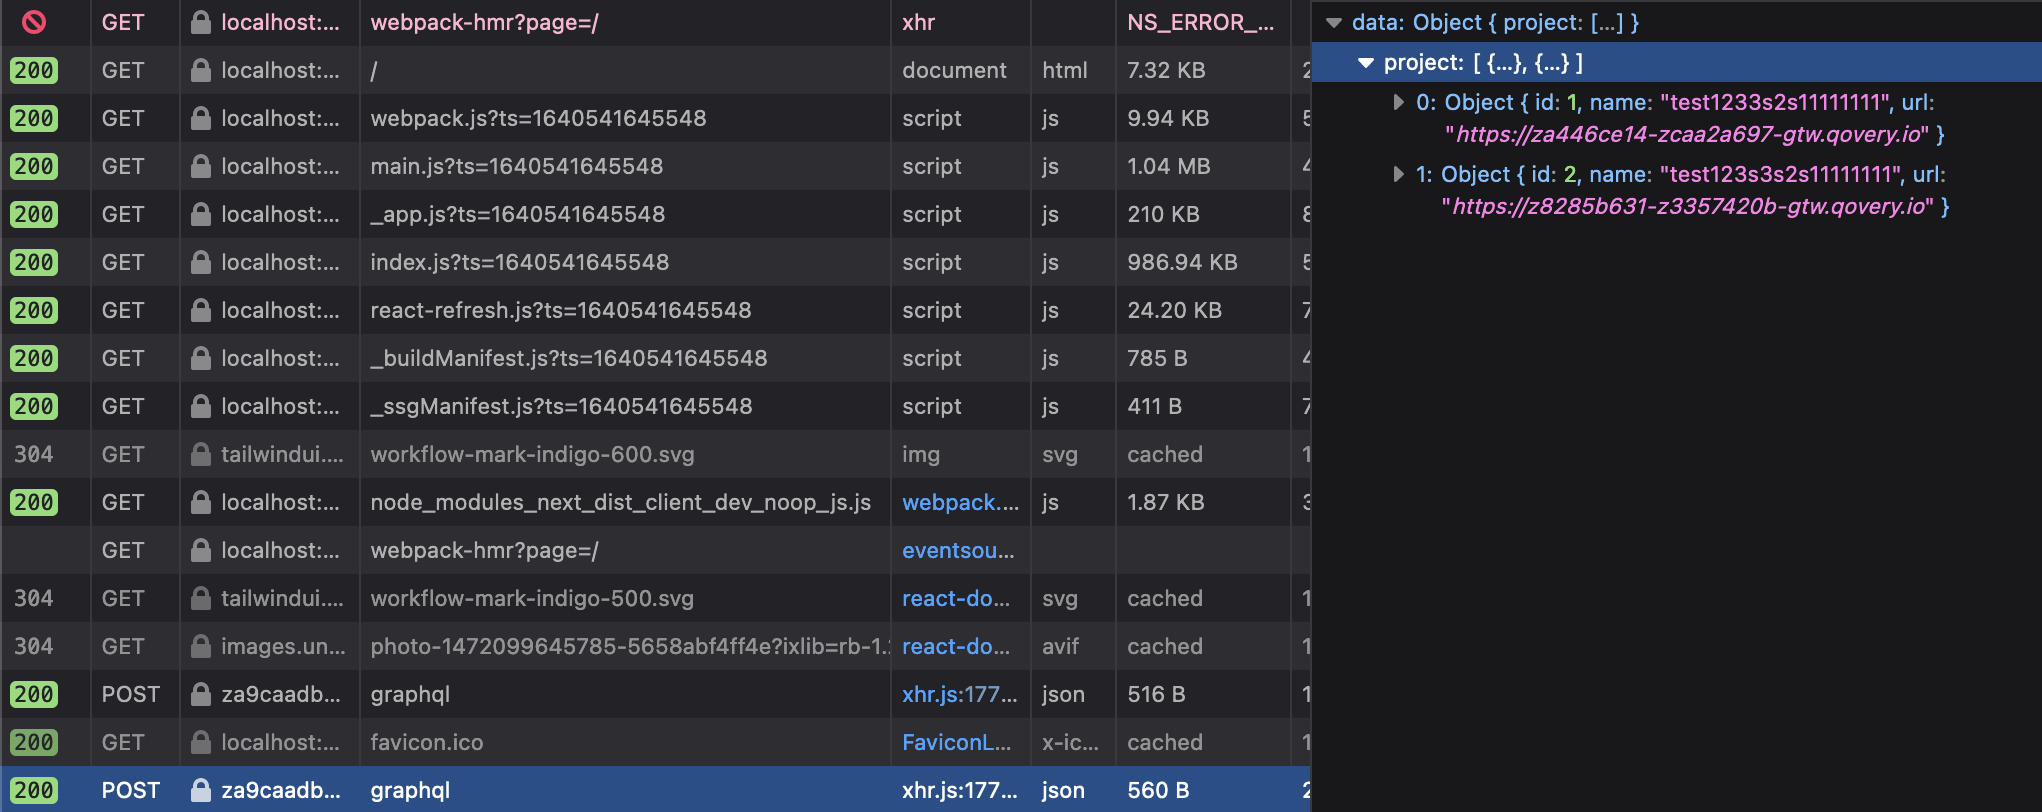
In the next step let’s take care of the list of user projects:
const { isLoading, error, data } = useQuery('projects', () => {return axios({url: graphqlApiEndpoint,method: 'POST',headers: { Authorization: 'Bearer ' + token },data: {query: `query Projects {project {idnameurl}}`,},});});
In the snippet above, we use ReactQuery to manage the server state (store the info about the project client-side) and axios for performing the HTTP request. In the headers, we send users’ accessToken, and the payload allows us to specify data that we are interested in about projects we have access to.
The response from the query contains info we can use to render the list of AppWrite projects managed by AppWriteCloud:
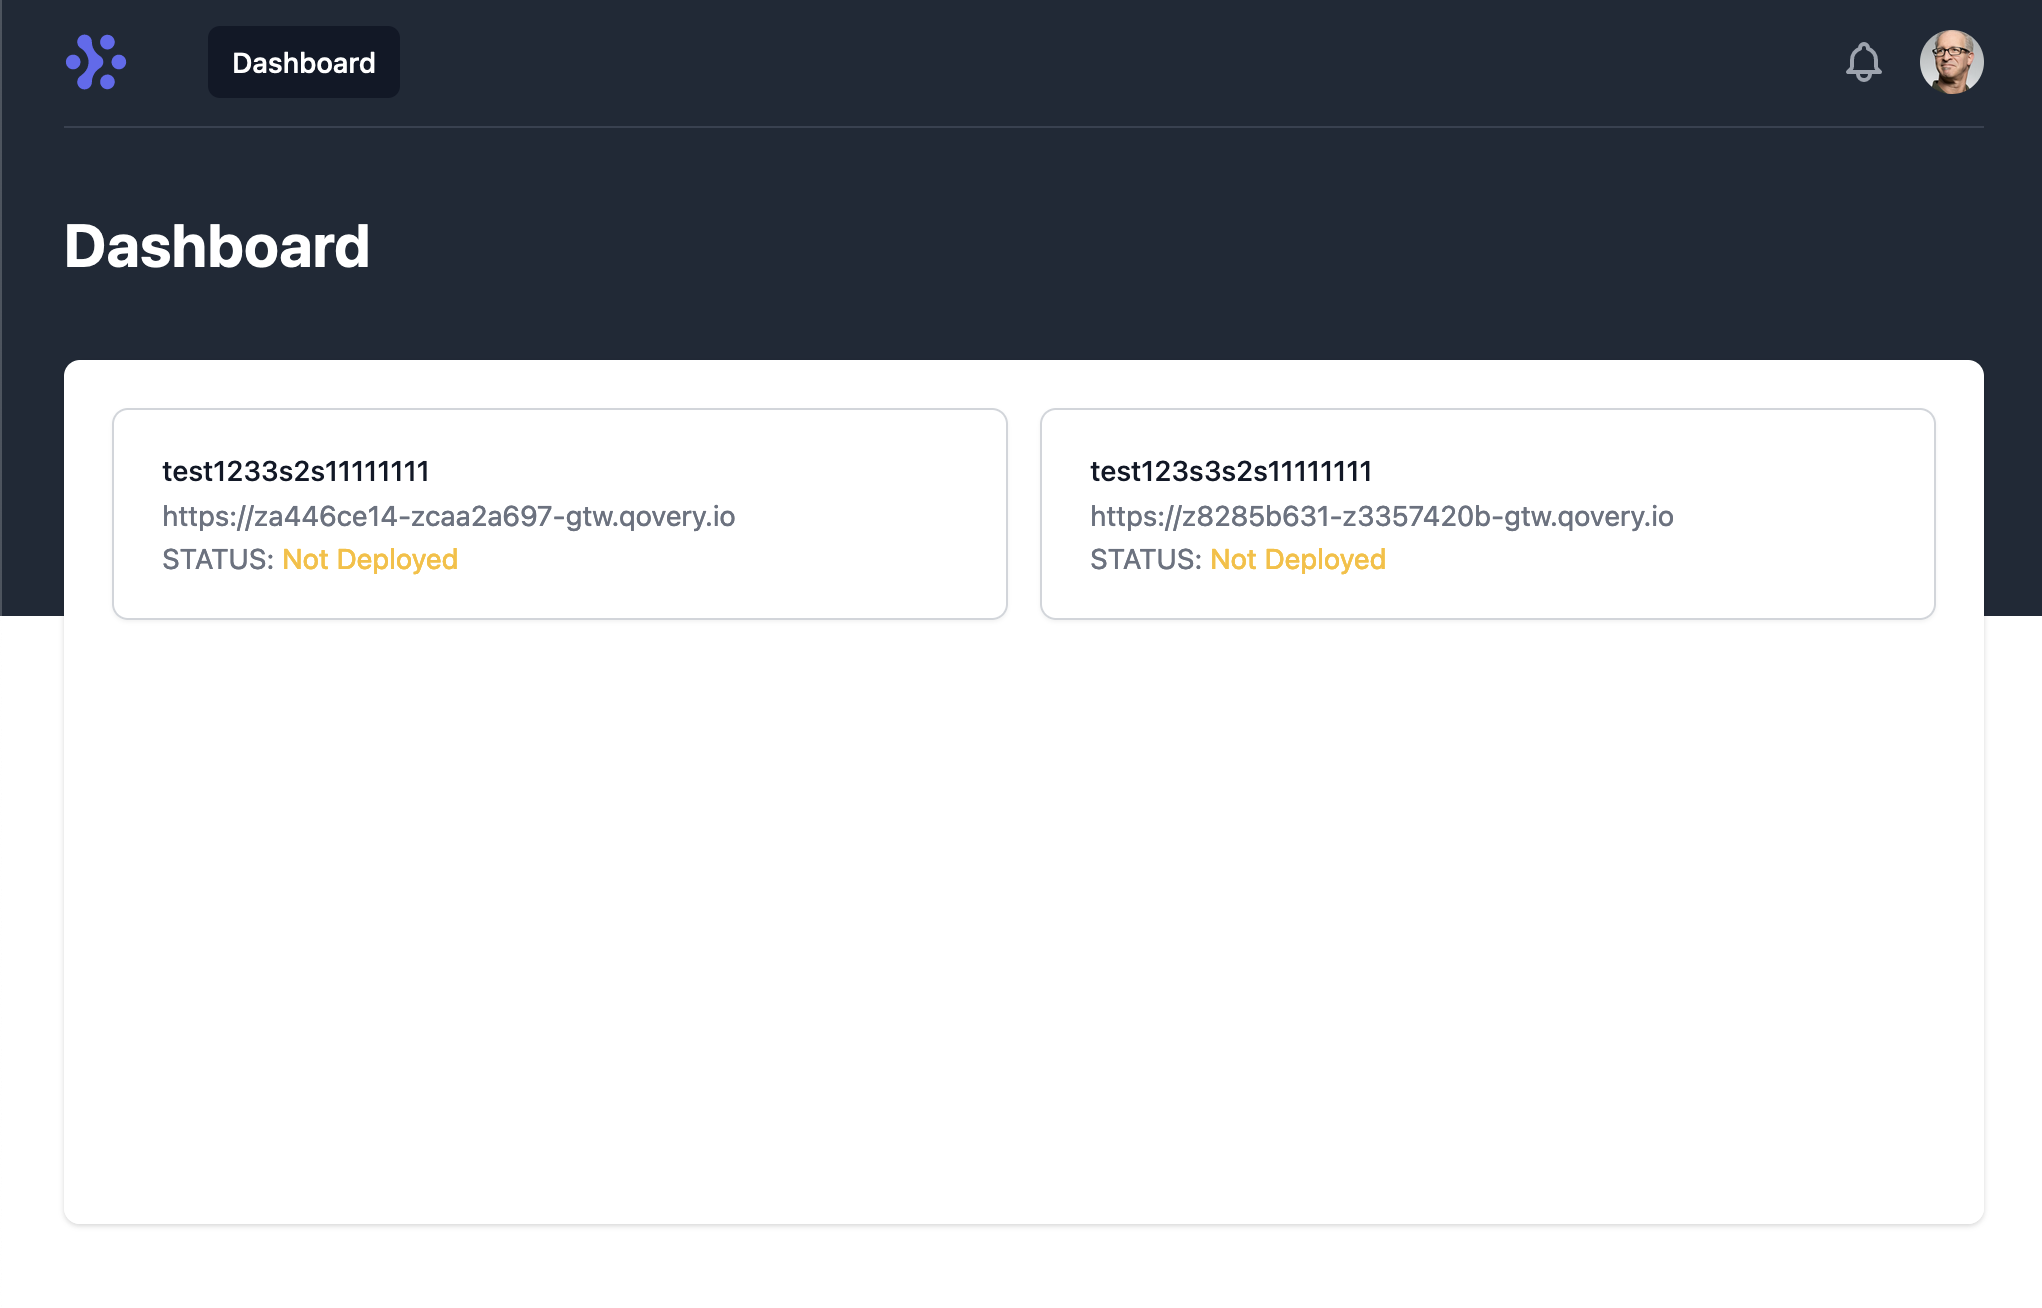
Now, to display it, add the following piece of code into our dashboard component:
{appwriteProjects.map((project) => (<divkey={project.id}className="relative rounded-lg border border-gray-300 bg-white px-6 py-5 shadow-sm flex items-center space-x-3 hover:border-gray-400 focus-within:ring-2 focus-within:ring-offset-2 focus-within:ring-indigo-500"><div className="flex-1 min-w-0"><a href="#" className="focus:outline-none"><spanclassName="absolute inset-0"aria-hidden="true"/><p className="text-sm font-medium text-gray-900">{project.name}</p><ahref={project.url}className="text-sm text-gray-500 truncate hover:text-lg">{project.url}</a></a></div></div>))}
This should allow us to display a list of user’s projects in the dashboard like this:
After improving the sign in form (see the whole code repository here, the whole flow should now look like this:
Conclusion
In this article, we bootstrapped a frontend application and added it to our app write cloud. We created the first version of our frontend that makes use of React, Next.js, ReactQuery and Tailwind. The UI is integrated with our backend GraphQL API that is deployed on Qovery and allows us to manage AppWrite projects deployed on AWS for AppWrite Cloud clients.