AWS IAM (Identity & Access Management) service allows AWS services to interact with each other by using roles. Those roles can easily be used to give permissions to your Qovery application, container or job.
It is a secure way to give your application permissions without having to manage credentials. More than that, it rotates the token automatically.
This tutorial will show you how to add AWS IAM roles to your Qovery application, container or job.
Application requiring S3 permissions
In this first step, we will create a simple application that needs AWS permissions to access s3 buckets.
Create an application
We are going to create a simple container, but you can use an existing one if you want (or an application or job).
Here is a simple Debian container example:
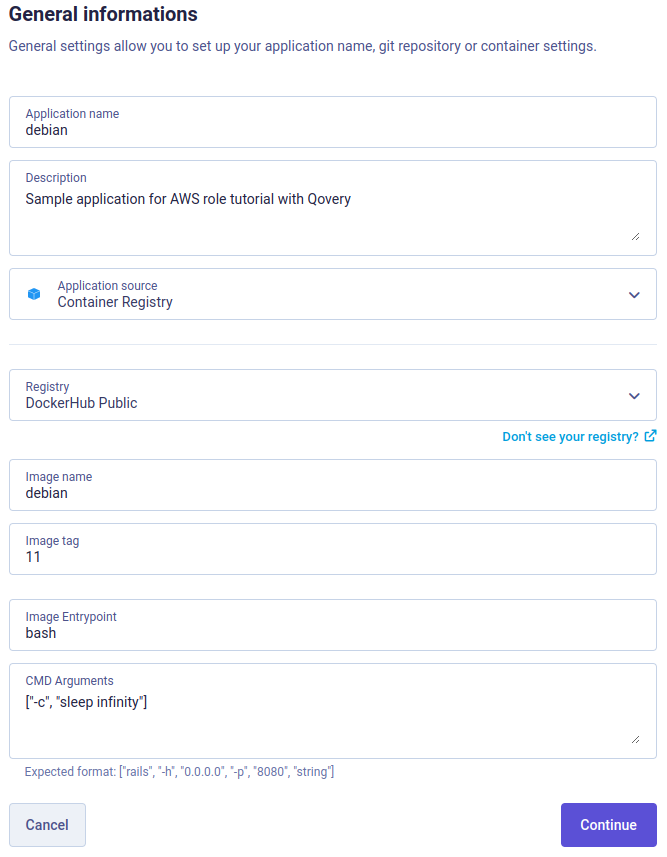
Set only 1 instance and 128MB of memory is enough for this example. Then continue until you have the Create button, there is nothing more to setup.
Get Kubernetes namespace name
Then in this container (or any application in this environment) Variables, search for the variable called QOVERY_KUBERNETES_NAMESPACE_NAME and copy its value somewhere.
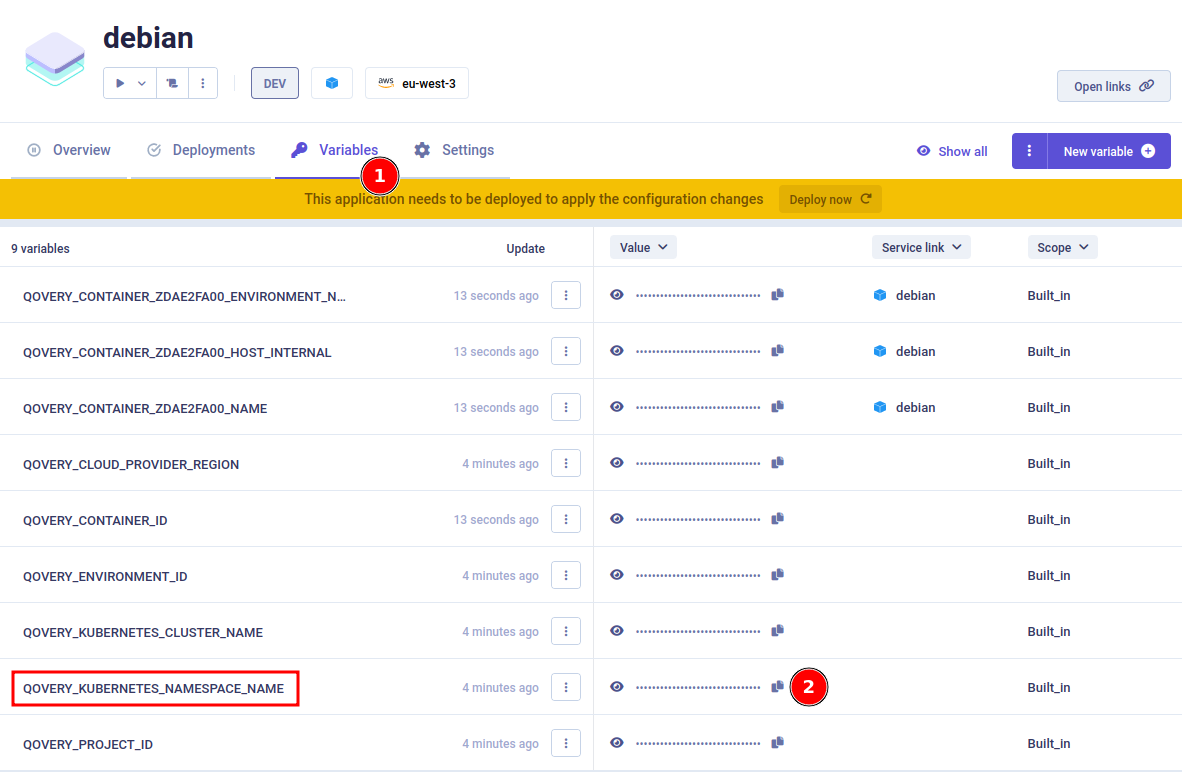
It is the Kubernetes namespace name where the container is located.
Configure OIDC provider
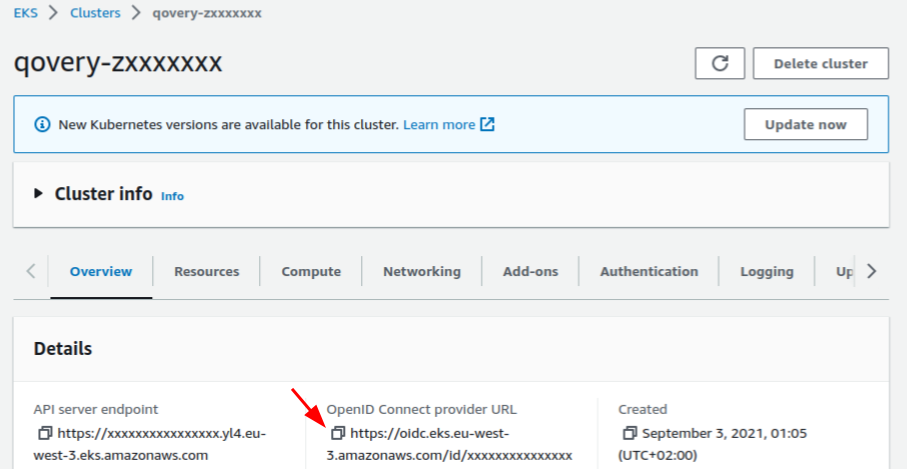
Get your Cluster OIDC provider URL
On your AWS console, go to your EKS cluster and Overview section. Copy the OpenID Connect provider URL:
Create an Identity provider
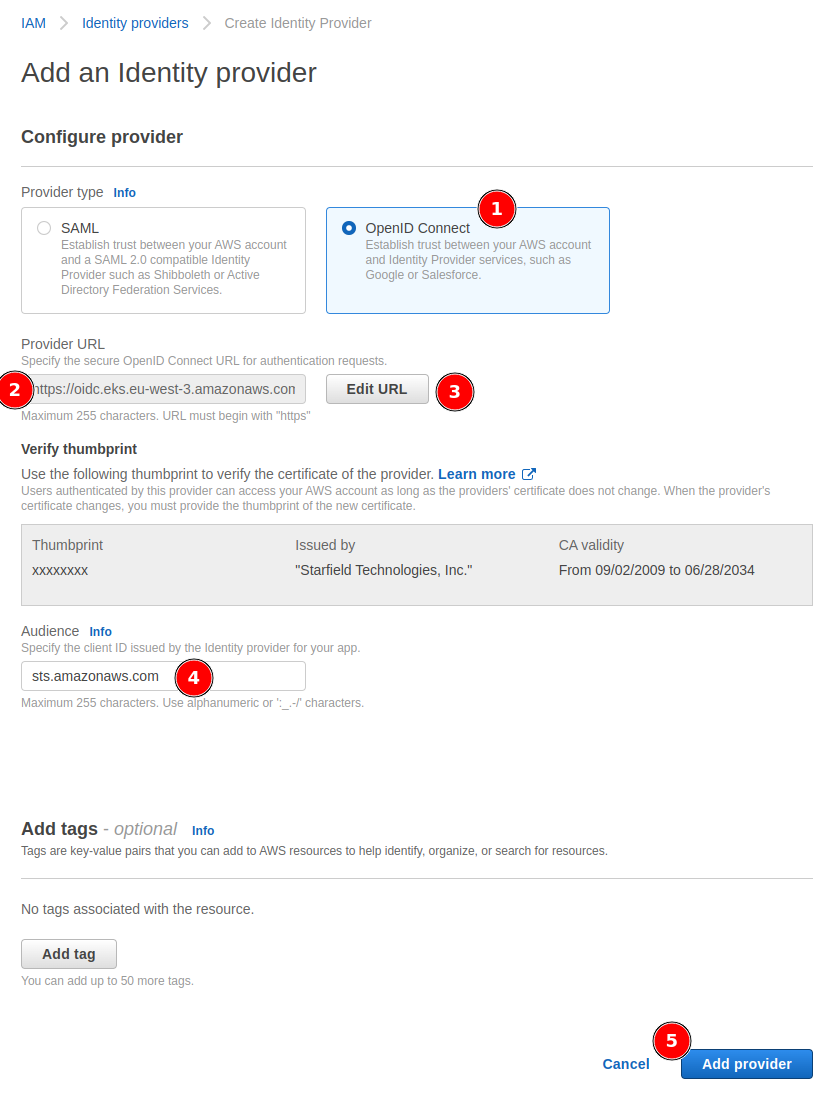
On your AWS console, go to IAM service, then Identity providers section, and Add provider button:
- Select the
OpenID Connectprovider type - Paste the
OpenID Connect provider URLpreviously copied toProvider URL - Click on
Get thumbprintbutton, once done the button will change toEdit URL - Add
sts.amazonaws.comasAudience - Click on
Add providerbutton
Configure AWS IAM roles
Create a role
Now we can create a role. In the IAM service, go to Roles section, and click on Create role button.
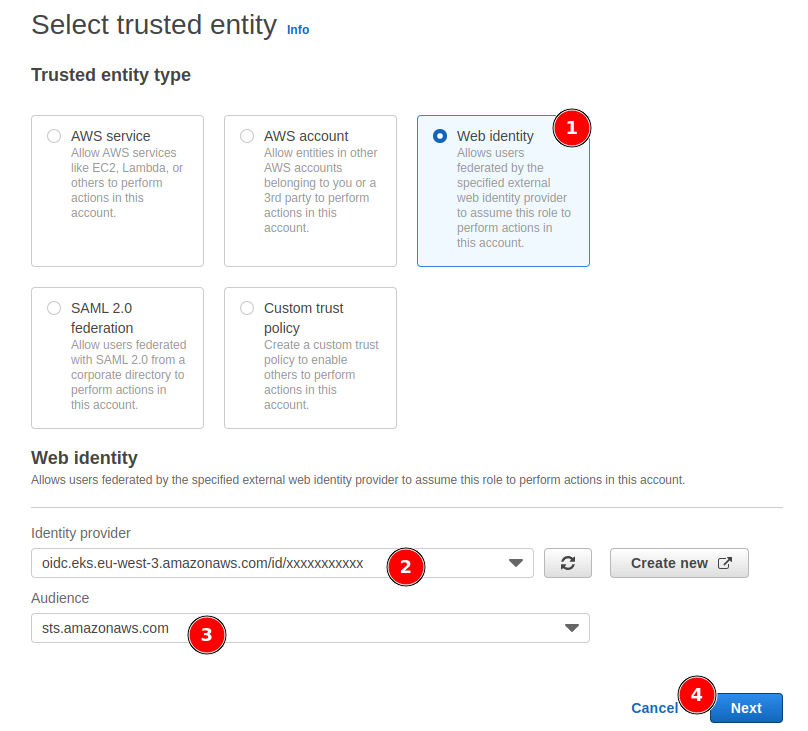
You have to select the Trusted entity type. For this tutorial, we are going to use the Web identity type.
Set the Identity provider to the one you just created, and the Audience to sts.amazonaws.com. Then click on the Next button.
Role permissions
Select the policy of your choice. For this example, the policy AmazonS3ReadOnlyAccess will be used to list S3 buckets. Then click on the Next button.
To finish, set the role name and description of your choice and click on Create role button.
Configure trusted entities
Qovery environment scoped role
Once created, select your freshly created role, go to the Trust relationships tab, and click on Edit trust policy button.
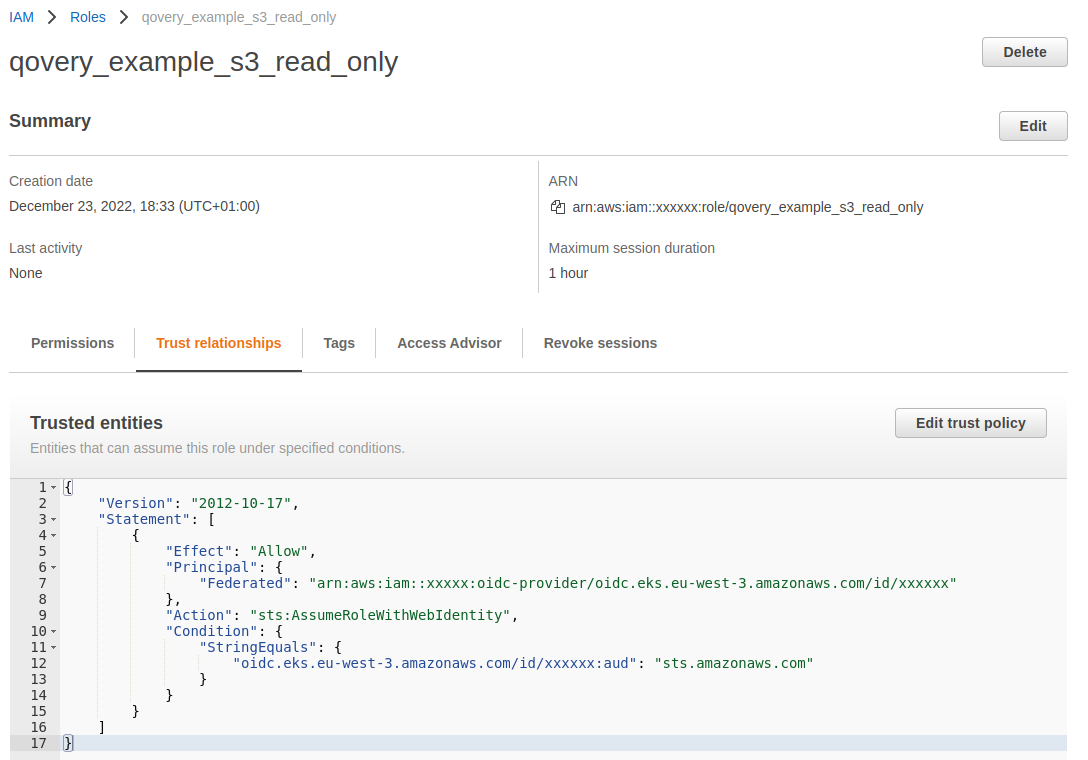
Update the policy line regarding the OIDC condition from:
"oidc.eks.eu-west-3.amazonaws.com/id/xxxxxxx:aud": "sts.amazonaws.com"
to:
"oidc.eks.eu-west-3.amazonaws.com/id/xxxxxxx:sub": "system:serviceaccount:kubernetes_namespace:service_account_name"
Replace:
kubernetes_namespace: with the namespace name, corresponding to the Qovery environment (previously copied in step 1)service_account_name: define a service account name which will be re-use later (ex:my-s3-role)
Once done, click on the Update policy button.
Last element to copy and save somewhere: is the role ARN.
In the end, you should have something like:
{"Version": "2012-10-17","Statement": [{"Effect": "Allow","Principal": {"Federated": "arn:aws:iam::yyyyyyy:oidc-provider/oidc.eks.us-east-2.amazonaws.com/id/xxxxxxx"},"Action": "sts:AssumeRoleWithWebIdentity","Condition": {"StringEquals": {"oidc.eks.eu-west-3.amazonaws.com/id/xxxxxxx:sub": "system:serviceaccount:kubernetes_namespace:service_account_name"}}}]}
Cluster scoped role
If you want to be able to keep the Role and permissions with the "On-demand environment" and "Clone" features, then you have to scope the role "cluster side" instead of the "Kubernetes namespace" side.
To do so, update the Condition with StringLike instead of StringEquals, and use a wildcard instead of the namespace name:
"Condition": {"StringLike": {"oidc.eks.eu-west-3.amazonaws.com/id/xxxxxxx:sub": "system:serviceaccount:z*:service_account_name"}}
Replace:
service_account_name: define a service account name which will be re-use later (ex:my-s3-role)z*: the wildcard to use to match all namespaces deployed with Qovery
Create a service account
This step will help you deploying a service account on your Kubernetes cluster. In case you want to do it manually on the cluster with kubectl, you just have to push a service account like:
apiVersion: v1kind: ServiceAccountmetadata:name: $SERVICE_ACCOUNT_NAMEnamespace: $QOVERY_KUBERNETES_NAMESPACE_NAMEannotations:eks.amazonaws.com/role-arn: $AWS_ROLE_ARN
Deploy a service account with Helm
Qovery provides a simple Helm chart to deploy a service account on your Kubernetes cluster in a specific environment (Kubernetes namespace).
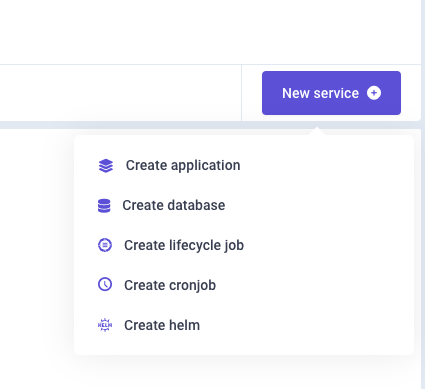
Start to create a new service, with an Helm chart:
Then configure the Helm chart with the following values:
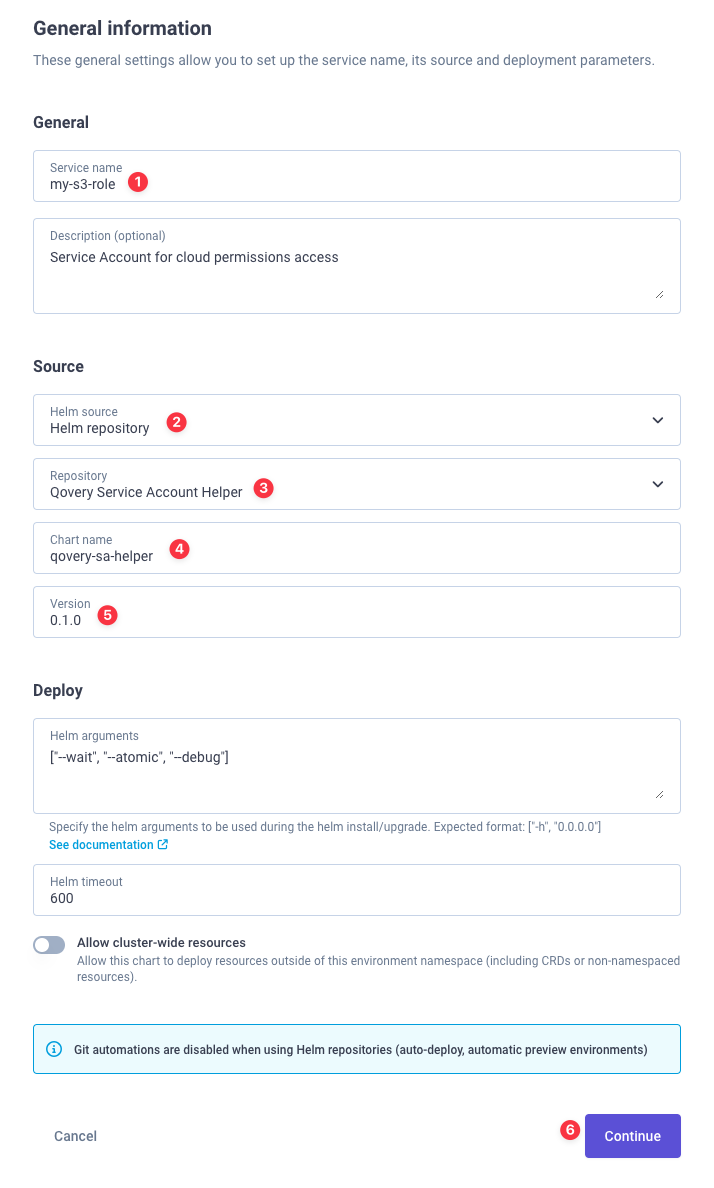
- Helm source:
Helm repository - Git repository:
Qovery Service Account Helper - Chart name:
qovery-sa-helper - Version:
0.1.0
Create a new help repository on phase 3, and fill the chart info:
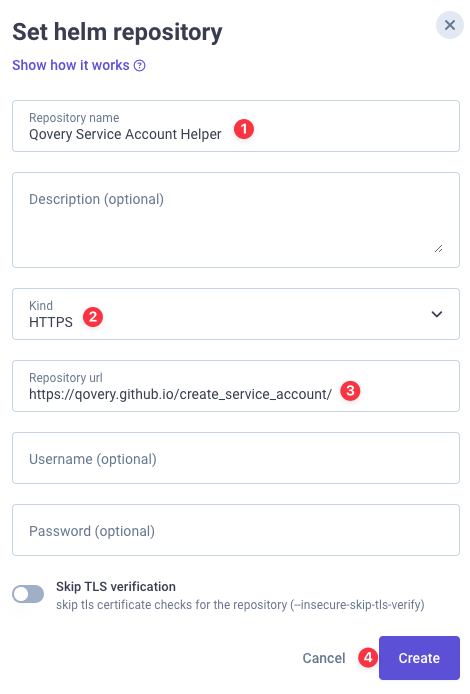
- Repository name:
Qovery Service Account Helper - Kind: HTTPS
- Repository url:
https://qovery.github.io/create_service_account/
Then click on Create, and the Continue button.
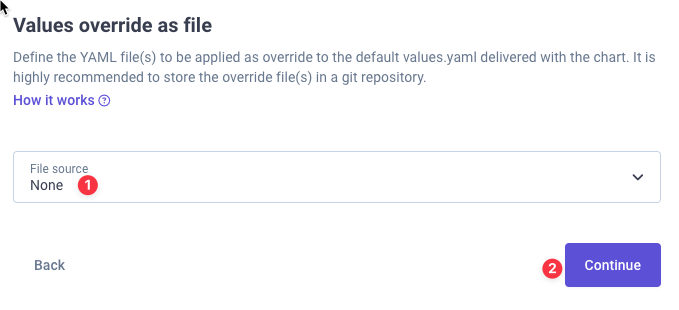
On the values override file, we do not need to override anything, so select None, and then click on the Continue button.
We then have to add 2 override arguments:
serviceAccount.name: the name of the service account in Kubernetes (the same name you have declared for the role in theTrusted entitiespolicy section)awsRoleArn: the ARN of the role you have created
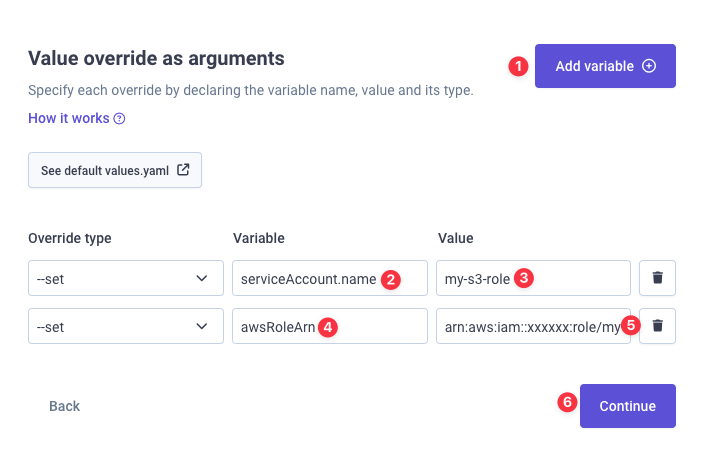
Then click on the Continue button.
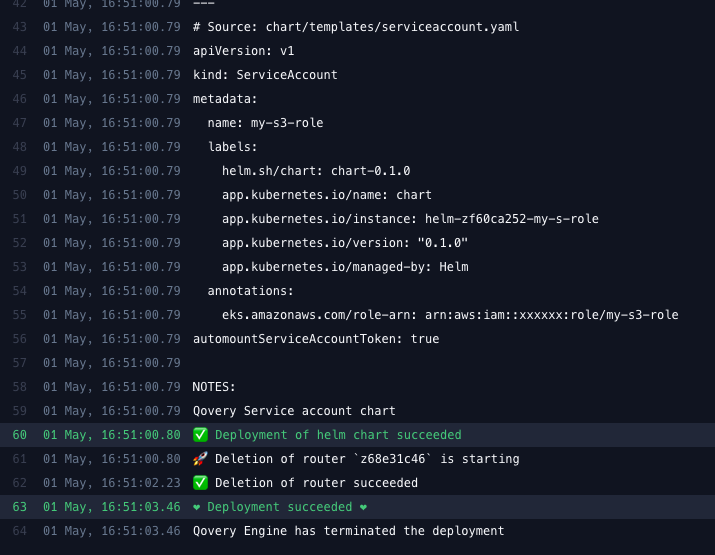
You can finally Create and Deploy it. If you look at the logs, you should see something like:
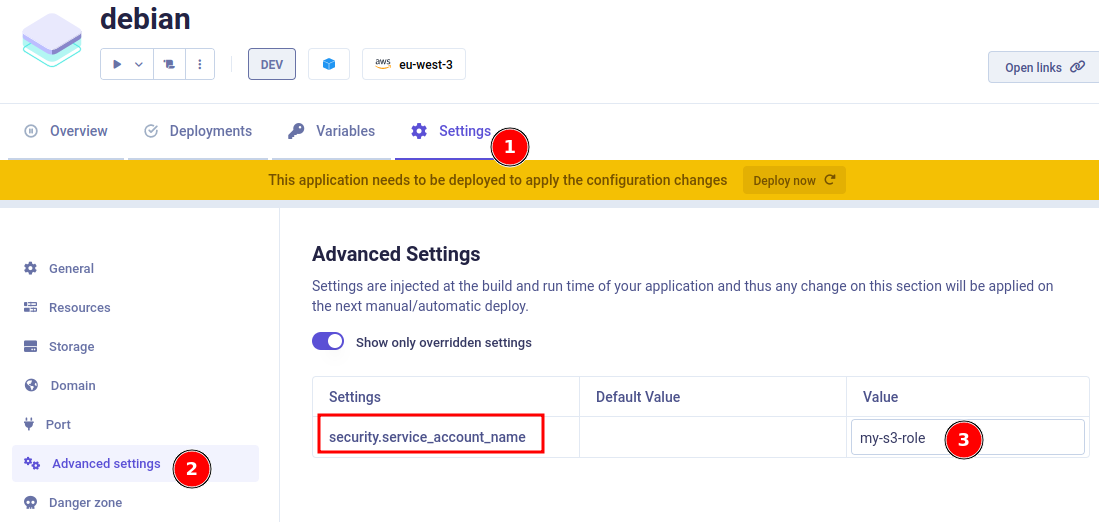
Set application service account
Set service account
The final step is to set this service account (pointing to the AWS role) to your application. Go into your application Advanced settings and set the Service account to the one you have just created:
Deploy your application with the Deploy now button.
At this stage, the job should have been executed and the service account should be deployed on your Kubernetes cluster, and the Debian container, running.
Validate access
To validate AWS role has correctly been deployed, we can connect to the pod, and see if we have the AWS token. We will use the Qovery CLI to connect to our pod:
$ qovery shellQovery: Select organizationOrganization:✔ QoveryQovery: Select projectProject:✔ AWS roles tutorialQovery: Select environmentEnvironment:✔ aws-roleQovery: Select serviceServices:✔ debian
Now we are connected to the pod, we can check the AWS token:
$ env | grep AWSAWS_DEFAULT_REGION=us-east-2AWS_REGION=us-east-2AWS_ROLE_ARN=arn:aws:iam::xxxxxx:role/my-s3-roleAWS_WEB_IDENTITY_TOKEN_FILE=/var/run/secrets/eks.amazonaws.com/serviceaccount/tokenAWS_STS_REGIONAL_ENDPOINTS=regional
Token is here! Let's install the AWS CLI and validate the role access. We should be able to list S3 buckets:
$ apt-get update && apt-get -y install awscli$ aws s3 ls2022-09-23 06:56:38 aws-cloudtrail-logs-qovery...
It works! We have access to S3 buckets using the AWS role.
Conclusion
The first setup phase can be time-consuming. However, once done, applying roles to your applications is very easy and fast. You can now use roles to access any AWS service!