Before you begin, this page assumes the following:
- You have already deployed an application with Qovery
- You are familiar with the concept of Microservices
In this guide, we'll deploy a set of microservices, a database and a frontend UI application that consumes our public API. Our backend microservices will communicate on a secure internal network, not accessible from the outside. Our front-end application will consume the API only from the publicly exposed application.
The schema of what we want to achieve:
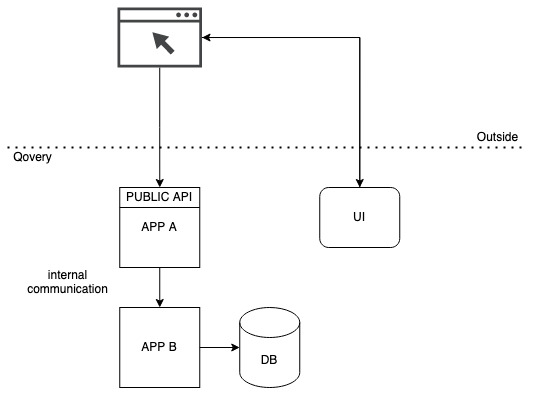
As you can see in the picture:
- we have two backend applications (App A and App B)
- one of them (App B) connected to a database
- App A exposes a public API that is consumed by API clients (our frontend application run in users browsers).
- additionally, we host our frontend application (UI) on Qovery so that users can access it directly in their browsers.
What differentiates Qovery from most other similar platforms is its first-class support of microservices. At Qovery, your project can be easily composed of multiple applications. It's up to you to decide how to build your system, but Qovery enables you to easily and safely communicate between your backend applications, databases, and frontend websites.
Deploy Application A
In the first step, deploy an application named APP_A in your environment.
Assumptions:
- The app exposes REST API over HTTP on port 8080
- The app name is APP_A
After the application is created, let's expose the API publicly - it will be used later on by our frontend application.
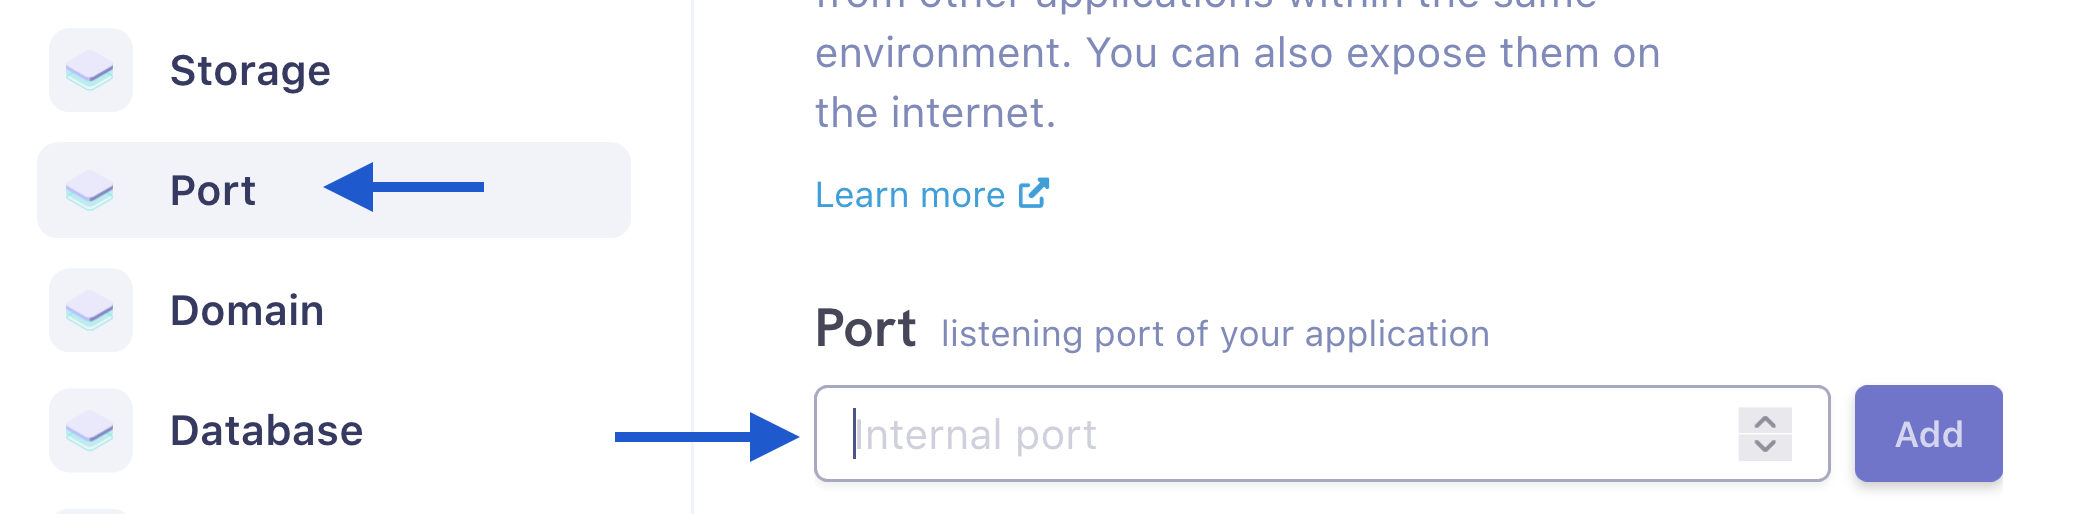
Exposing public API
- Navigate to APP_A application settings
- Select Port
- Add port 8080
This is it. By default, Qovery exposes your ports publicly over HTTPS on port 443, so the app should be publicly accessible and reachable later on by our frontend application.
Deploy Application B
In the second step, deploy an application named APP_B in your environment.
Assumptions:
- The app exposes REST API over HTTP on port 8080
- The app name is APP_B
- The app is ready to use a PostgreSQL client to connect to a PostgreSQL database
Steps to do:
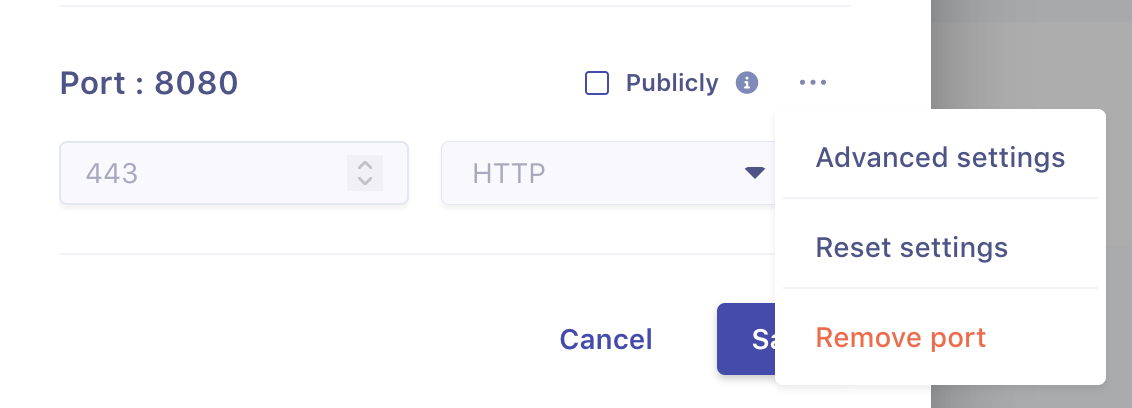
- Navigate to APP_B application settings
- Select Port
- Add port 8080
- Click Advanced settings in the 8080 port
- Remove the check from the Publicly Accessible field
Deploy Database
In this step, we'll deploy a PostgreSQL database that we'll consume in APP_B in the next step.
- Navigate to the environment in which you previously deployed your apps
- Create a new PostgreSQL database named MY_DB
Use the database
In this step, we'll make use of our database in APP_B
All you need to do to consume your database in APP_B is to configure your PostgreSQL client to use
BUILT_INsecrets injected by Qovery. You can read more about this concept here.If your APP_B is a Node.js application, this examplary code snippet will work well:
const { Client } = require('pg')const client = new Client({host: process.env.QOVERY_DATABASE_MY_DB_HOST,port: process.env.QOVERY_DATABASE_MY_DB_PORT,user: process.env.QOVERY_DATABASE_MY_DB_USER,password: process.env.QOVERY_DATABASE_MY_DB_PASSWORD,})client.connect(err => {if (err) {console.error('connection error', err.stack)} else {console.log('connected')}})This is it! After deploying the database, application and executing the code snippet, you should see the message
connected.We made use of
BUILT_INvariables injected by Qovery to make it easy to consume all the services within the environment.Consume internal APIs
In this step, we'll use the private API of our APP_B in our APP_A over a private network. We have already configured everything to make it work. The only missing step is the configuration in APP_A - it needs to know how to access our APP_B.
In the example below, we'll use Node.js and
axiosto create an HTTP client able to consume the API of APP_B:Now, you can configure your HTTP client in the frontend application to target your backend API:
const axios = require('axios');const appBAddress = "http://" + process.env.QOVERY_APPLICATION_APP_B_HOST + ":" + process.env.QOVERY_APPLICATION_APP_B_PORTaxios.get(appBAddress + '/api/users').then(response => {console.log(response.data);}).catch(error => {console.log(error);});This is it! Every request using the API client we have just configured will consume the API of APP_B over the secure, internal network.
Once again, we used the
BUILT_INsecrets. Read more about them hereConsume the public API in the frontend application
In this step, we'll deploy a frontend application and consume our public API exposed by APP_A.
In the first step, create your frontend application.
After the application is created, we can easily configure it to consume our public API. All we need to do is to make use of the
BUILT_INsecrets. See how to achieve it in a Nuxt.js example below:export default {env: {apiUrl: process.env.QOVERY_APPLICATION_APP_A_URL}}import axios from 'axios'export default axios.create({baseURL: process.env.apiUrl})After providing the configuration from above, deploy your frontend application.
Now our frontend application will be able to consume the API exposed by the publicly exposed APP_A.
Summary
In this guide, we deployed two microservices that communicate over the internal network. We also deployed a frontend application that makes use of a public API exposed by one of our applications. At the same time, we deployed a database and connected it to the second of our backend microservices.
Q&A
Do you need more examples? Do you have any questions? Feel free to ask on our Community forum.