Building multi-tenant applications where each customer has their own dedicated URL is a common pattern in SaaS platforms. While Qovery automatically handles TLS/SSL certificate creation and renewal for your custom domains, managing certificates at scale for multi-tenant architectures presents unique challenges. This guide will show you how to implement a robust certificate management strategy using dedicated ingresses for each tenant.
The Challenge
When building multi-tenant applications on Qovery, the default approach uses a single ingress controller to manage all custom domains for the service. This creates several issues:
- Certificate generation failures: If validation fails for one domain, it can prevent certificate generation for all domains
- Deployment risks: A single misconfigured domain can cause the entire deployment to fail
- Privacy concerns: Customers can see other tenants' domains when inspecting the SSL certificate
- Certificate limits: Let's Encrypt has rate limits that can be reached when managing many domains on a single certificate
The Solution: Dedicated Ingresses Per Tenant

Instead of managing all domains through a single ingress, we'll create a dedicated ingress for each customer. This approach provides:
- Isolation: Each tenant gets their own certificate and ingress configuration
- Reliability: Issues with one tenant's domain won't affect others
- Privacy: Certificates only contain the specific tenant's domain
- Scalability: Easier to manage rate limits and certificate renewals
Implementation Guide
Prerequisites
- A Qovery account with a configured cluster
- DNS management access for your domains
Step 1: Organize Your Platform (Optional but Recommended)

While not mandatory, creating separate environments helps maintain a clean separation between your core infrastructure and tenant-specific configurations.
Create a Core Environment
This environment will host your main application components (frontend, API, database, etc.).
- Navigate to your project dashboard
- Click "Create new environment"
- Name it "Core", "Main" or similar
- Configure your environment settings
Create a Tenants Environment
This dedicated environment will contain all tenant-specific ingress configurations.
- Create another environment
- Name it "Tenants" or "Customers"
- This provides logical separation and easier management
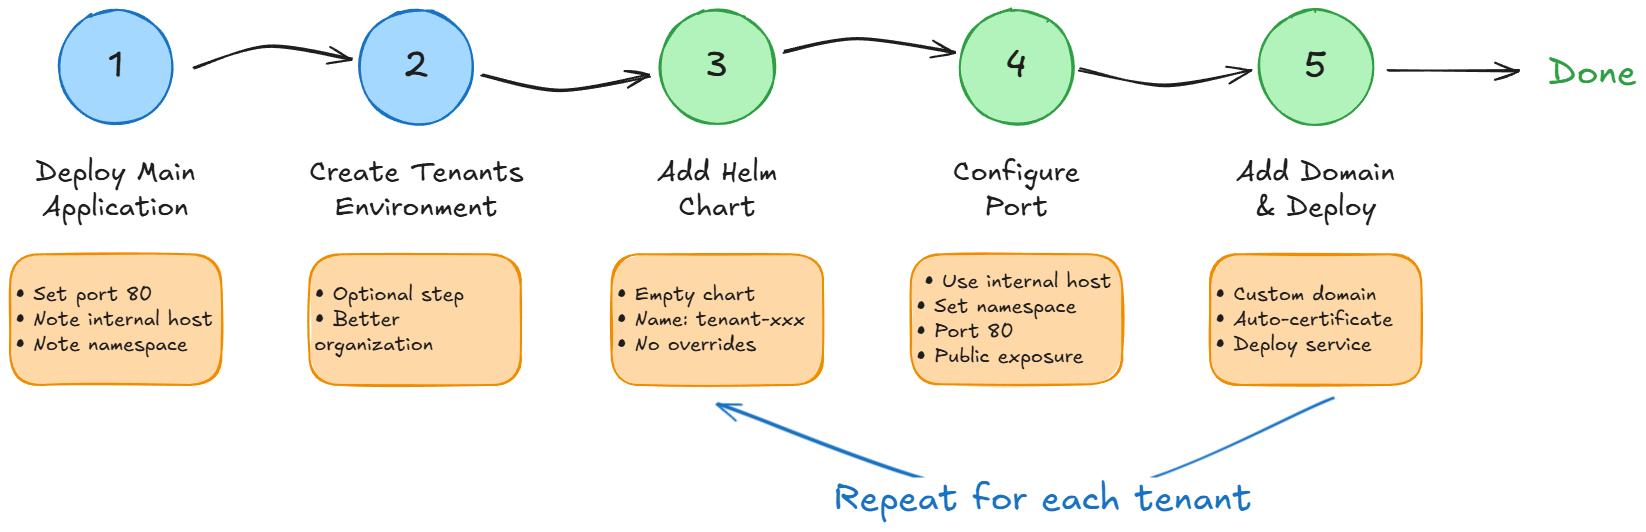
Step 2: Deploy Your Main Application
If you haven't already deployed your application, follow the Qovery deployment guide.
For this example, we'll use a simple web application:
Deploy your container
- Use the Qovery UI, our CLI, our Terraform Provider or our REST API to deploy your application
- For testing, you can use a simple nginx container
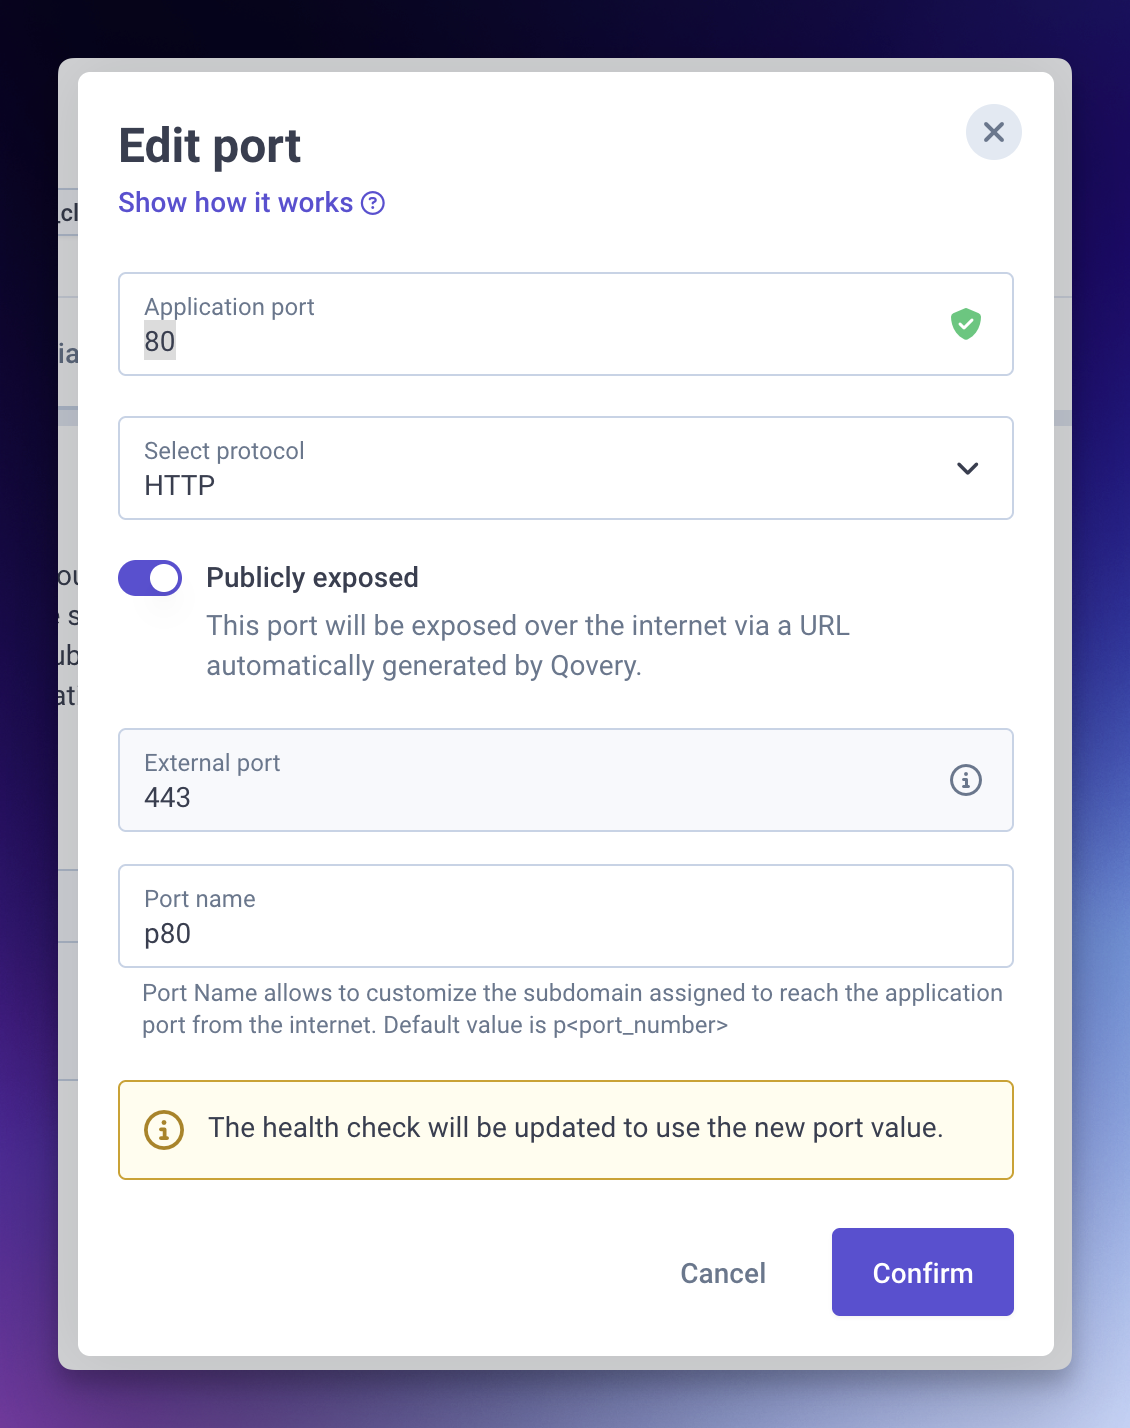
Configure the application port
- Navigate to Settings → Ports
- Click "Add port"
- Configure:
- Port: 80 (or your application's port exposed by your container)
- Protocol: HTTP
- Exposure: Publicly exposed
Add your main domain (optional)
- Go to Settings → Domains
- Click "Add domain"
- Enter your primary domain
- Configure the required CNAME records in your DNS provider
Note important values
Before proceeding, save these values from your application's built-in environment variables:
QOVERY_CONTAINER_XXXXXXX_HOST_INTERNAL: The internal hostname of your applicationQOVERY_KUBERNETES_NAMESPACE_NAME: Your environment's namespace
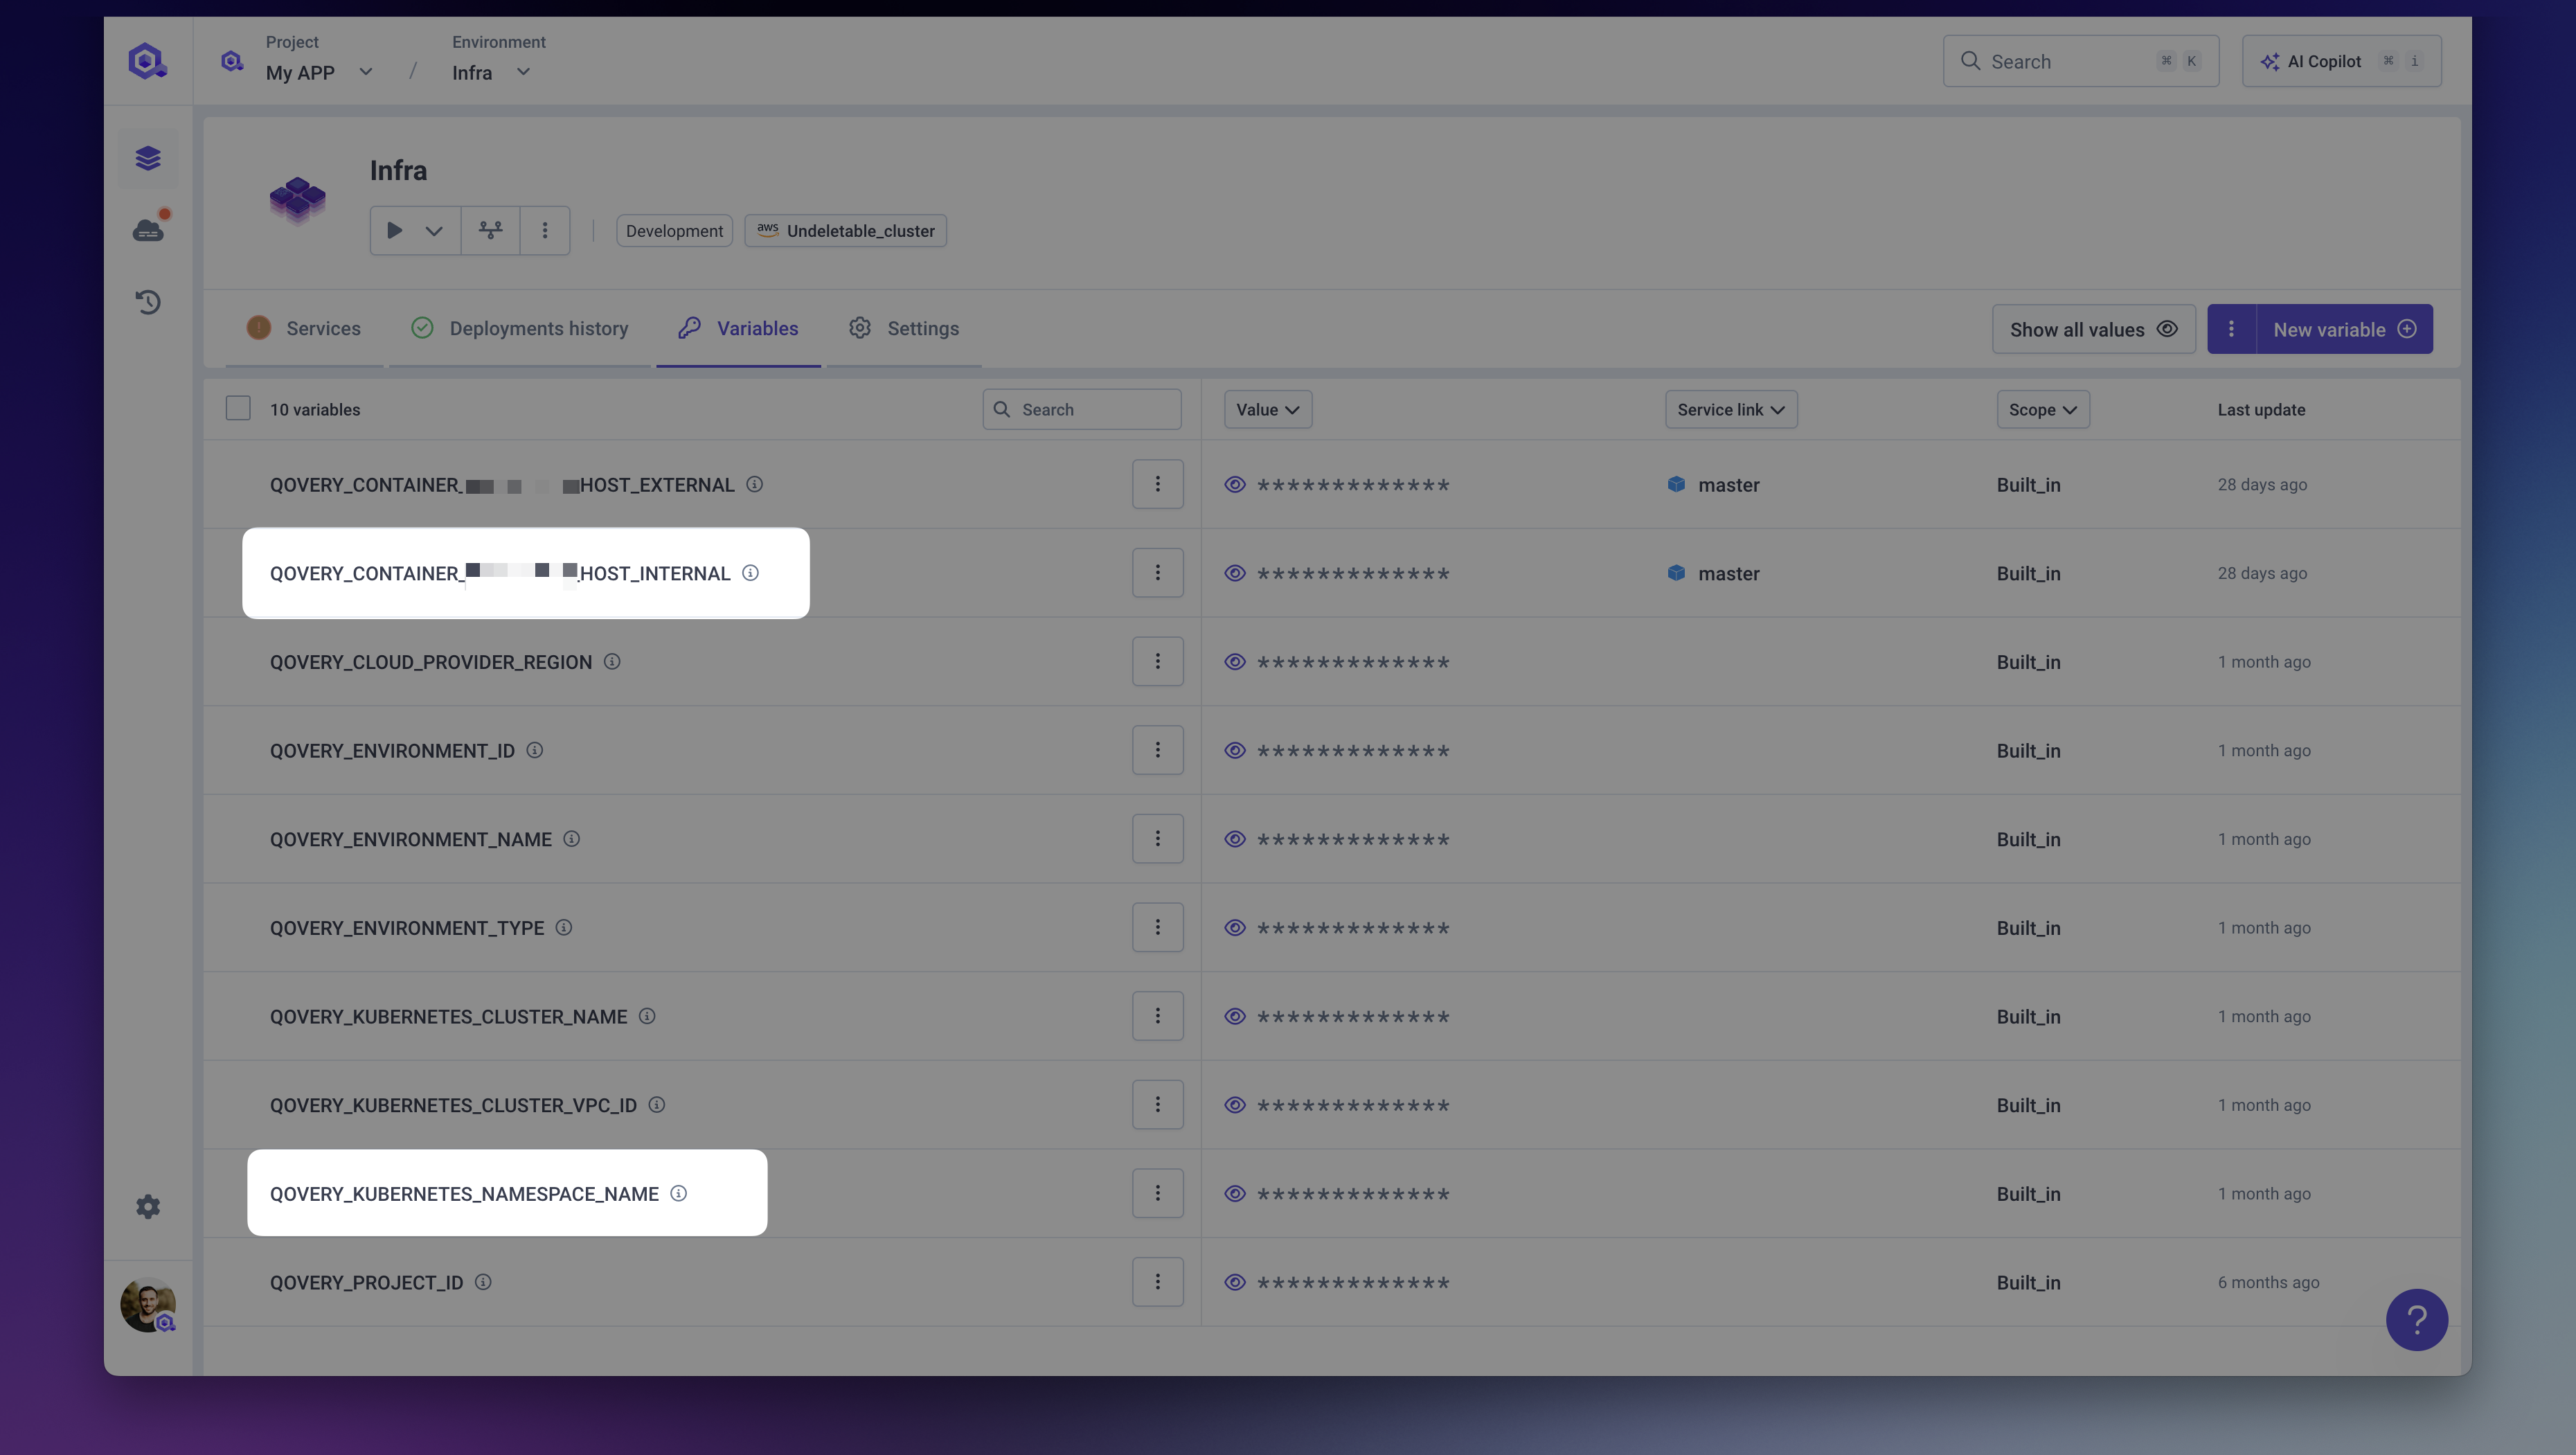
- You can find these in the Variables section of your application.
Step 3: Create Tenant-Specific Ingresses
Now we'll create dedicated ingresses for each tenant using Helm charts.
Switch to your Tenants environment (if you created one)
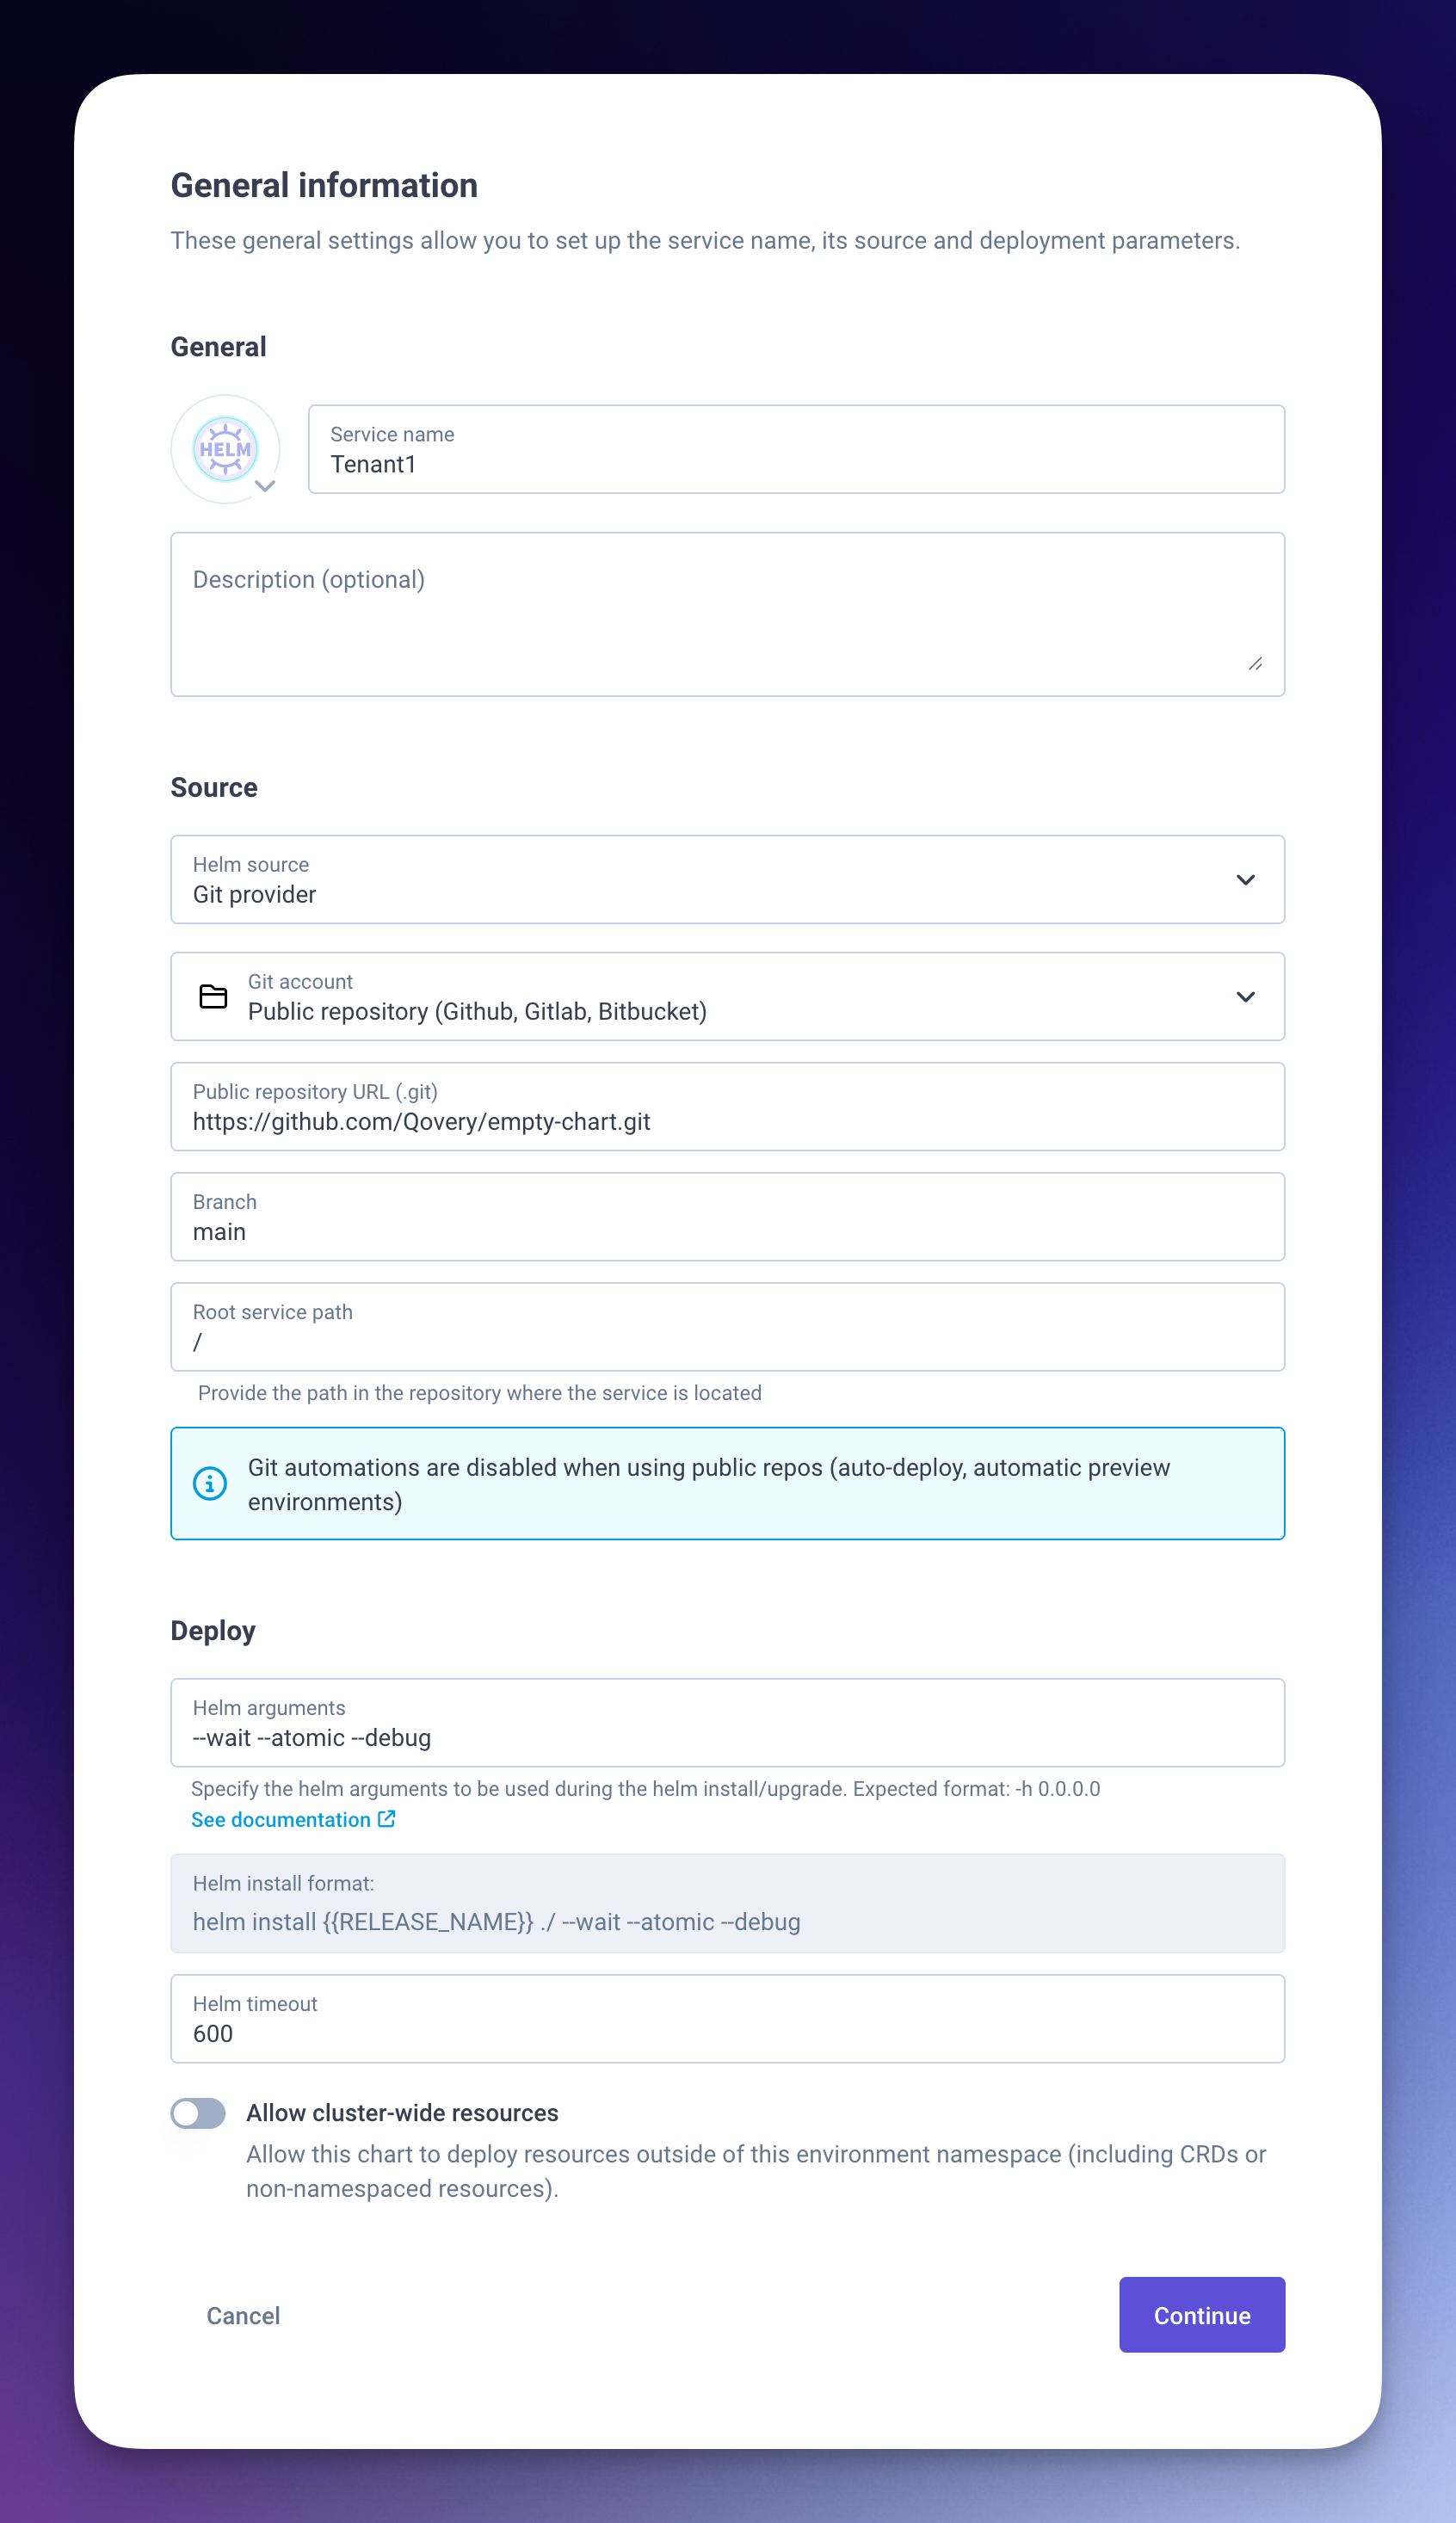
Create a new Helm service
We'll use an empty Helm chart, Qovery will create an ingress resource. You can use this empty chart template or create your own.
- Click "Create new service"
- Select "Helm"
- Name it after your tenant (e.g., "tenant-acme-corp")
- Use the empty chart repository
- Keep default values (no overrides needed)
- Select only “Create” at the end of the create wizard
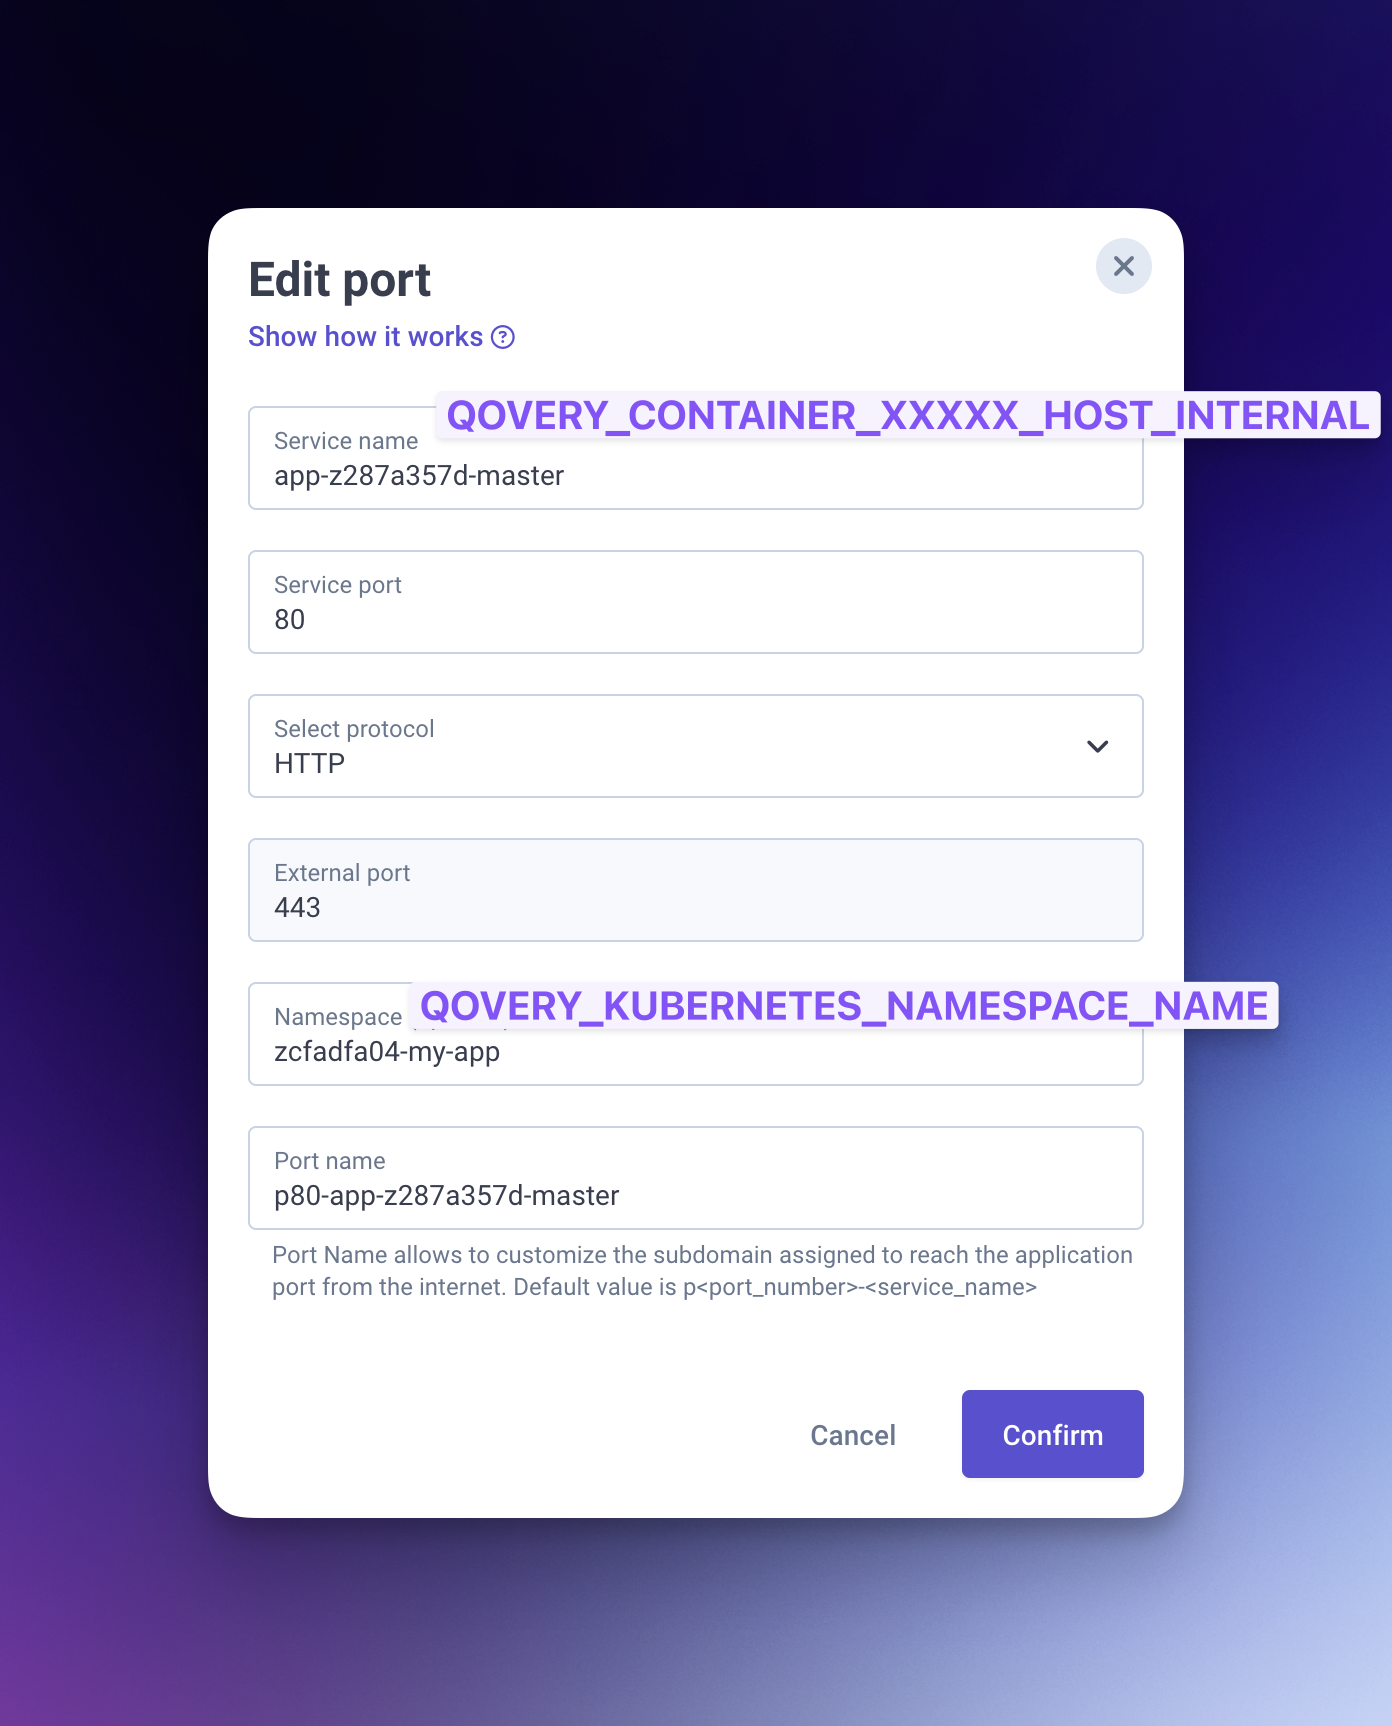
Configure the ingress
Navigate to Settings → Ports and add a port:
- Service name: Use the
QOVERY_CONTAINER_XXXXXXX_HOST_INTERNALvalue from the "Core" application (Step 2.4) - Service port: Set the port defined on the core application (Step 2.2)
- Namespace: Use
QOVERY_KUBERNETES_NAMESPACE_NAME(if using separate environments) value from the "Core" application (Step 2.4)
- Service name: Use the
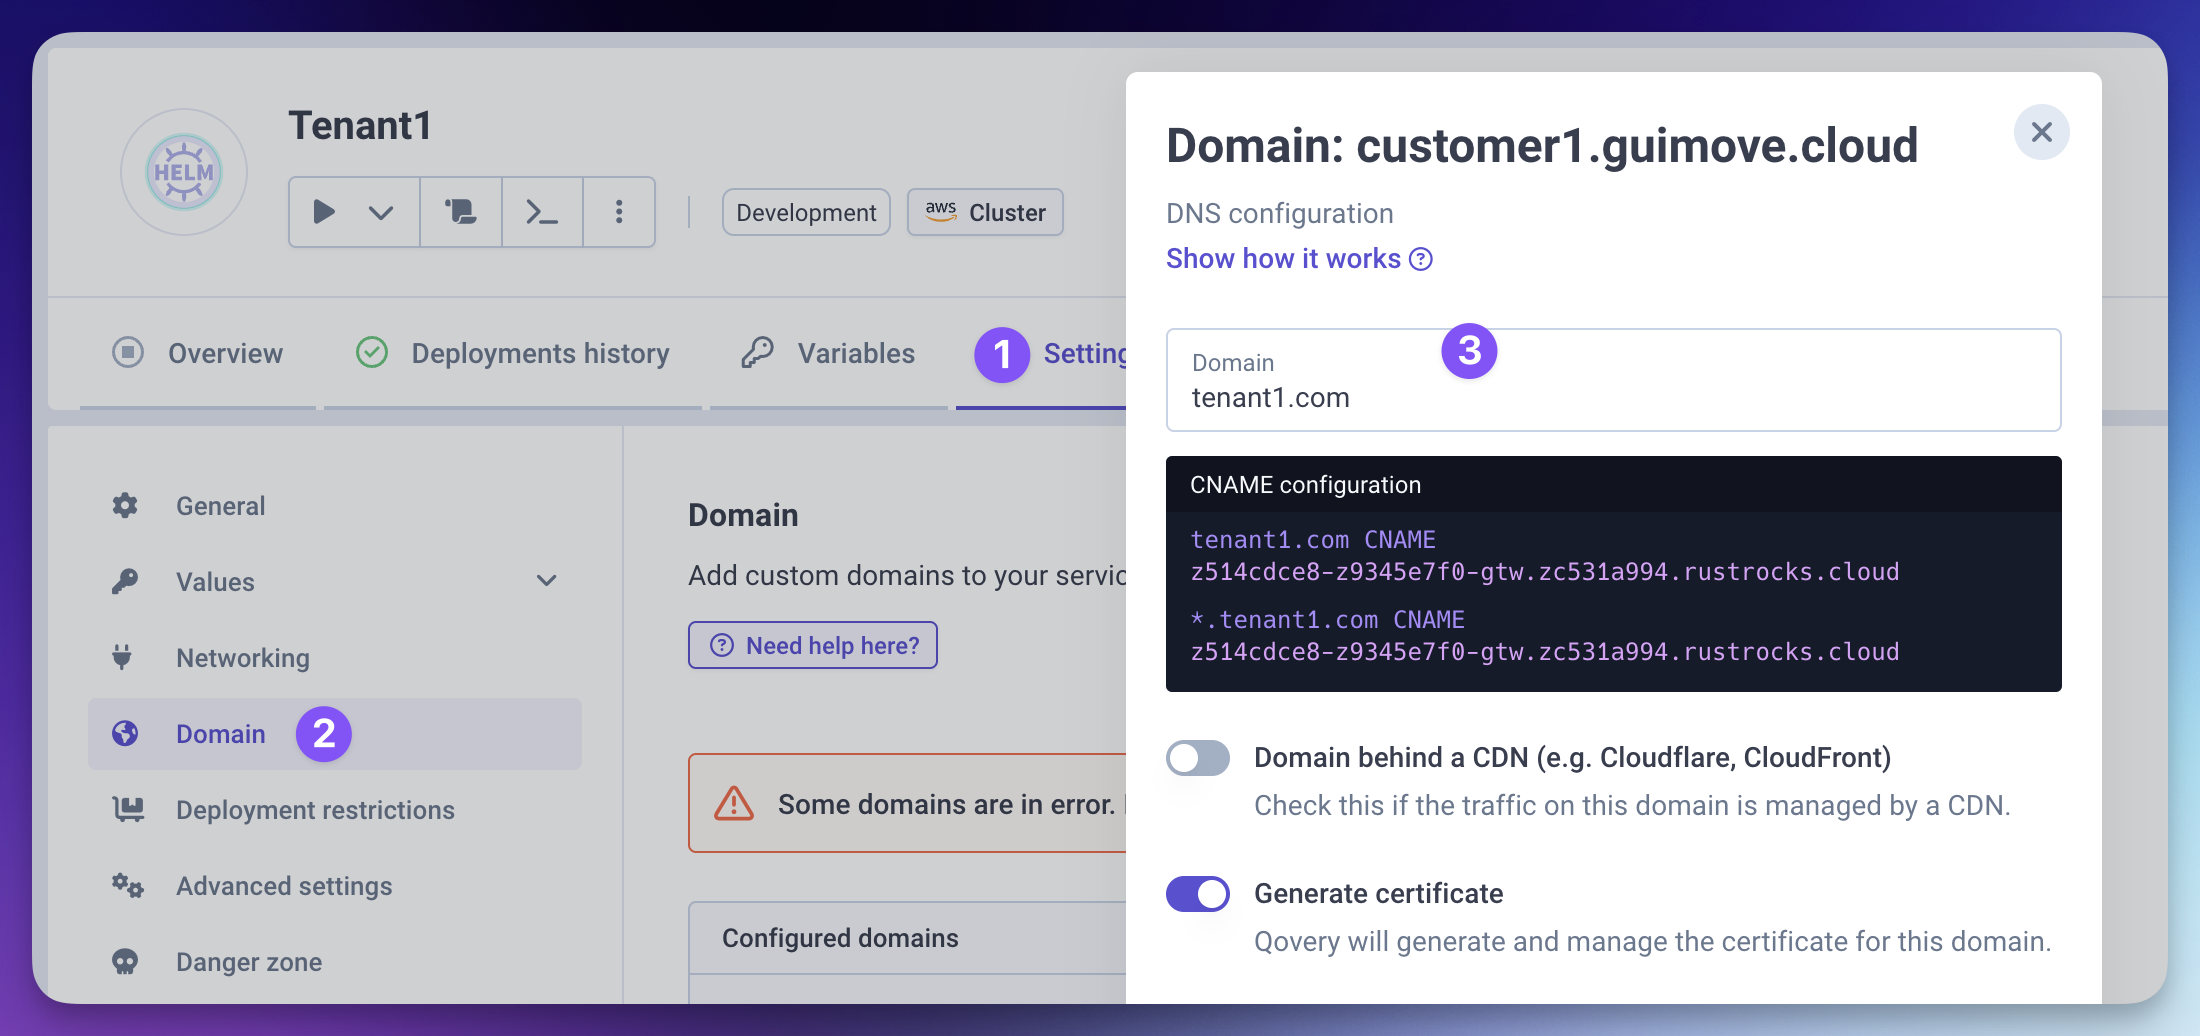
Add the tenant's custom domain
- Go to Settings → Domains
- Add the tenant's specific domain
- Ensure the tenant configures their DNS records
Deploy the service
Deploy the Helm chart. Qovery will:
- Create a dedicated ingress for this tenant
- Generate a separate SSL certificate
- Route traffic to your main application
Step 4: Scale to Multiple Tenants
For additional tenants, you have two options:
Clone existing tenant configuration
- Clone an existing tenant service
- Update the name and domain
- Deploy
Create from scratch
- Repeat Step 3 for each new tenant
Troubleshooting
Certificate Generation Issues
- Check DNS propagation
dig _acme-challenge.tenant-domain.com CNAME
Verify ingress configuration
- Check the Qovery deployment logs
- Ensure the domain is correctly configured
Monitor cert-manager logs
- Access your cluster logs to see certificate generation details
Routing Issues
- Verify internal service name on the tenant port configuration
- Ensure the service name matches your application's internal hostname
- Check namespace configuration
- Confirm the namespace is correct if using separate environments
Conclusion
By implementing dedicated ingresses for each tenant, you create a more robust, scalable, and secure multi-tenant architecture on Qovery. This approach provides better isolation, easier troubleshooting, and improved privacy for your customers.
Related Resources
- Qovery Custom Domain Documentation
- Deploying Applications with Qovery
- Environment Management Guide
- Qovery Helm Deployment
Next Steps
- Explore Qovery's API to automate tenant provisioning
- Consider implementing auto-scaling on the main service