Environment
Before you begin, this documentation assumes the following:
You have created a Project.
An Environment is a group of applications and databases running within the same namespace. A Project can have multiple Environments.
Types of environment
There are different types of environments that can be defined within Qovery. Types of environment are also called mode, to label it and share with others in the organization how to use it.
Here is the mode you should set depending of the use of your Environment.
| environment mode | recommended mode | why |
|---|---|---|
| Production | Production environment should not be stopped or deleted by anyone. | |
| Staging | Staging environment reflects how things work and is sometimes as critical as production for companies. | |
| Development | Development environment is a working environment that could be used to develop and test new features and fixes. |
A special mode Preview exists and it is automatically set when a Preview Environment is created on a new pull request. Have a look at this section to know more about preview environments.
Create an environment
You can create a new environment by clicking on the Create environment button of the Environment list page.
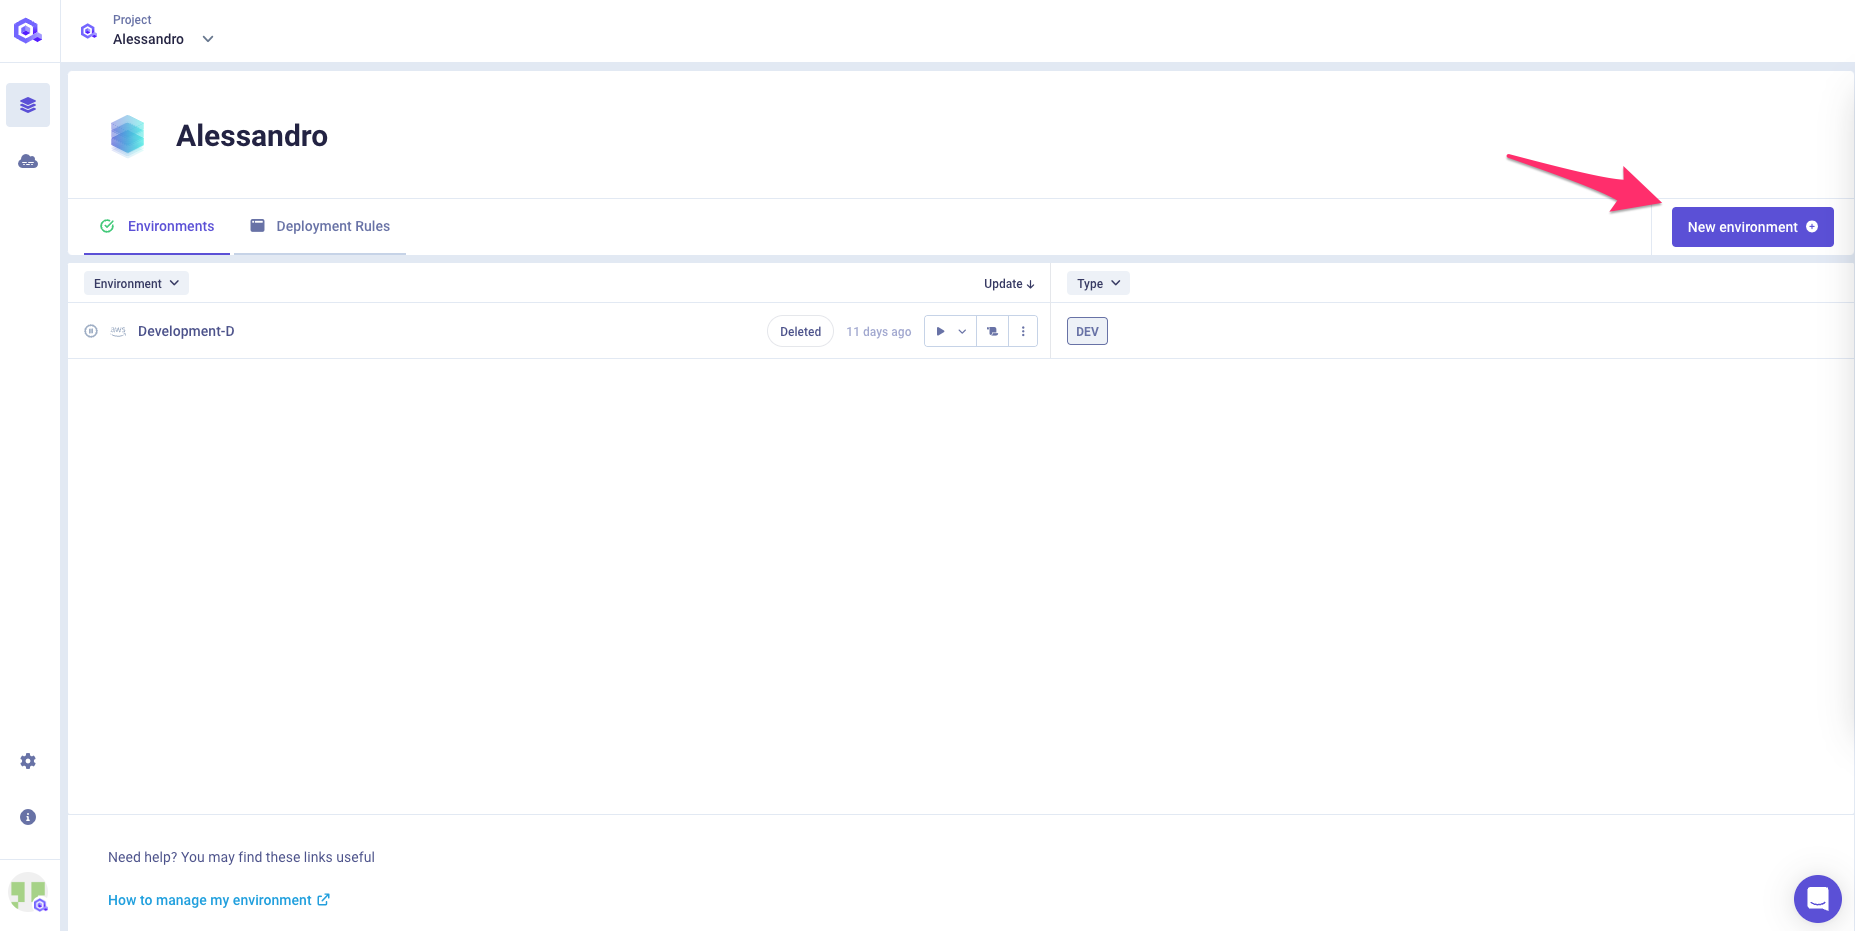
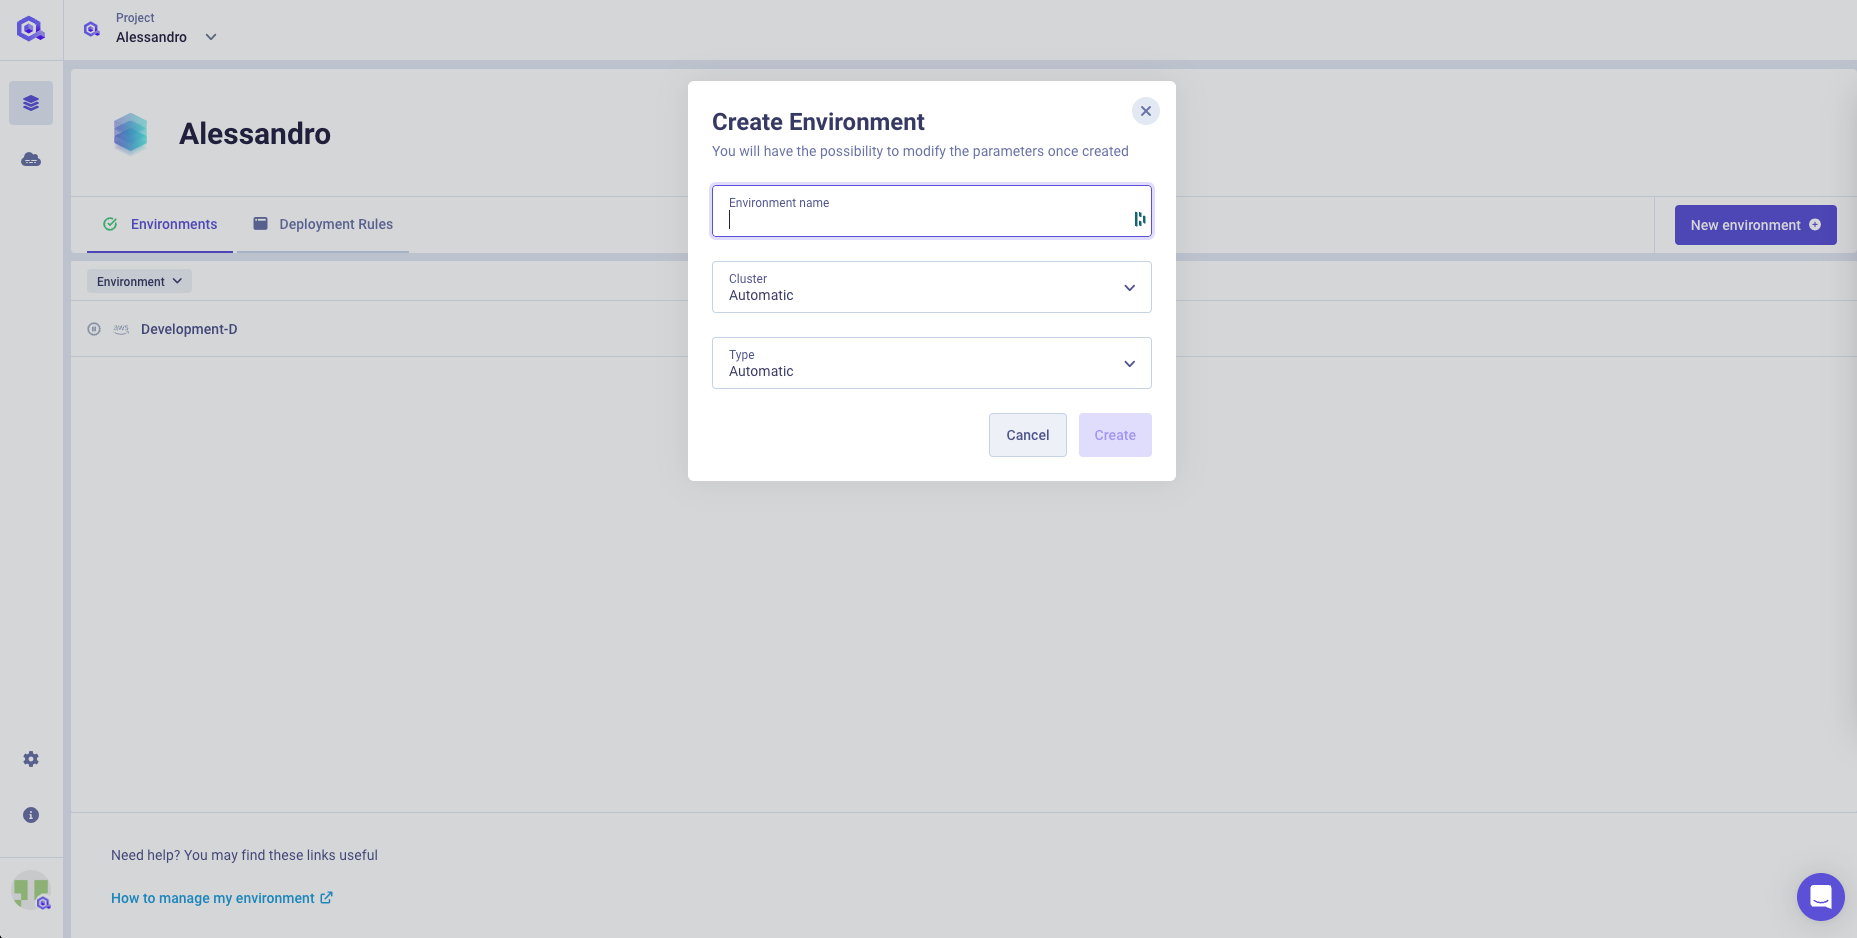
A modal will appear that will allow you to specify following parameters
- name: Give a name to your environment that is easily recognizable by anyone from your team. It is good practice to name your environment
production,mainormaster,staging,dev,fix/xxx,feat/xxx, depending on the purpose of your environment. - mode: Specify environment mode. See Types of environment section.
- cluster : Specify the organization cluster on which this new environment will be deployed.
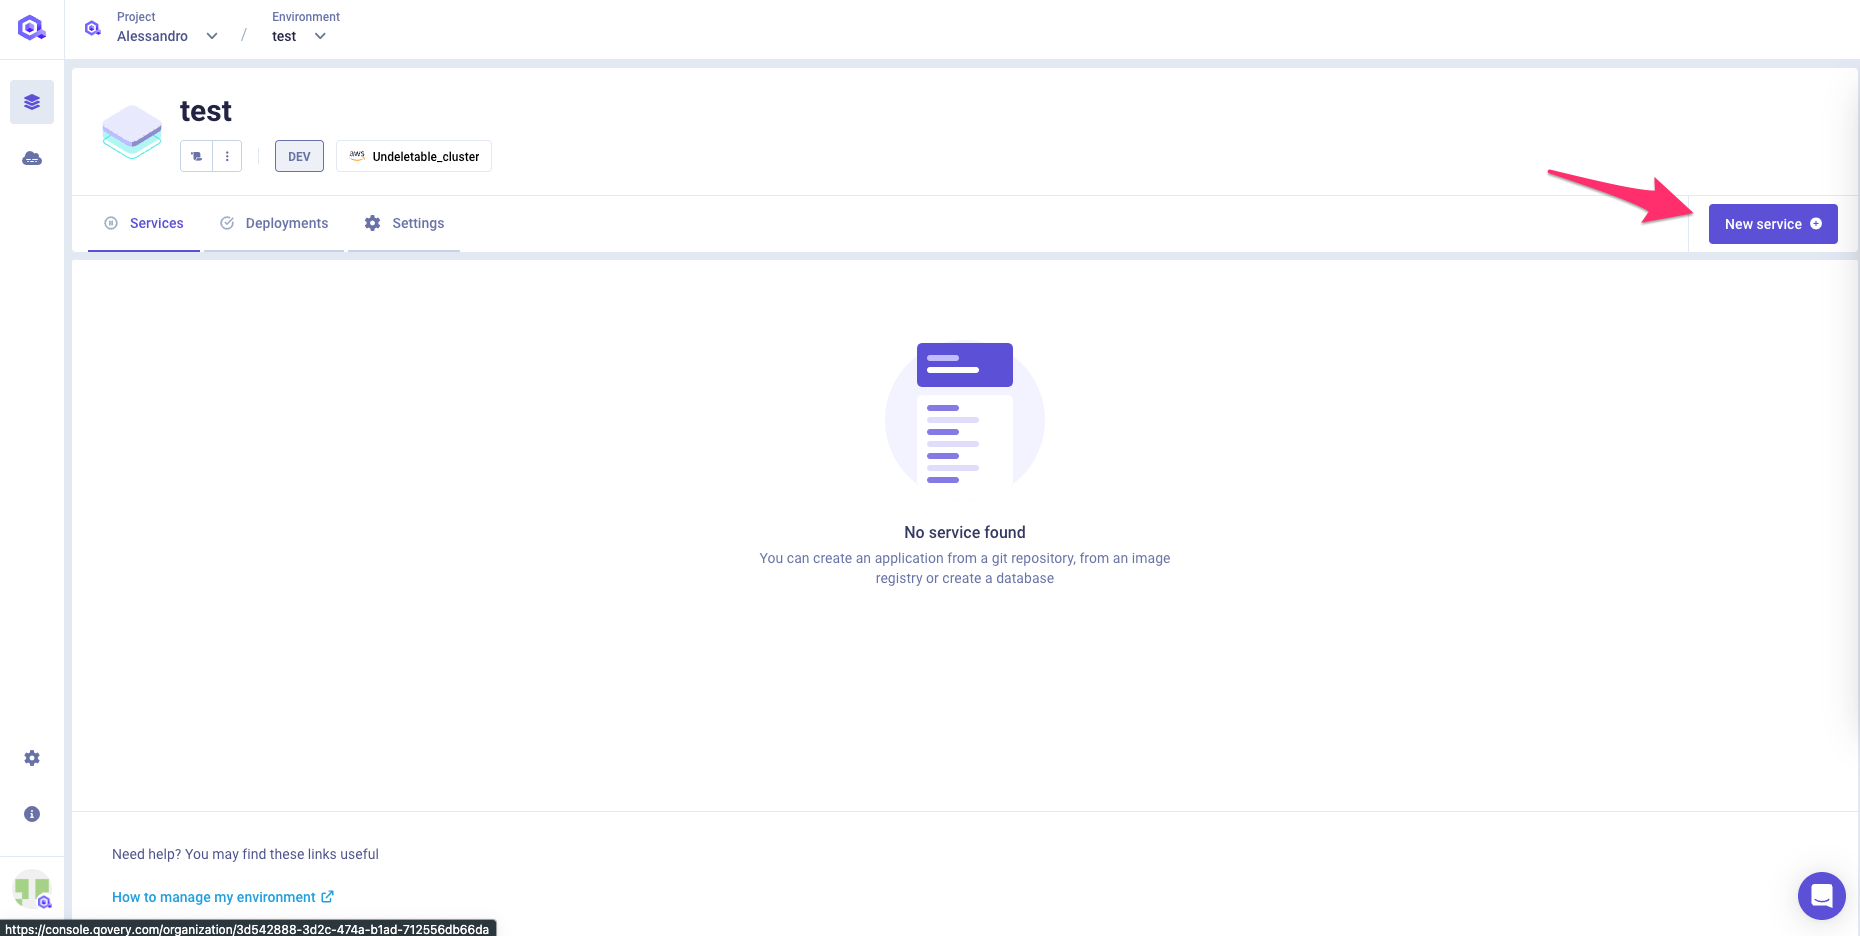
Once created you can start adding your services within it depending on your need:
- Application: generic long-running workload
- Cronjob: scheduled task
- Lifecycle Job: generic task to be executed at environment start/stop/delete.
- Database: managed or container database
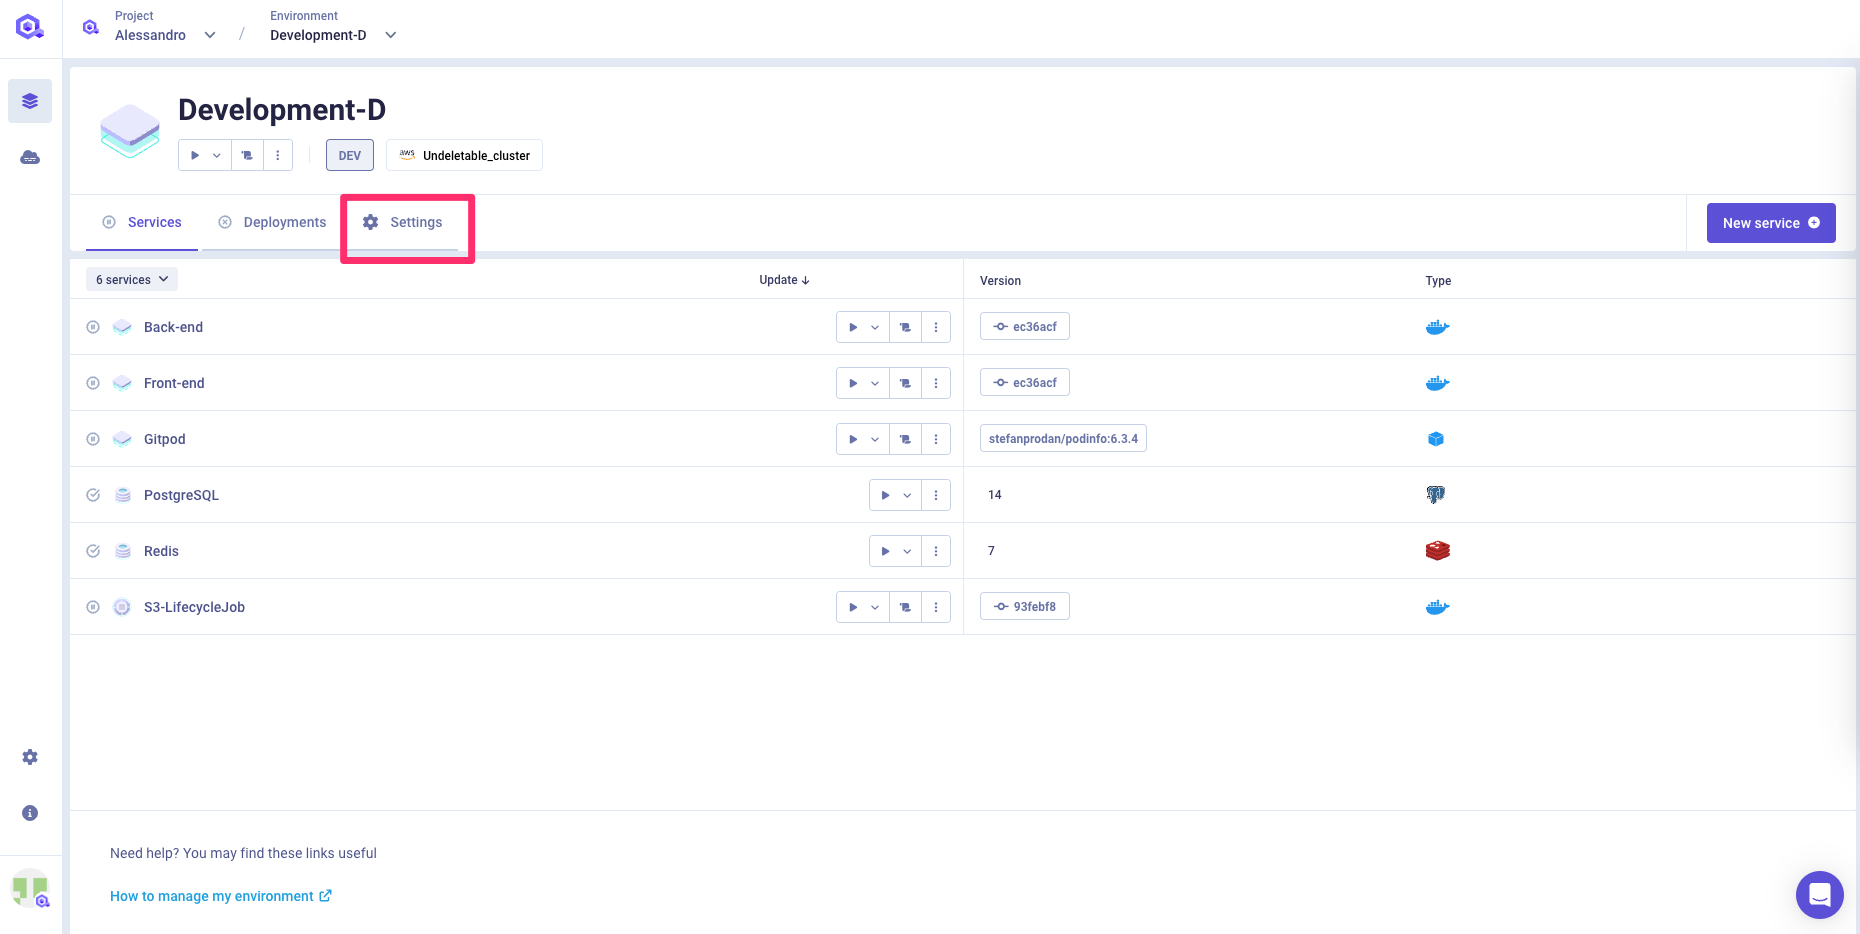
Editing the environment settings
You can access the environment settings by opening the SETTINGS tab.
General settings
On the General tab, you will be able to update your environment name. It will also display the environment mode and the cluster assigned to your environment.
Deployment Rule
Using Deployment Rules is a good practice to drastically reduce your cost. To know more of the benefit of using them, have a look at the Deployment Rules section.
A default deployment configuration is applied to your environment when it's created but you can modify this default behaviour by creating a dedicated rule at project level that will affect any new environment created and matching the condition.
Once created, you can edit the deployment rule of the environment from the deployment rules settings.
Below you can find the description of the deployment rule settings that can be modified for a specific environment
Start & Stop
The start and stop section allow you to override the default settings applied by the project rule to precisely set up when the environment should be deployed and cleaned up.
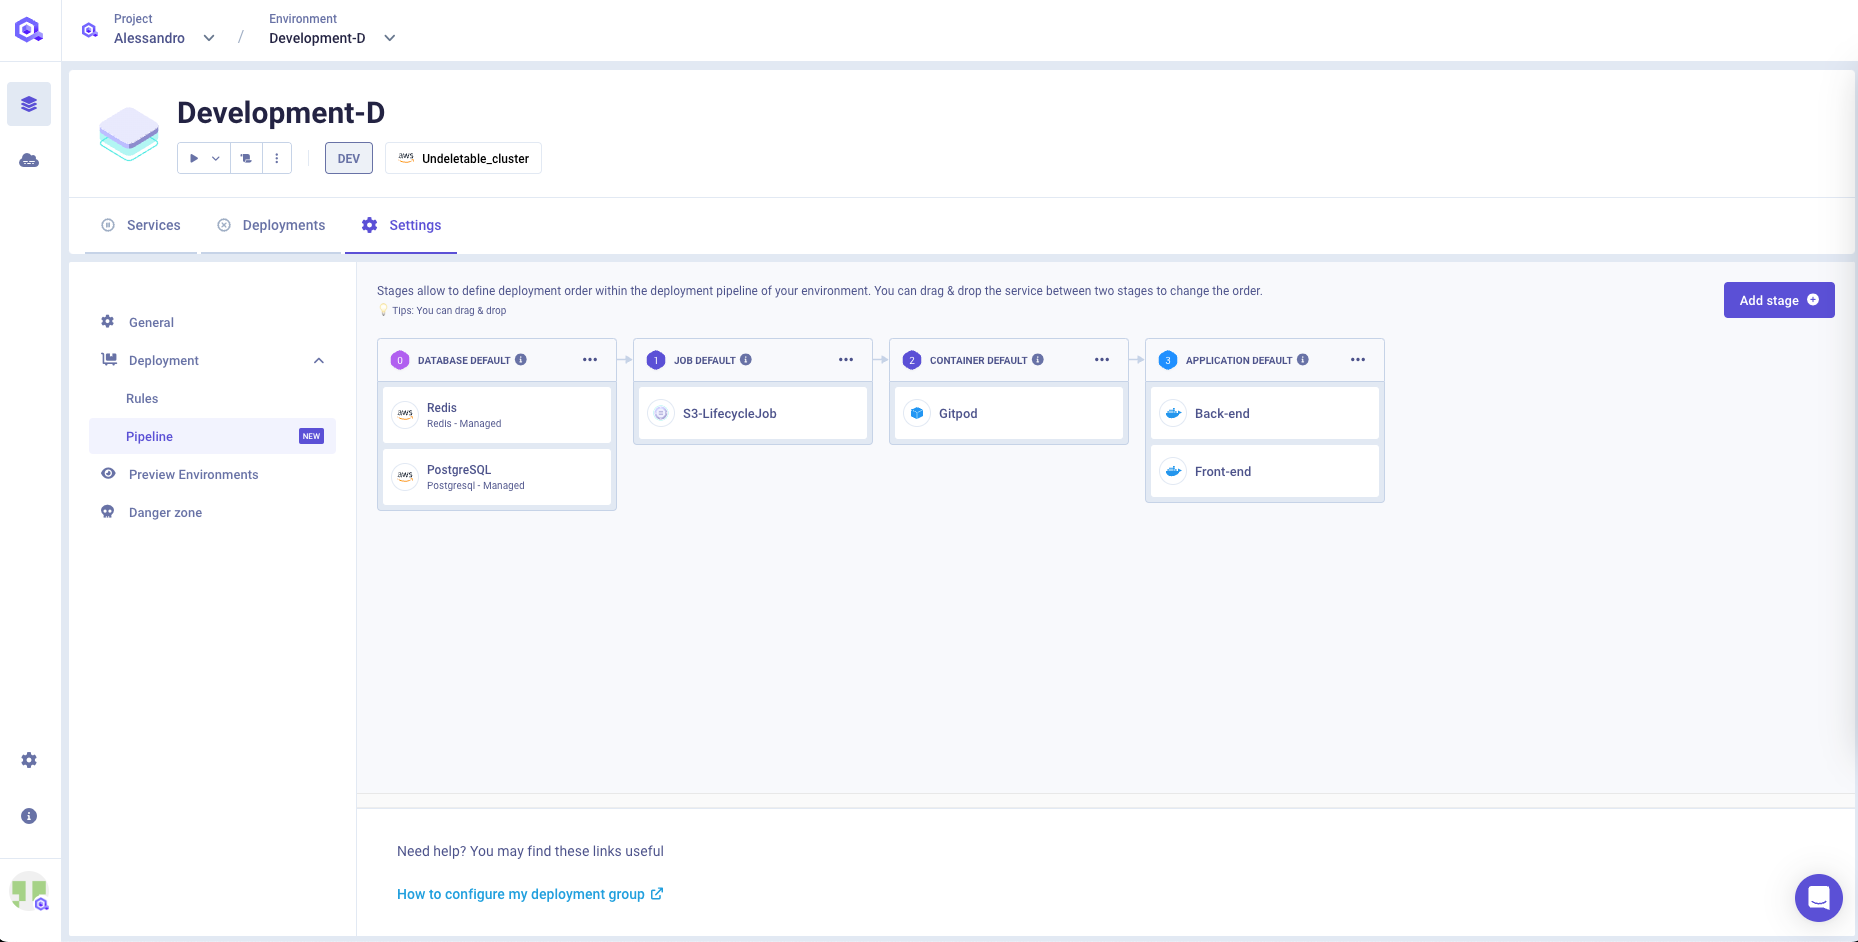
Deployment Pipeline
This section allows you to configure the deployment pipeline to be executed when a deployment on the environment is triggered. More in particular, you can define the deployment order of each service within your environment.
You can get more information about the Qovery deployment pipeline and how it works within this section.
Editing deployment order
You can edit the order simply by drag and drop the service from one stage to another.
You can also modify the order of an entire stage by opening the 3 dots menu of the stage and clicking on Edit order
Adding a new stage
You can add a new stage by pressing the Add stage button. A name and a description are required to create the new stage.
Editing deployment stage
You can modify the name and the description of a stage by opening the 3 dots menu of the stage and clicking on Edit order
Preview environment
Use Preview Environment to get early feedback on your application changes by creating a dedicated environment for each of your pull requests. Your production environment runs 24/7, where your other environments may not need to run all day long. E.g. you may need to run Environments to get early feedback on your application changes before the changes are merged into production. This is what we call Preview Environment.
Sometimes Preview Environment is also known as Ephemeral Environment, Temporary Environment, Development Environment, Review App.
The preview environment section allows you to manage the complete setup of your preview environment feature
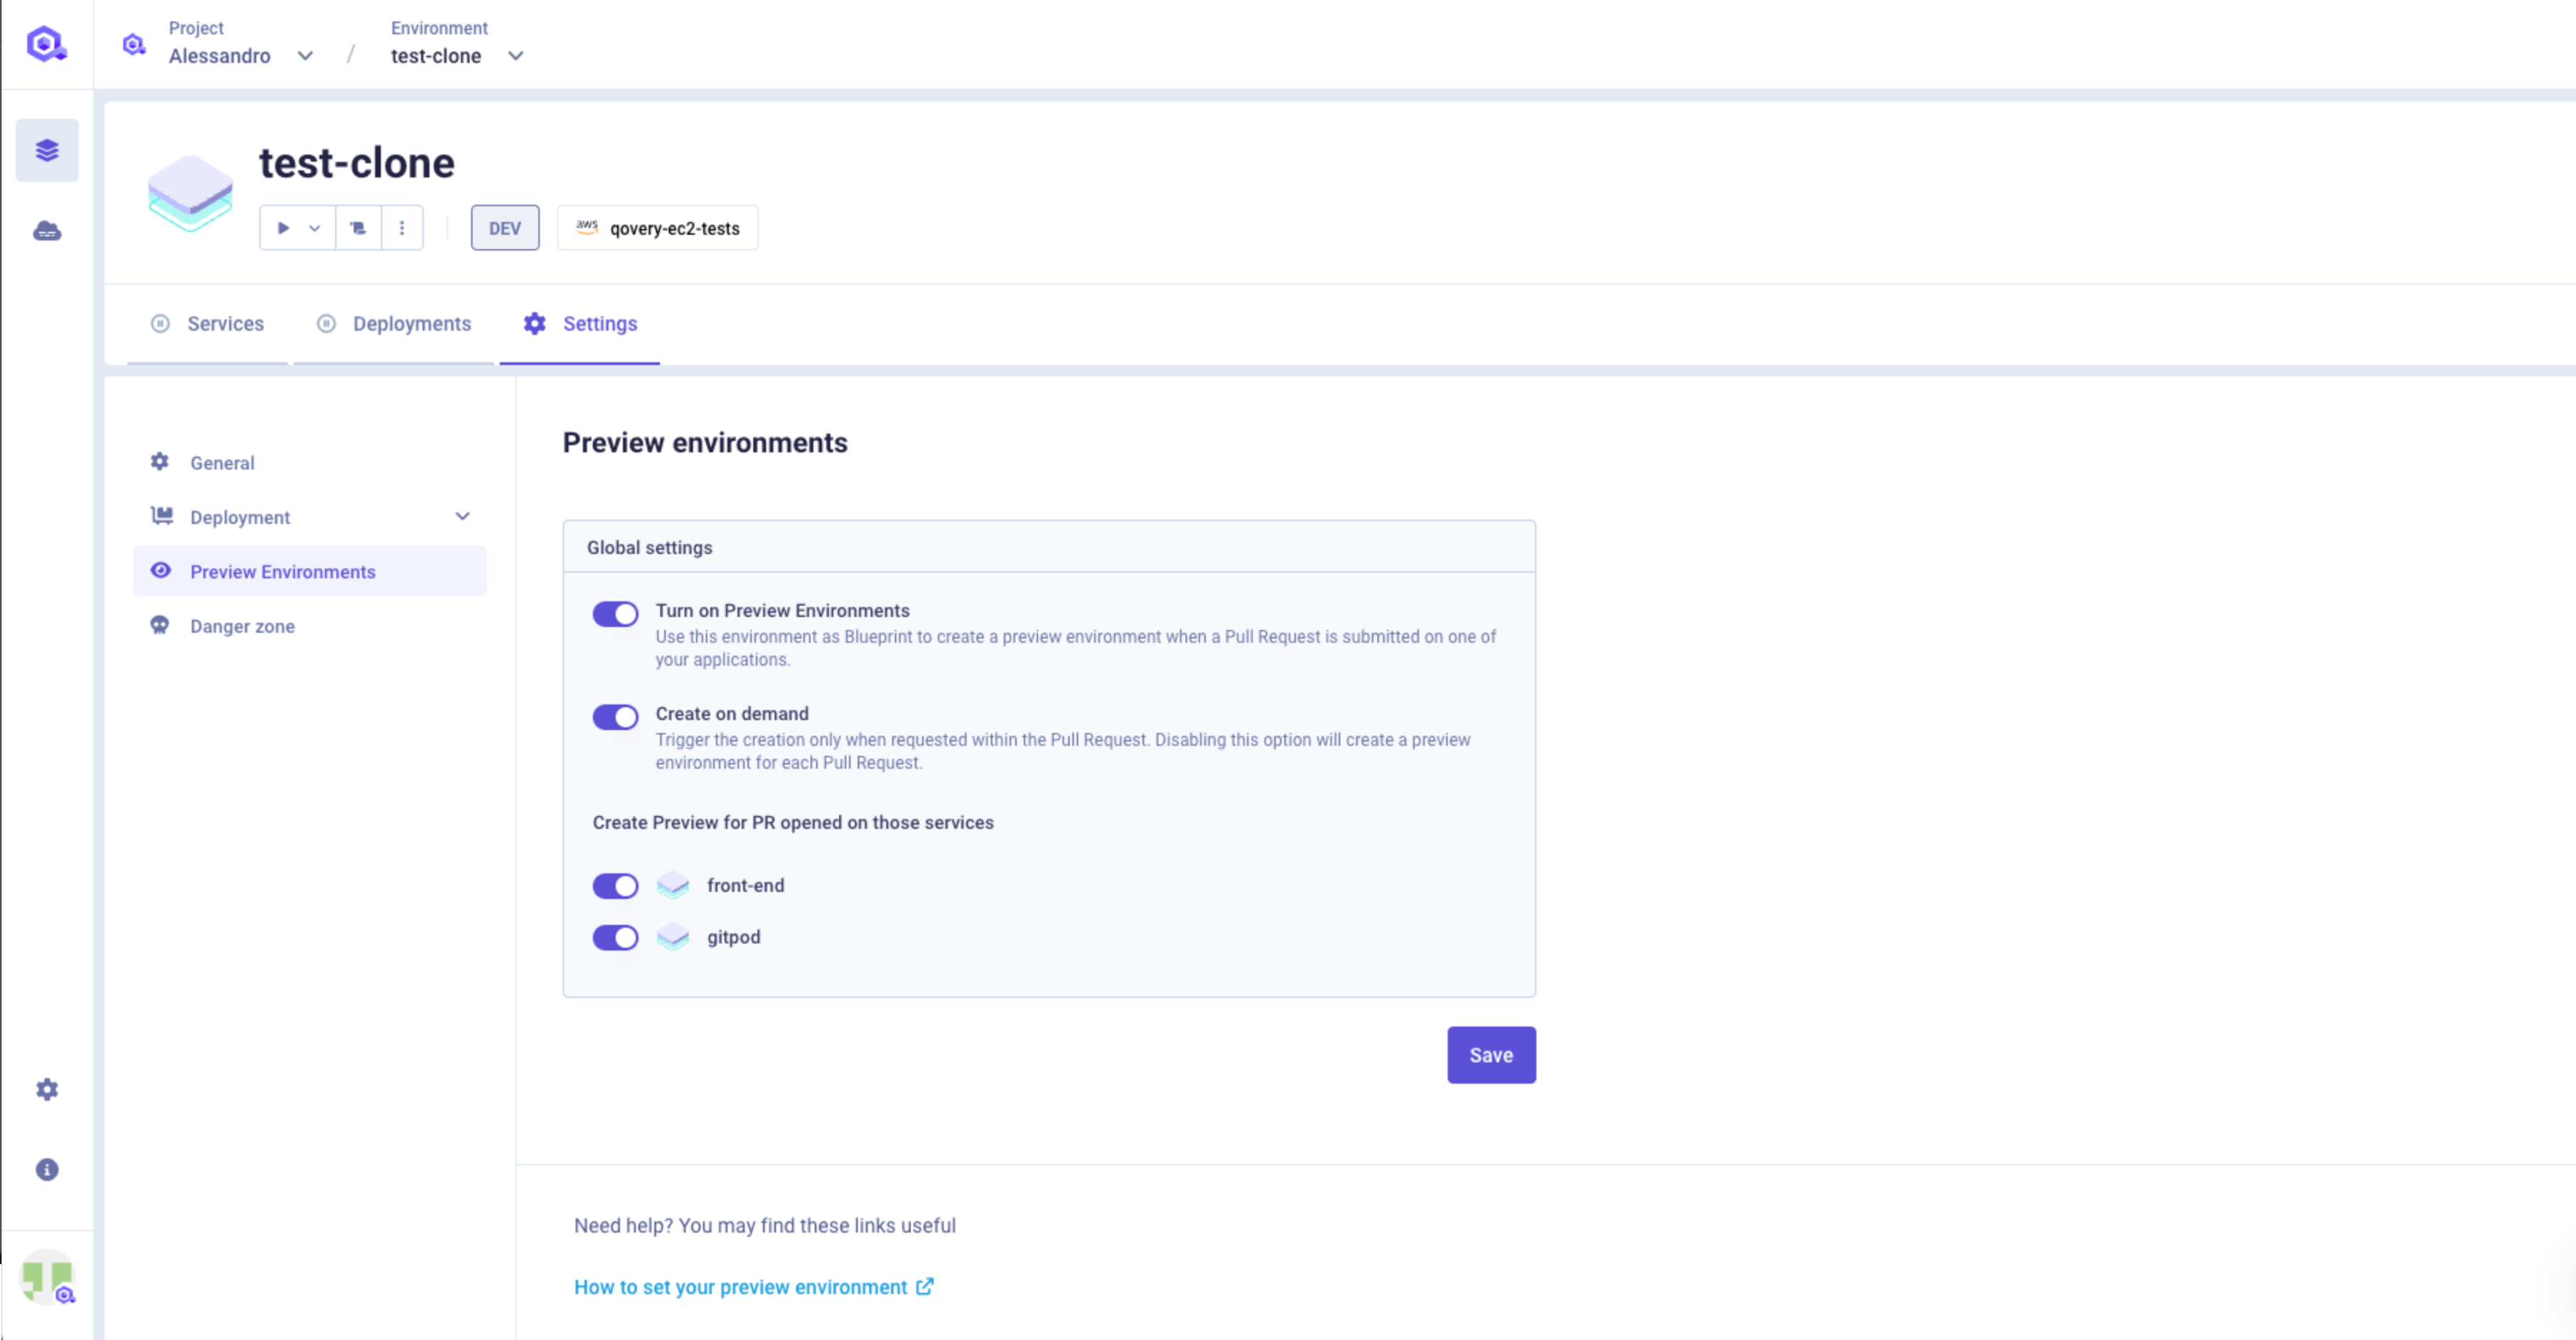
Turn on Preview Environments
it allows you to enable the preview environment feature for the current environment. Any PR opened on a service belonging to this environment will trigger the preview environment flow.
Create on demand
You can define the behaviour to follow for the creation of the preview environments:
- On Demand (Flag enabled)
- On every PR (Flag disabled)
On Demand Flow
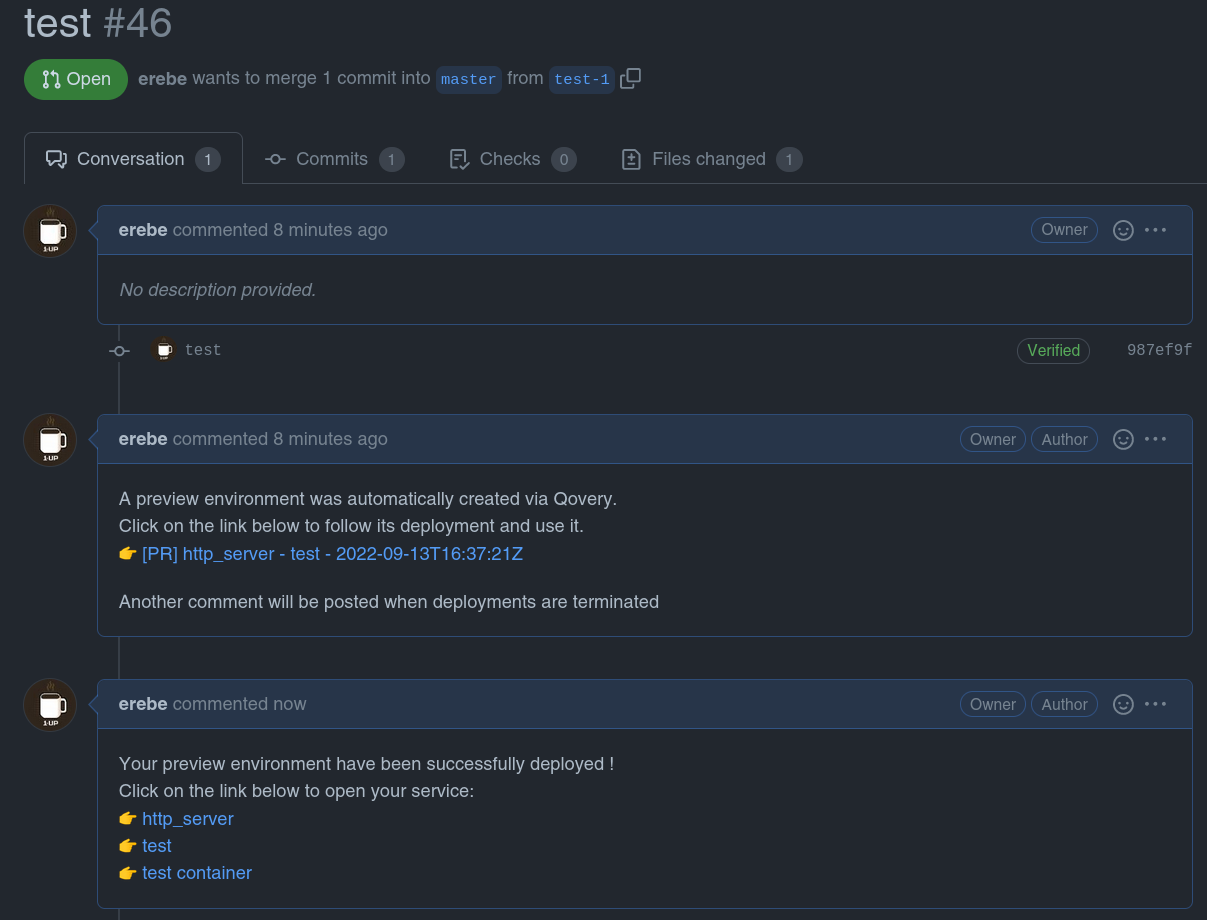
- A message is dropped on the PR asking you if you want to create a preview environment or not. You will get the list of environments where the preview env feature is activated (in case you have multiple environments) and the command to add as a comment of your PR to trigger the preview.
- you will decide weather to create a preview environment or not by typing the right command as a comment within the PR
- once the command is added in the comments, the preview creation is triggered and your preview environment is created and its deployment starts
- once the deployment is completed, an additional comment will be posted in the PR, providing you with URLs to access your services.

On every PR Flow Same as above but the preview environment creation flow is triggered automatically without any user intervention (only step 3 and 4)
Auto-delete
Auto-delete feature allows you to control if your applications should be, by default, automatically deleted after branch merging or deletion.
Service List
By default the preview environment feature is activated on any services of the environment connected to a git repository. In this sectoin you can decide to activate/desactivate the feature for a specific service.
Clone environment
Cloning an existing environnment is convenient for those use cases:
- Make a demo without impacting the original environment.
- Validate a feature on a dedicated environment.
Cloning an environment is possible directly from the 3 dots menu of your environment.

When cloning an environment, every configuration of the original environment will be copied except for:
- Application custom domains: custom domains are not cloned to avoid collision.
- Application BUILT_IN variables: Since completely new services will be create, the original built_in variables will be replaced. Aliases and overrides are preserved during the clone operation.
Terraform exporter
You can export the configuration of your environment as a Terraform manifest via the Export as Terraform option. This is helpful when you want to manage your configuration via Terraform: instead of creating the terraform manifest by hand, you can build the setup via the Qovery interface and export is as a Terraform file
The export will contain the Terraform definition of the environment, the services within it but as well all the other resources linked to the environment (organization, cluster, project).
You can decide wether or not the export should contain or not the secrets defined within the Qovery console.
Here's a video explaining how it works:
Deploy an environment
Have a look at the Deployment Management section for more information on how to deploy your environment.
Delete an environment
To delete your environment, you must go in the settings > Danger zone and delete your Environment.