Application
Before you begin, this documentation assumes the following:
You have created an Environment.
An application is part of a Project within an Environment and is a container unit. Multiple applications can be part of the same Environment, be connected to a set of dependencies (databases and other services), and can communicate with other applications within the same Environment.
Qovery allows you to create and deploy applications from two different sources: Git Repository or Container Registry
Deploying from a Git Repository
In this configuration, Qovery will pull the code from the chosen repository, build the application and deploy it on your kubernetes cluster.
The list of Git repositories available during the setup is strictly tied to the permissions of your git account (by default Qovery can access all your repositories). You can also manage the access via dedicated Git Tokens.
Deploying from a Container Registry
In this configuration, Qovery will pull the chosen image and deploy it on your kubernetes cluster.
To improve security and avoid deploying images from non-authorized registries, we have decided to restrict the list of Container Registry you can use during the setup process. Only an administrator with the right permissions can manage it from the Container Registry Management page
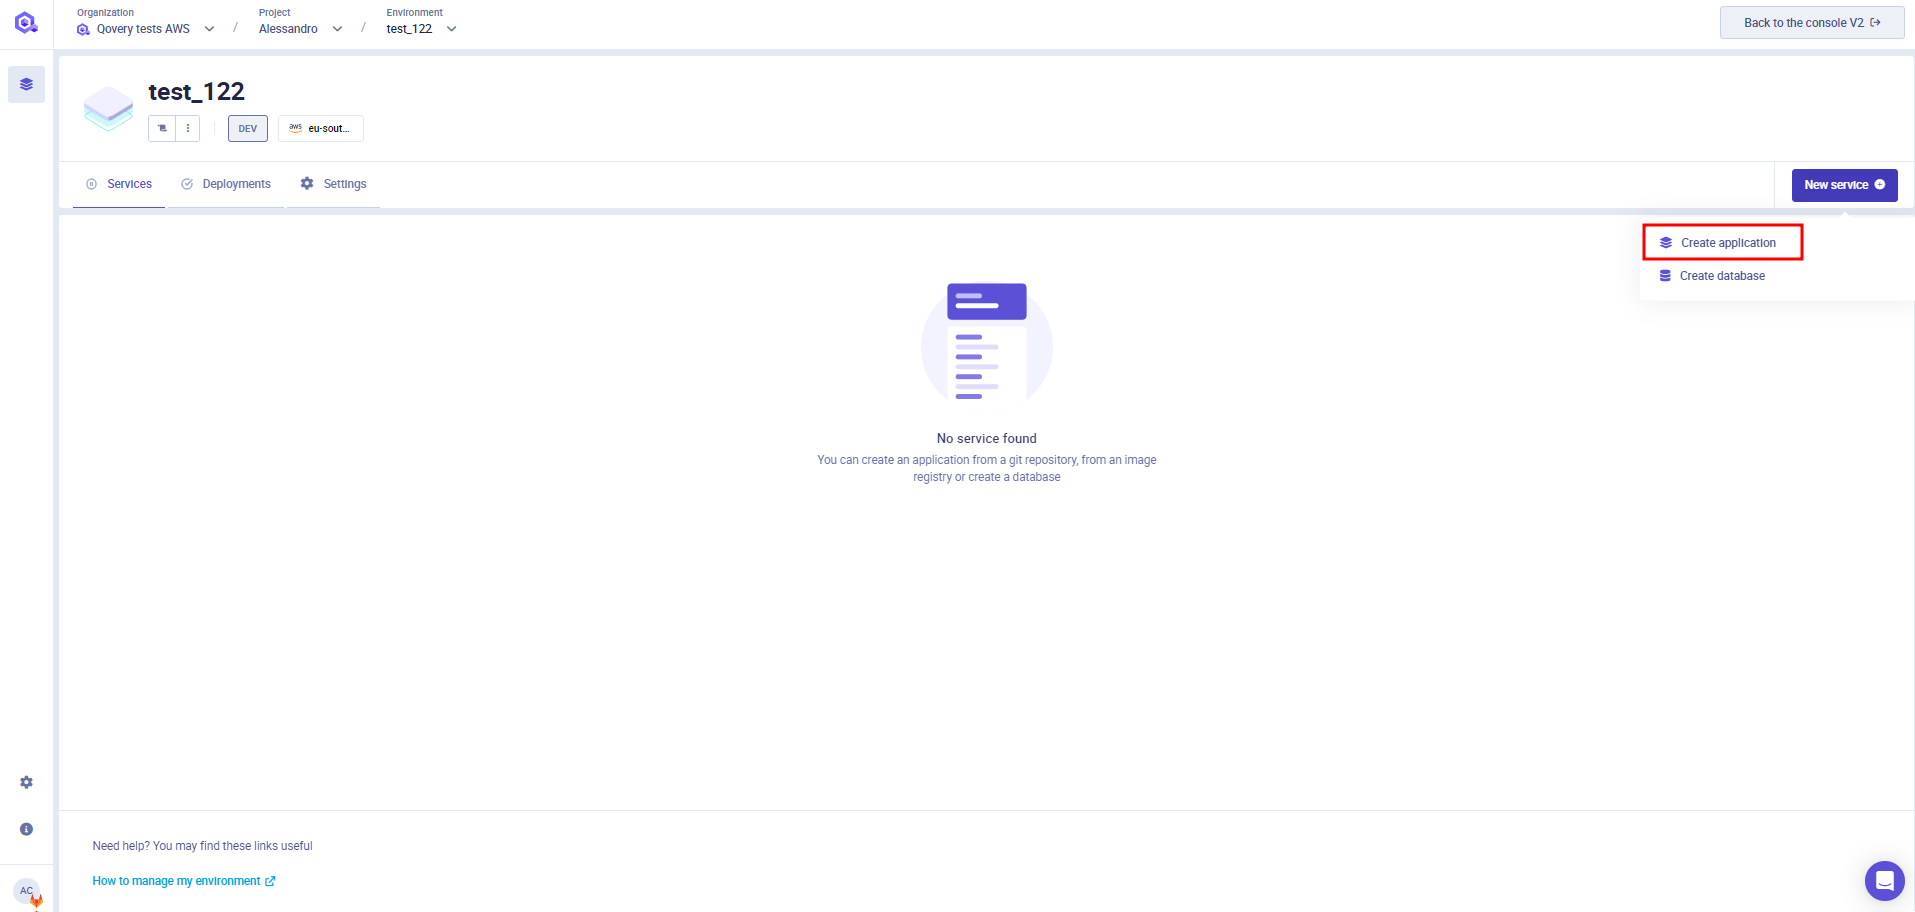
Create an Application
Go into the chosen environment and press the "New Service" button and then the "Create application" button
Select the following fields:
- Application Name: give a name to your application
- Application Source: Chose between Git Repository or Container Registry, depending on the source location of your application
If you want to deploy an application from a Git Repository you will have to select:
- Git Repository: Select the git provider hosting your code (it can be hosted on GitHub, GitLab or Bitbucket). You can add a new git access by clicking on
New git access. - Branch: Select branch that Qovery should use to deploy your application
- Root Application Path: base folder in which the application resides in your repository
- Build and deploy: configure your Dockerfile location and parameters. For more information, go to this section
If you want to deploy an application from a Container Registry you will have to select:
- Registry: select the container registry storing the image of your application. You can add a new container registry by clicking on
New registry. - Image name: the name of the image to be deployed with this application (example: postgres)
- Image tag: the tag of the image to be deployed with this application (example: 1.0).
- Deploy: configure your deployment parameters. For more information, go to this section
Auto Deploy
See the Deploying with auto-deploy feature section.
Extra labels/annotations (optional)
Add your extra annotation/label groups. See the Add annotation/label group section for more information.
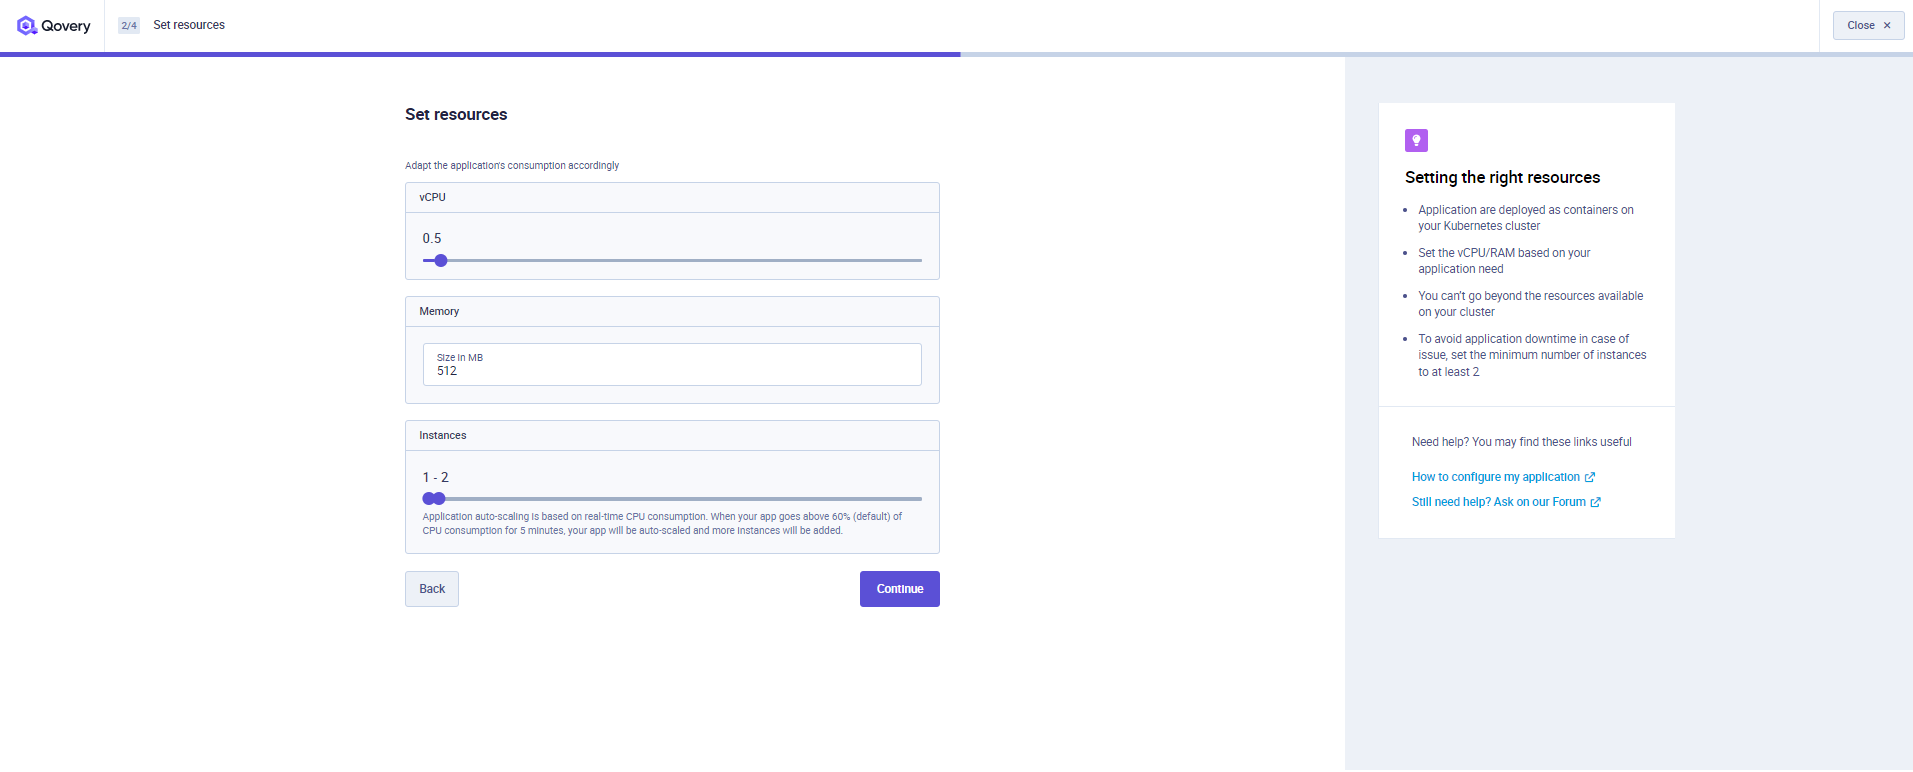
Within this section, you will need to define the resources to be assigned to your application at run time.
- vCPU: the vCPU assigned to each instance of your application. The default is 500m (0.5 vCPU).
- RAM: the amount of RAM assigned to each instance of your application. The default is 512MB.
- GPU: the amount of GPU assigned to each instance of your application. The default is 0. The GPU feature must be enabled on your cluster to be able to use GPU instances (see AWS with Karpenter cluster setup documentation).
- Number of instances (Application Auto-scaling): select the minimum and the maximum number of instances of your application that can run within your cluster. The number of instances running at an insant t is automatically managed by Kubernetes (Application auto-scaling) and it is based on real-time CPU consumption. When your app goes above 60% of CPU consumption for 5 minutes, your app will be auto-scaled and more instances will be added. It is transparent. Qovery runs your application on Kubernetes and relies on metrics-server service to auto-scale your app.
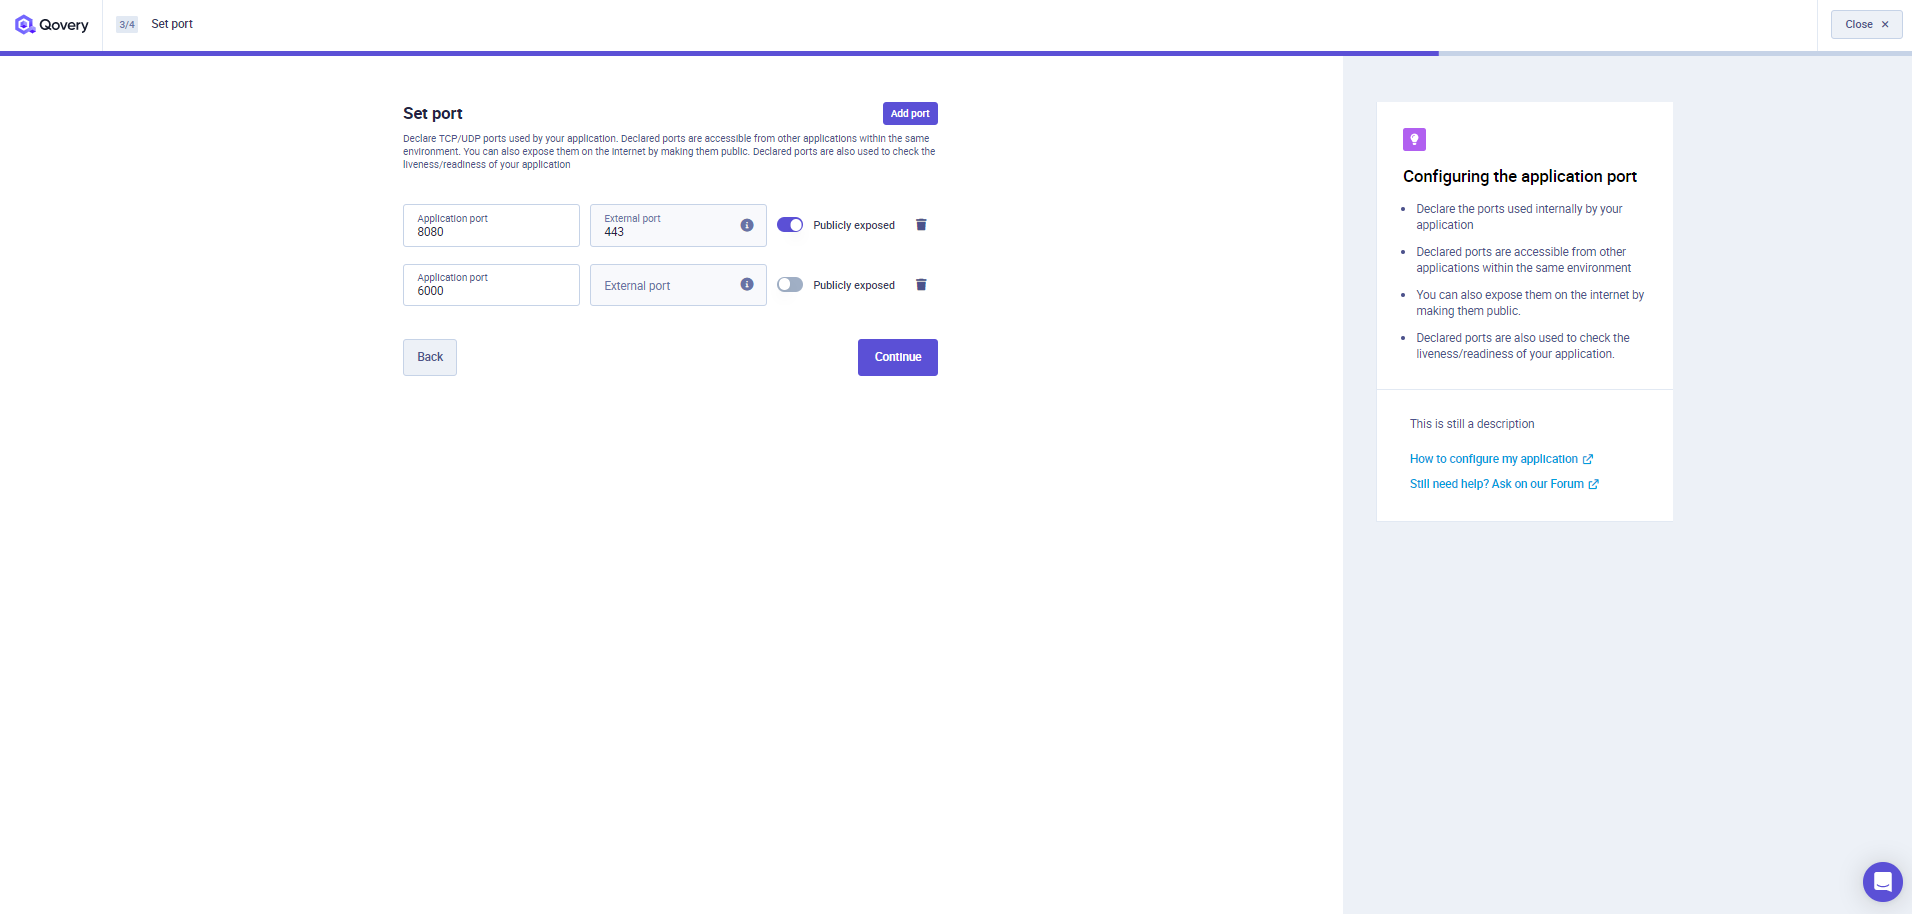
You can now define one or more ports for your Application. Most of the application needs to be accessed by other services inside or outside your environment over different L7/L4 protocols. Today Qovery supports the following protocols:
- HTTPS (Select this protocol if you need to run Websockets)
- gRPC
- TCP
- UDP
By default ports are accessible only from inside your environment. You can also expose them publicly, making them accessible over the public network via a dedicated public domain that will be assigned to your application by Qovery during the deployment (See the Qovery Provided Domains section). Note that HTTPS/gRPC ports are always exposed over the port 443.
Important Informations
- Most of the Kubernetes Health Checks are based on the port declared in this section. Make sure you declare the right port and that you configure the health checks properly.
- Connections on public ports are automatically closed after 60 seconds. If you want to implement long living connection (like for websockets) please make sure to use the rigth ingress timeouts in the advanced settings section
- Exposing publicly TCP/UDP ports requires to create a dedicated load balancer and it takes a few minutes before having it ready (~15 minutes). Note also that this has a direct impact on your cloud provider bill.
- You can configure your application to use the PORT environment variable by adding the PORT on your application env variables page.
- A Note on Listening IPs: It is best for your application to listen on
0.0.0.0:$PORT. While most things work with127.0.0.1andlocalhost, some do not (NodeJS for example)
(Optional) If a port has been defined for your application, you can define the health check probes to run in order to verify the state of your application
To know more about how to configure your Liveness and Readiness probes, have a look at the health-checks section
Define any input variable required by your application to run. Any declared variable will be injected as environment variables based on the selected scope (project, environment, service) Any additional environment variable can be added later from the environment variable section

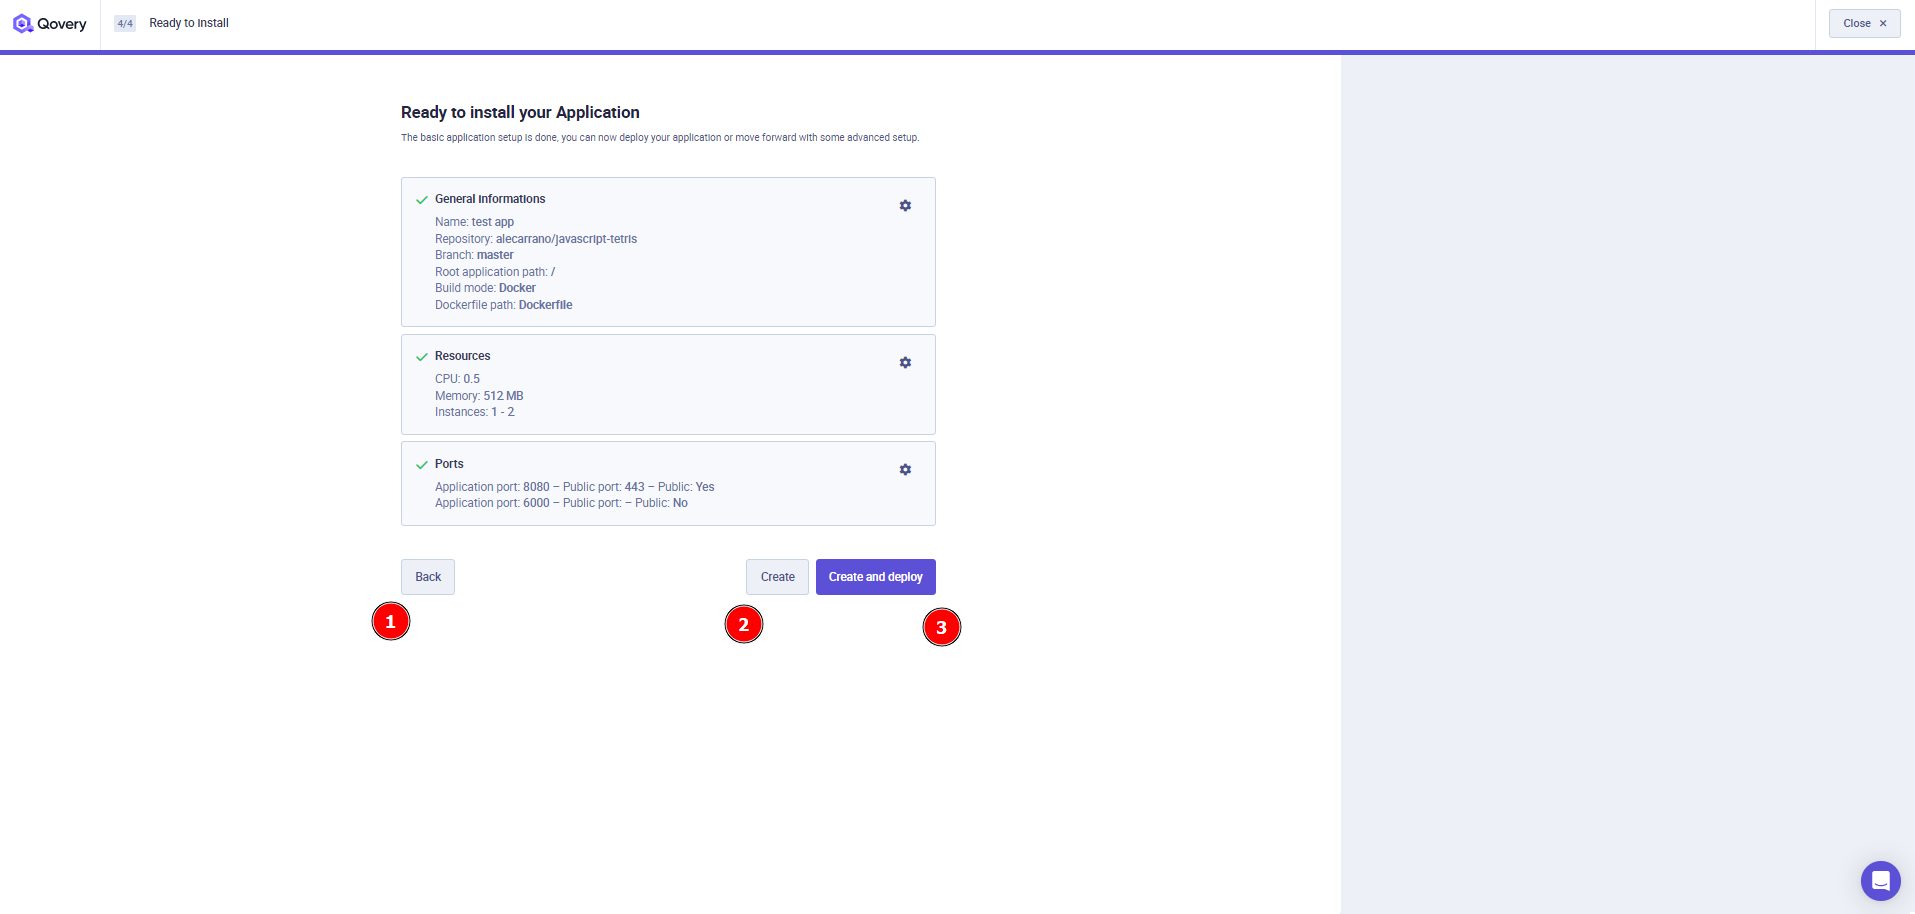
You will find a recap of your application setup and you can now decide to:
- Go back to one of the previous steps and change your application settings
- Create your application without deploying it
- Create and deploy your application
Deployment Management
Have a look at the Deployment Management section for more information.
Configuration
Once created, you can access the configuration of an application at any time via the Settings tab available on the application section
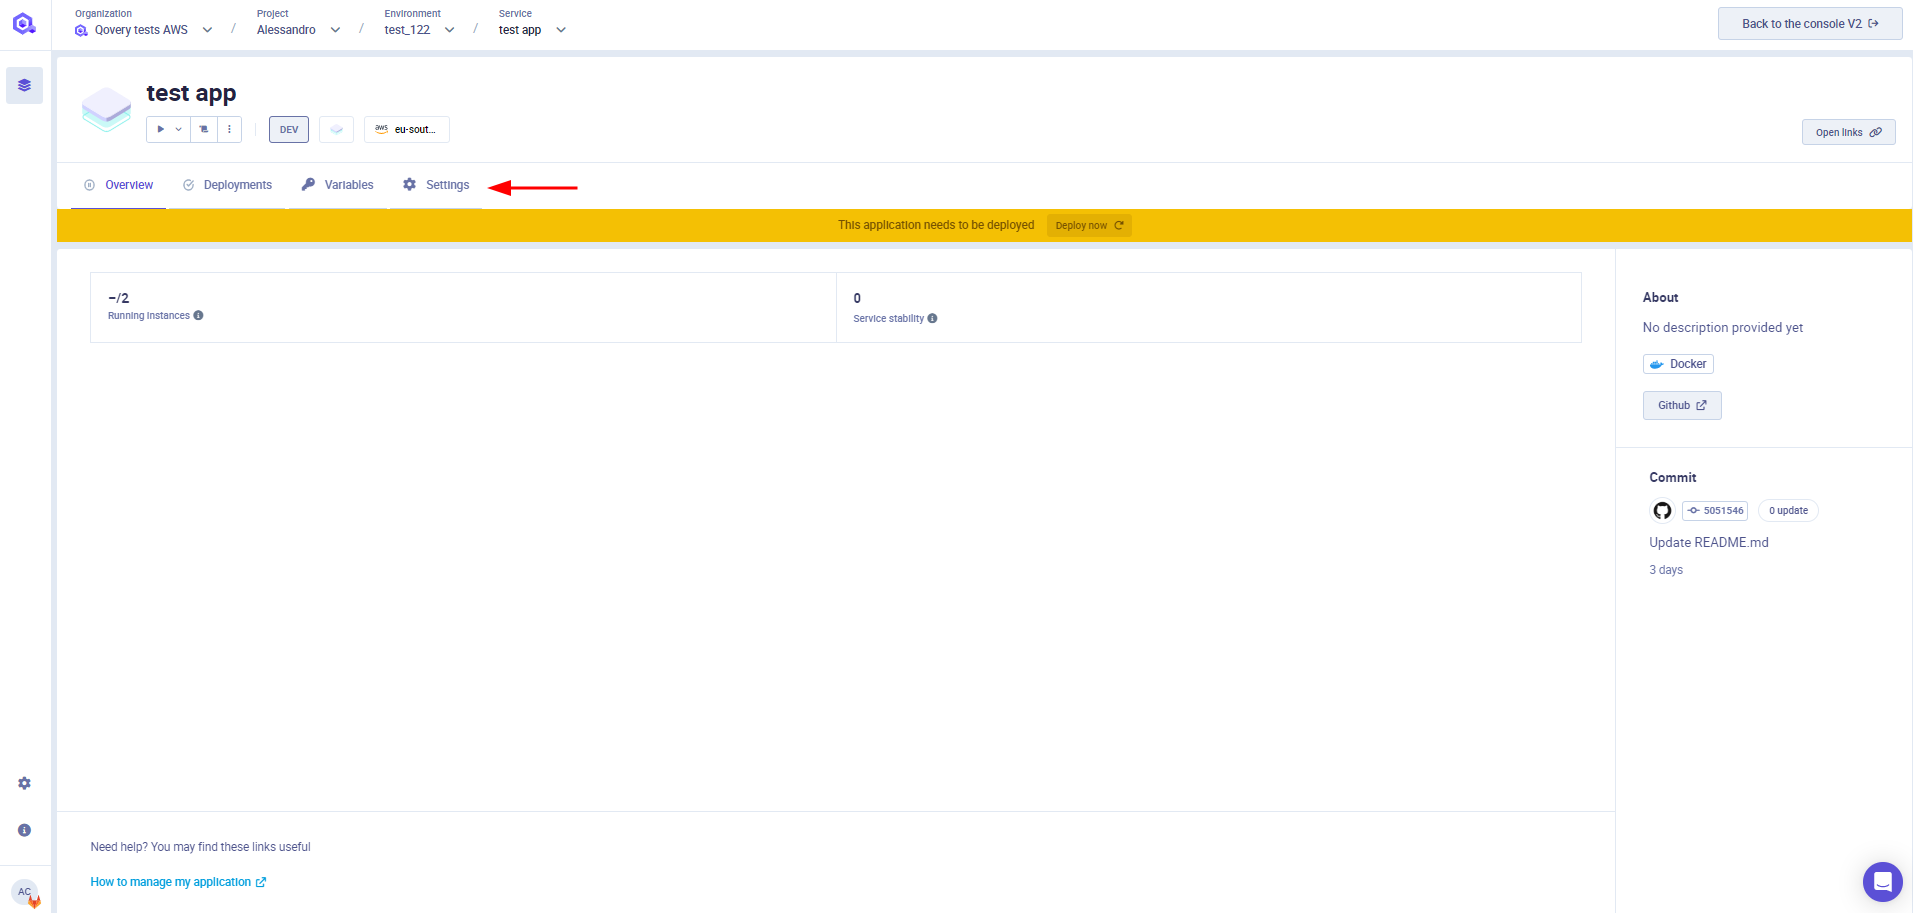
You can find below the description of each of the tabs available in this section
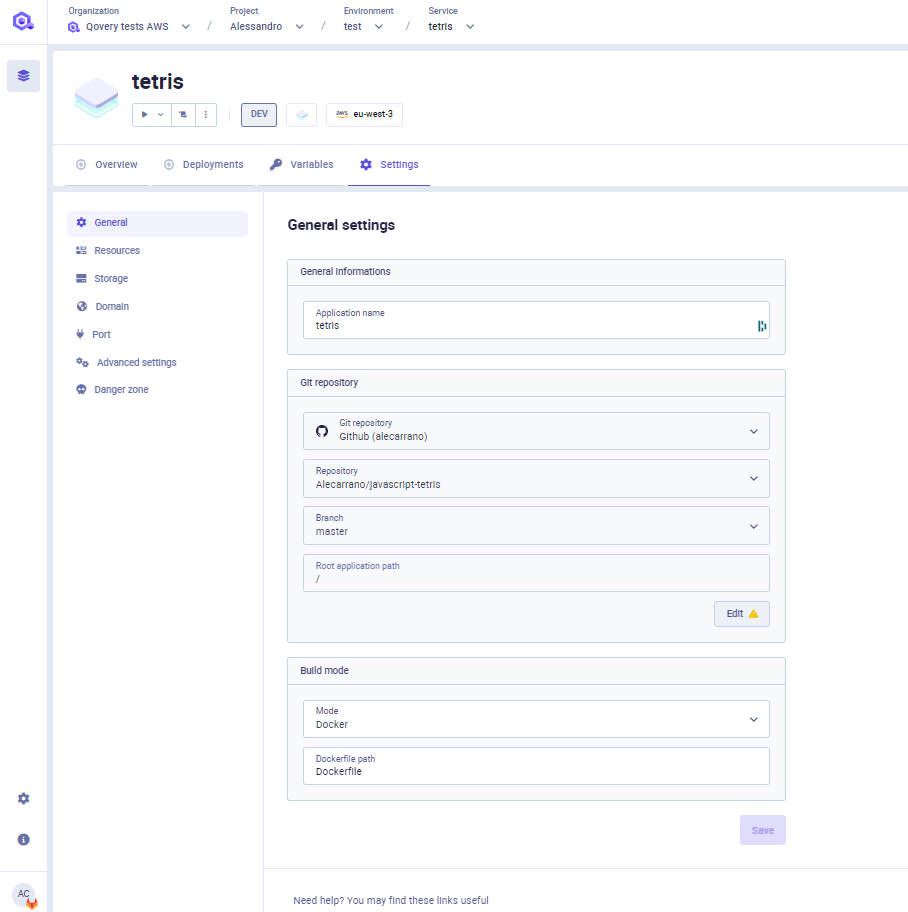
General
General settings section allows you to set up your application name and the source code location (git repository or image registry) .
Git Repository
If your application is built and deployed from a git repository, within this section you can:
- Modify the git provider where your code is stored (it can be hosted on GitHub, GitLab or Bitbucket).
- Modify the branch that Qovery should use for deploying your application
- Modify
Root Application Path- base folder in which the application resides in your repository
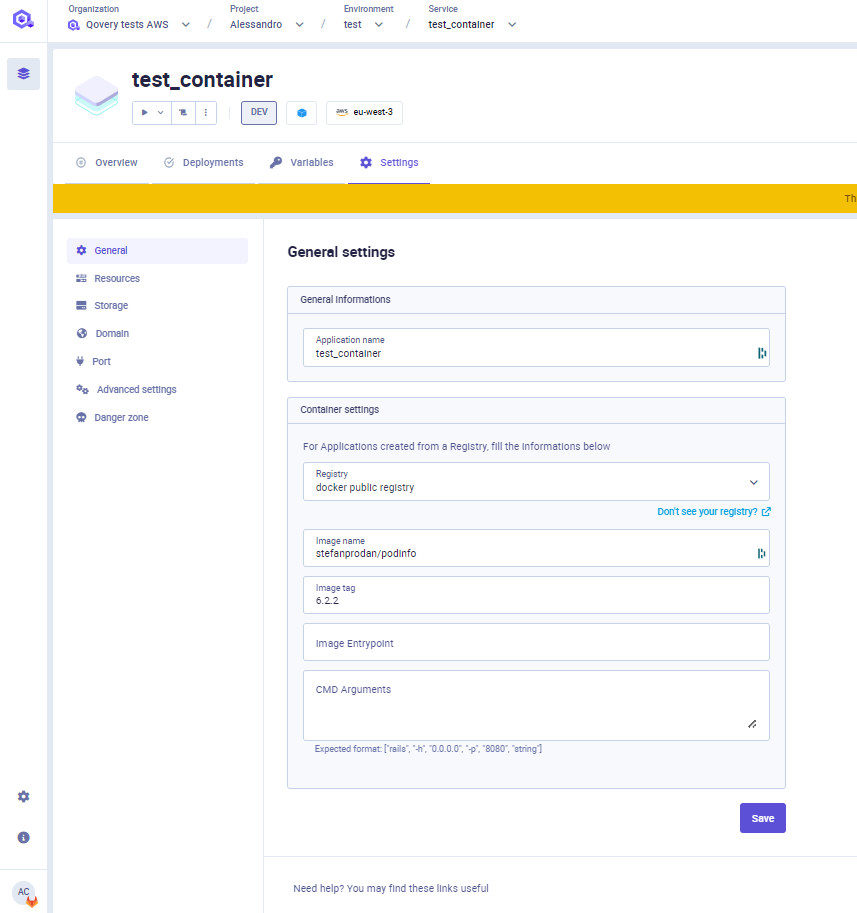
Container Registry
If your application is deployed from an image registry, within this section you can modify:
- Registry: select the container registry storing the image of your application. Note: only pre-configured registry are available in this list, check the Container Registry Management page for more information.
- Image name: the name of the image to be deployed with this application (example: postgres)
- Image tag: the tag of the image to be deployed with this application (example: 1.0).
- Image Entrypoint: the entrypoint to be used to launch your applicaiton (not mandatory)
- CMD Arguments: the arguments to be passed to launch your applicaiton (not mandatory). We expect the format to be an array. Example ["rails", "-h", "0.0.0.0", "-p", "8080", "string"]
Build and Deploy
Within this section, you can configure the following fields:
- Dockerfile: select the location of the dockerfile. If you don't have one, you can use the
docker initcommand to generate one for your application (check the documentation here). After creating a Dockerfile, specify the location of your Dockerfile inDockefile pathfield. (field available only if the application built by the Qovery CI) - Dockerfile stage: if you have a multistage dockerfile, select the target stage to build. Filling this field is equivalent to running the command
docker build --target <selected_stage>(field available only if the application built by the Qovery CI) - Image Entrypoint: the entrypoint to be used to launch your application (not mandatory)
- CMD Arguments: the arguments to be passed to launch your application (not mandatory) separated with a space. Example:
rails -h 0.0.0.0 -p 8080 string "complex arg".
Auto Deploy
See the Deploying with auto-deploy feature section.
Extra labels/annotations
Add your extra annotation/label groups. See the Add annotation/label group section for more information.
Resources
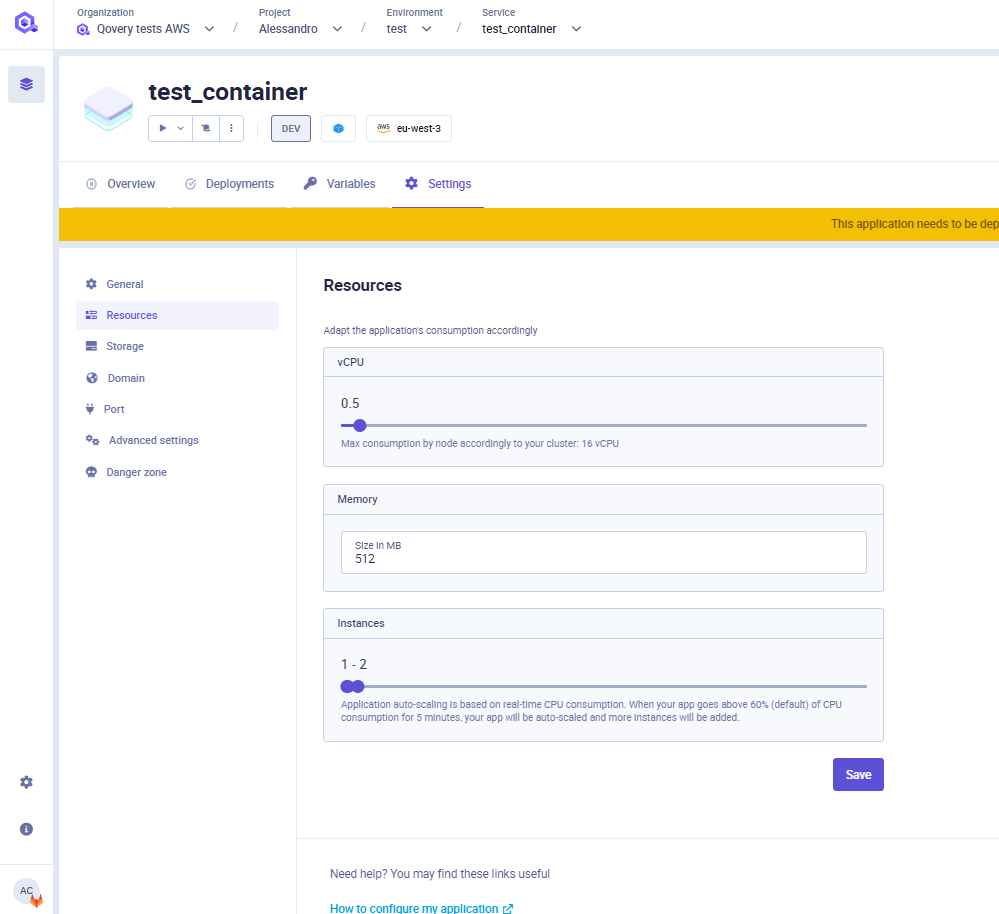
CPU
To configure the number of CPUs that your app needs, adjust the setting in the Resources section of the application configuration.
Please note that in this section you configure the CPU allocated by the cluster for your application and that cannot consume more than this value. Even if the application is underused and consumes fewer resources, the cluster will still reserve the selected amount of CPU.
RAM
To configure the amount of RAM that your app needs, adjust the setting in Resources section of the application configuration.
GPU
To configure the amount of GPU that your app needs, adjust the setting in Resources section of the application configuration.
Please note that in this section you configure the CPU allocated by the cluster for your application and that cannot consume more than this value. Even if the application is underused and consume less resources, the cluster will still reserve the selected amount of CPU. If your application requires more RAM than requested, it will be killed by the kubernetes scheduler.
Auto-scaling
Application auto-scaling is based on real-time CPU consumption. When your app goes above 60% of CPU consumption for 15 seconds, your app will be auto-scaled and more instances will be added. It is transparent. The downscale will happen if the CPU consumption is lower than 60% for at least 5 minutes. You can adjust the minimum and maximum of instances you need in your application settings. Qovery runs your application on Kubernetes and relies on metrics-server service to auto-scale your app.
Storage
Block Storage
The default filesystem for applications running on Qovery is ephemeral. Application data isn’t persisted across deploys and restarts, which works just fine for most apps because they use managed databases to persist data.
However, many applications need persistent disk storage that isn’t ephemeral. These include:
- Blogging platforms and CMSs like WordPress, Ghost, and Strapi.
- Collaboration apps like Mattermost, GitLab, and Discourse.
This is where Qovery block Storage comes in. Qovery applications can use storage to store data that persists across deploys and restarts, making it easy to deploy stateful applications.
Use cases
✅ Good use cases
- For I/O intensive applications (E.g. database)
- To store temporary files
❌ Bad use cases
- To store file > 1 TB
- To expose files from an application (E.g. images)
Types of Block Storage
Qovery Storage supports:
| Type | Max IOPS | Max Throughput | Min Size | Max Size | Use cases |
|---|---|---|---|---|---|
| fast_ssd | 64000 | 1GB/s | 5GB | 10GB Community / 1TB paid plans | Critical business applications that require sustained IOPS like databases |
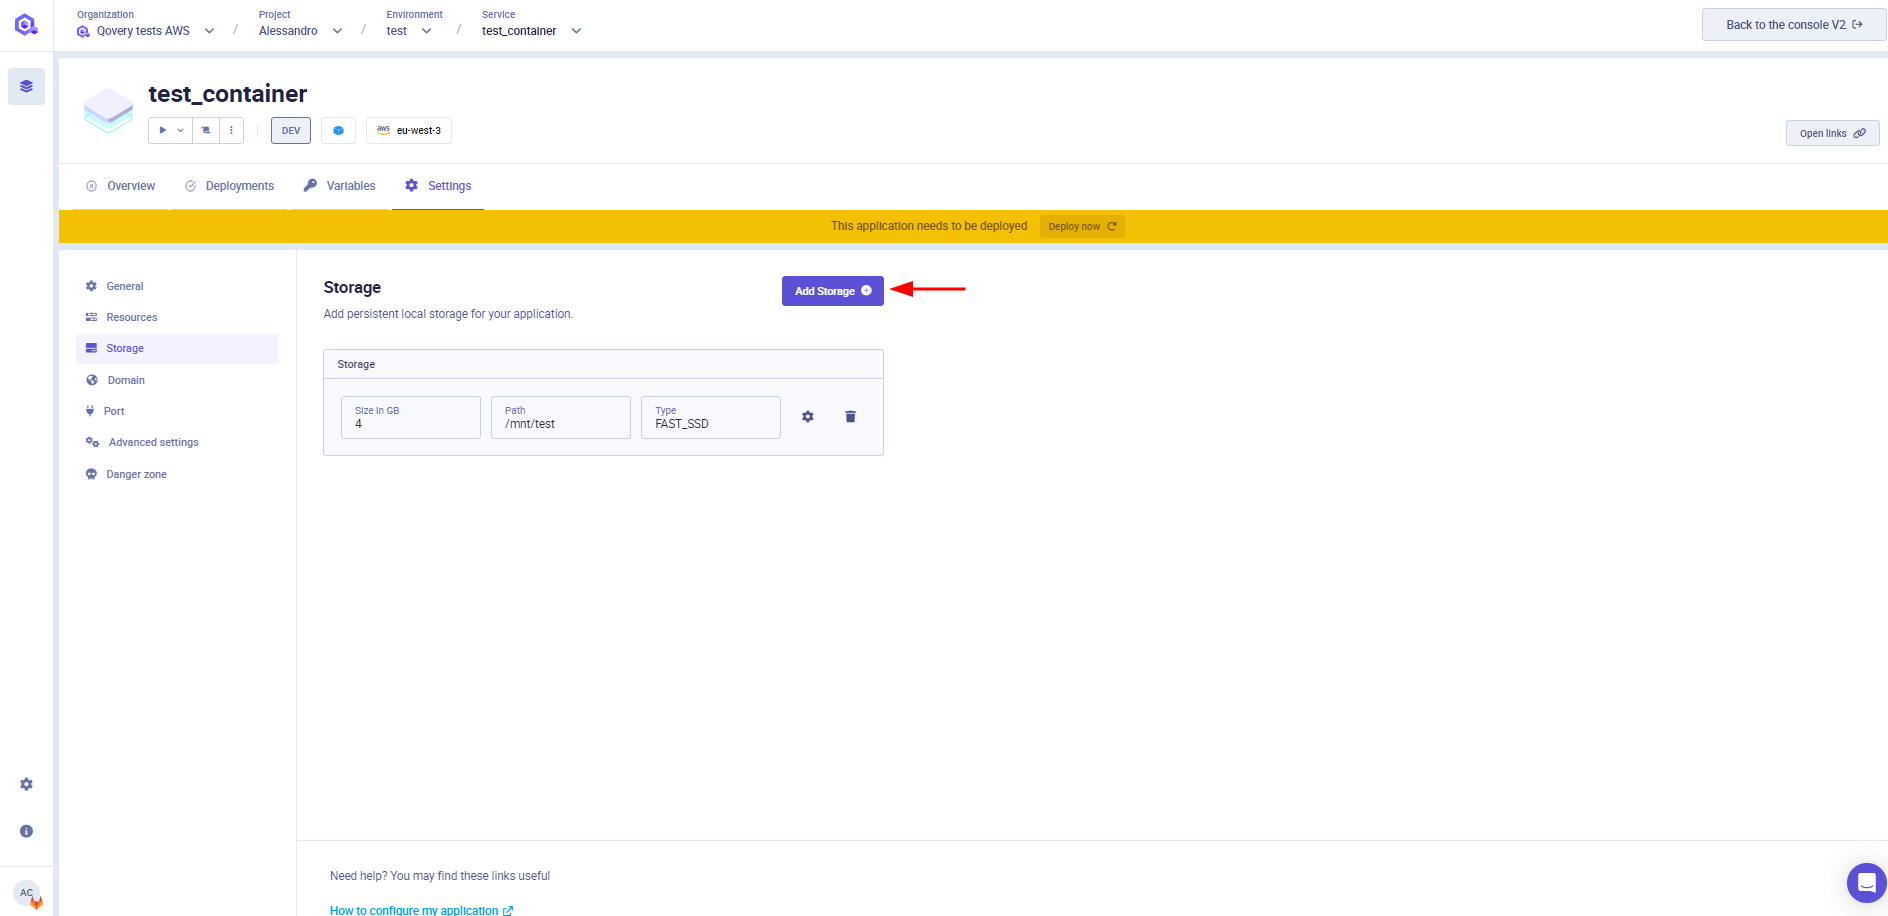
Configuration
You can set up your Block Storage in Storage section of your application configuration.
Ports
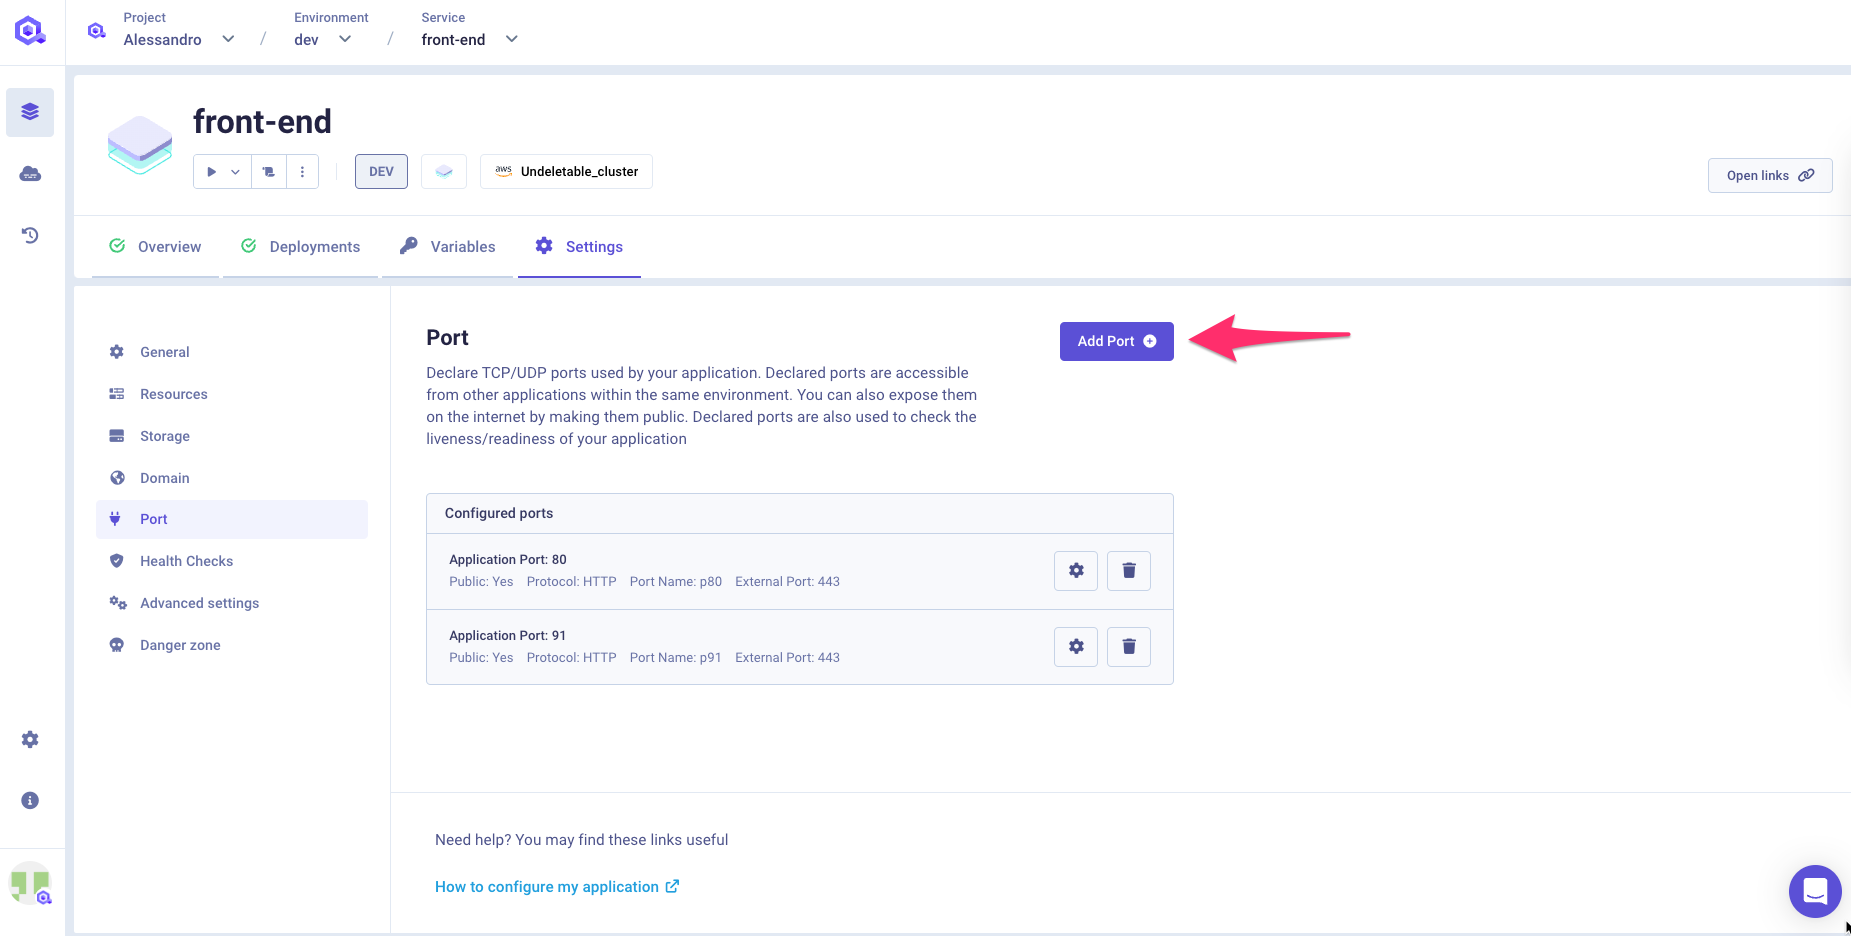
Within this section you can define the port exposed by your application to the other services or even over the internet. You can edit the existing ports or declare new ones by specifying:
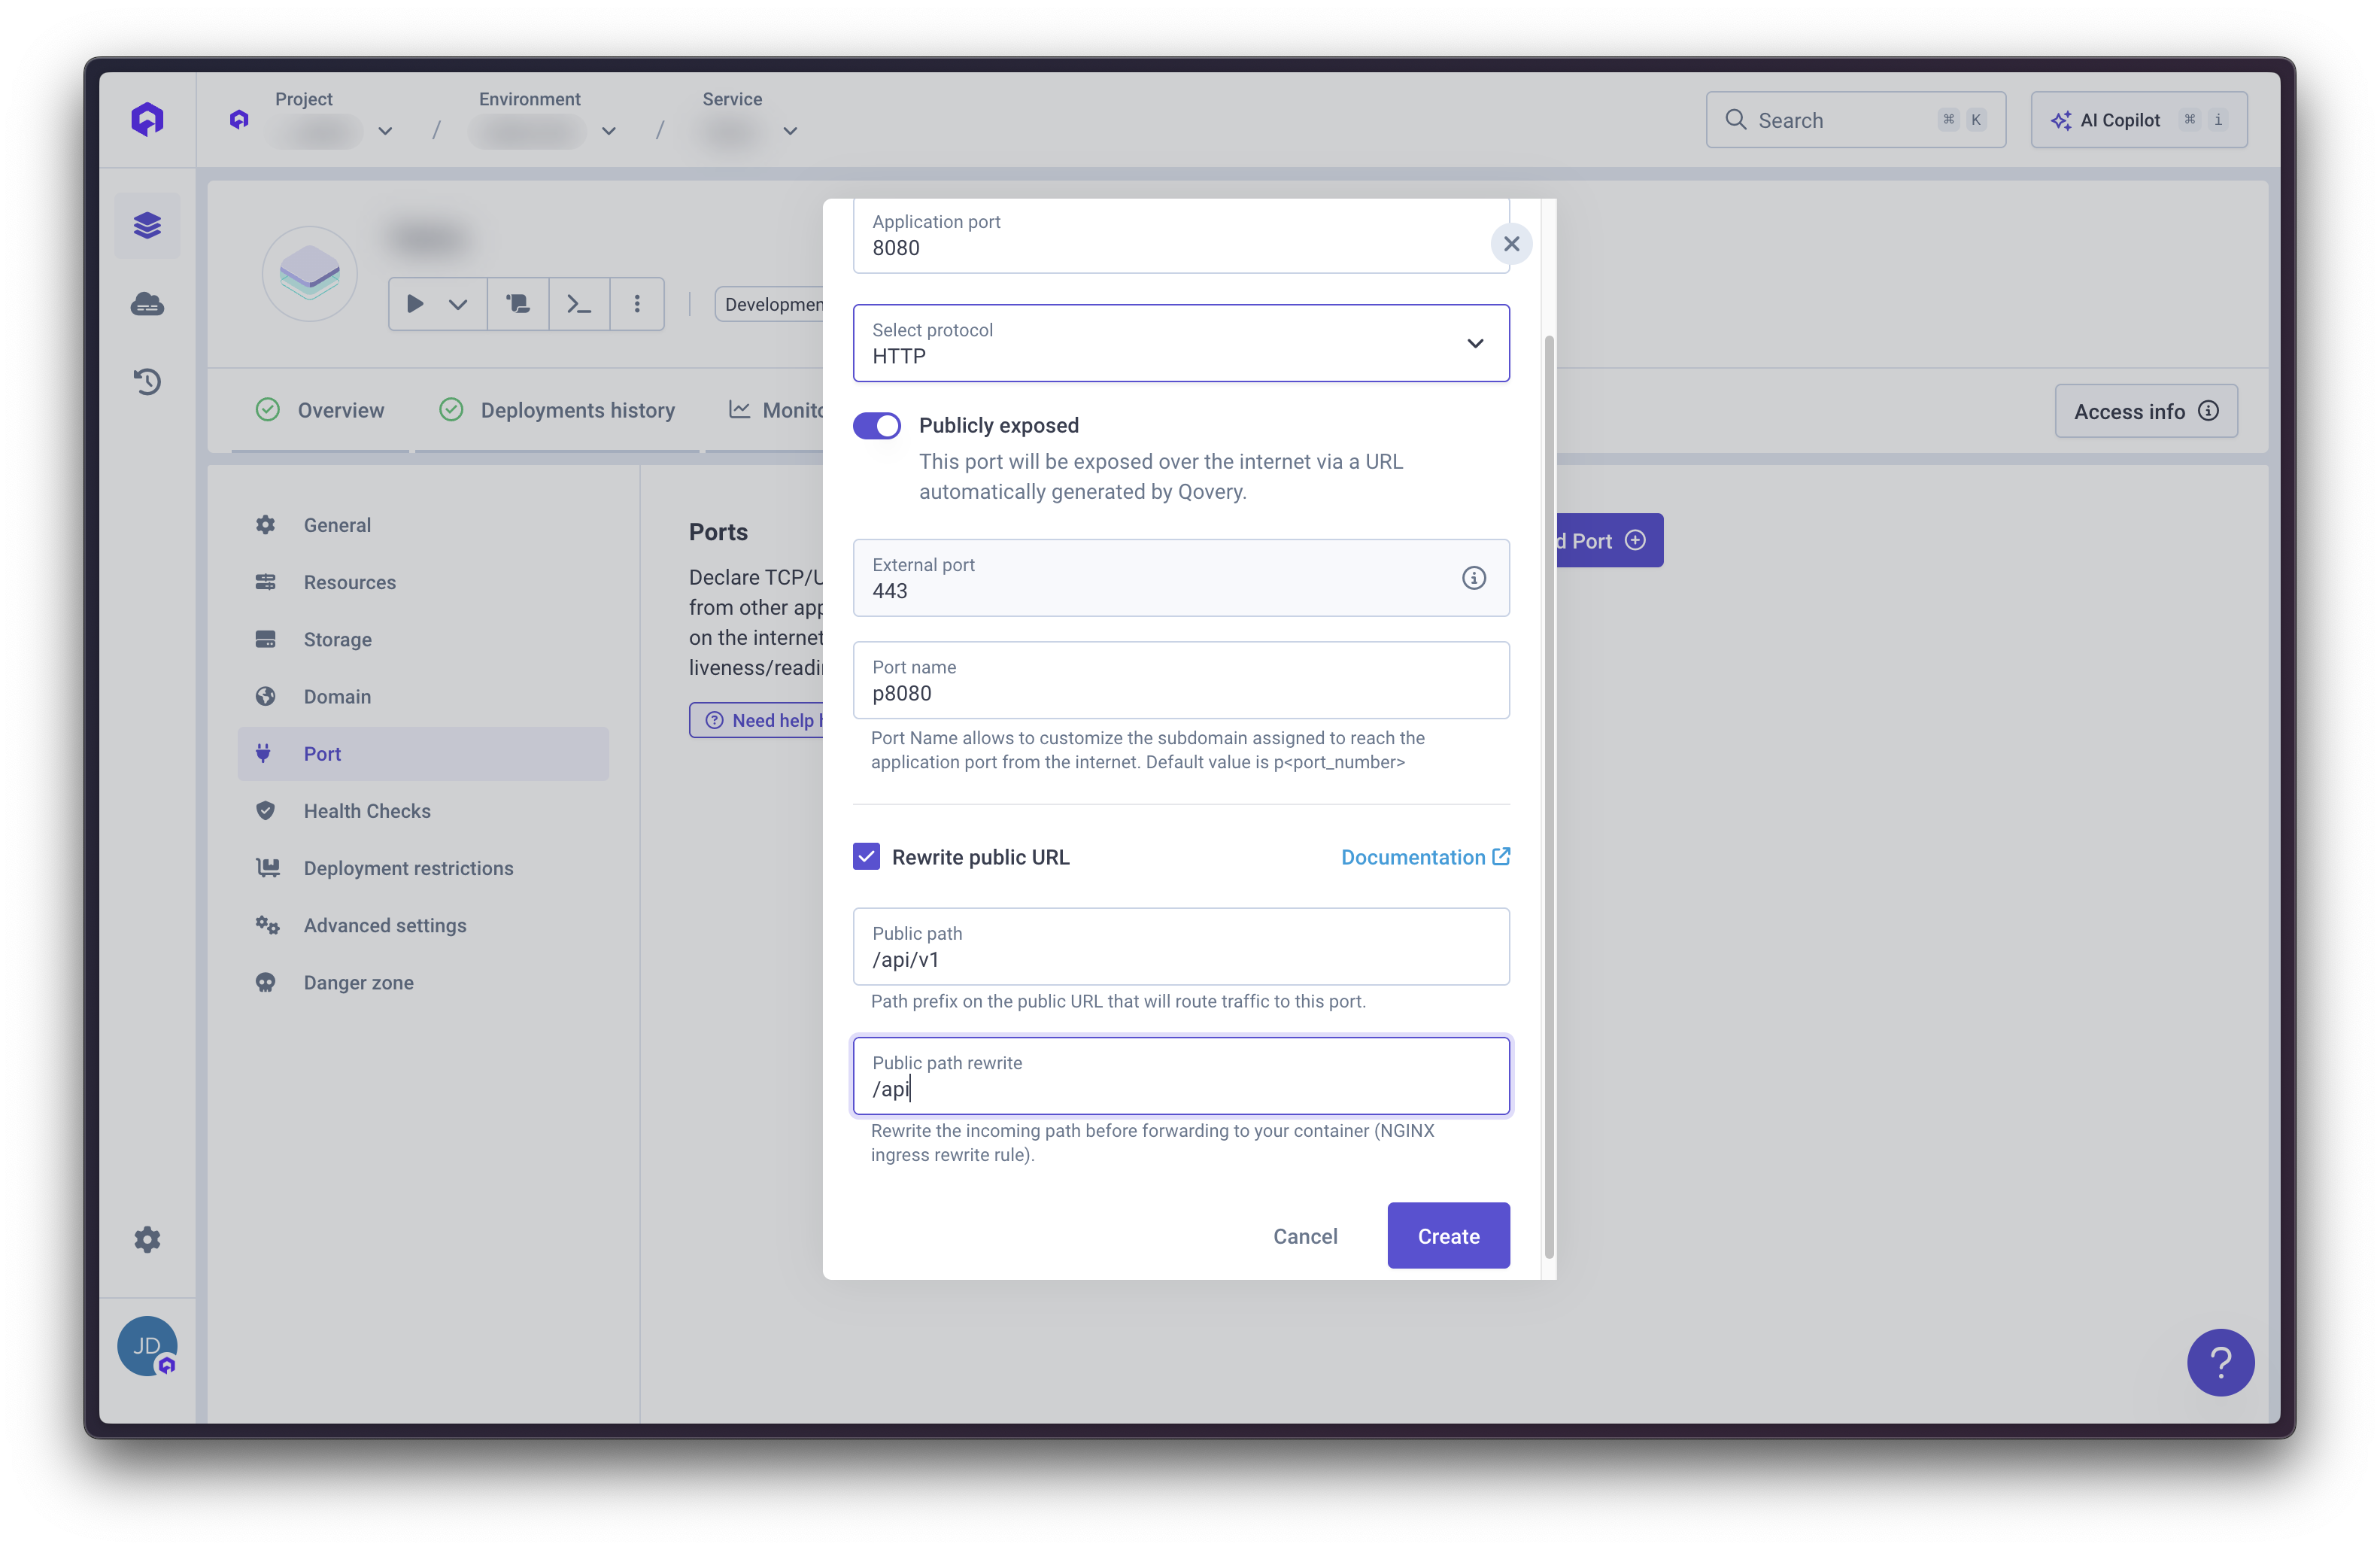
- Application port: this is the port exposed internally by your application for the other services.
- Protocol: you can select the protocol used by your application : HTTP (for both standard HTTP or websocket communications), gRPC, TCP, UDP.
- Publicly exposed: it allows you to expose over the public network your service. A public domain will be assigned to your application during the deployment (see Connecting from the internet section)
- If Publicly Exposed is selected:
- External port: it is the port that can be used to access this service over the internet (when exposed publicly). Note that for HTTP and gRPC the port is set by default to 443.
- Port Name: it is the name assigned to the port. When multiple ports are exposed publicly, its value is used to route the traffic to the right port based on the called subdomain (which will contain the port name value). Since each port is exposed on the port 443, having a different subdomain is the only way to have multiple ports exposed over the internet. If not set, the default value is
p<portNumber>(see Qovery Provided Domain section for more information) - Rewrite URL (optional): allows you to rewrite incoming request URLs before routing them to your service. This provides routing flexibility without requiring code changes. For example, requests from
/v1/apican be rewritten to/api, enabling you to modify public-facing URLs while keeping your backend paths unchanged.
Important Informations
- Most of the Kubernetes Health Checks]docs.using-qovery.configuration.service-health-checks are based on the port declared in this section. Make sure you declare the right port and that you configure the health checks properly.
- Connections on public ports are automatically closed after 60 seconds. If you want to implement long living connection (like for websockets) please make sure to use the rigth ingress timeouts in the advanced settings section
- Exposing publicly TCP/UDP ports requires to create a dedicated load balancer and it takes a few minutes before having it ready (~15 minutes). Note also that this has a direct impact on your cloud provider bill.
- You can configure your application to use the PORT environment variable by adding the PORT on your application env variables page.
- A Note on Listening IPs: It's best for your application to listen on
0.0.0.0:$PORT. While most things work with127.0.0.1andlocalhost, some do not (NodeJS for example)
Health Checks
To know more about how to configure your Liveness and Readiness probes, have a look at the health-checks section
Deployment Restrictions
This section allows to specify which changes on your repository should trigger an auto-deploy (if enabled). To know more about how to configure your Deployment Restrictions, have a look at the deployment restrictions section.
Connecting from the internet
Your application can be reached from the internet by publicly exposing at least one of its ports (See the Ports section to know more). Once this is done, Qovery will generate and assign a domain to your application (See this section to know more). You can customize the domain assigned to your application via the Domain section in the settings (see this section to know more).
Qovery provided domains
For each port publicly exposed, a domain is automatically assigned by Qovery to your application. Qovery will manage for you the networking and the TLS configuration for these domains.
Example: p80-zdf72de72-z709e1a88-gtw.za8ad0657.bool.sh or <service_name>-p80-zdf72de72-z709e1a88-gtw.za8ad0657.bool.sh for helm services.
Note:
- each service deployed on the same cluster will have the same root domain assigned (example:
za8ad0657.bool.sh) - the first characters of the domain (before the
-) is based on the portName given to the port associated with this domain (See the port section) - a default domain (without the portName) is assigned to the
default port(See the port section). Examplezdf72de72-z709e1a88-gtw.za8ad0657.bool.sh
Special Case - Preview Environment
For each port exposed publicly, an additional domain will be created with the following pattern portName-prId-srvName-envSourceName.cluster_domain:
- portName: is the port name, as explained above
- prID: is the id of the PR that has generated the preview environment
- srvName: is the name of the service
- envSourceName: is the name of the blueprint environment that has created the current preview environment
domain example: p80-123-frontend-blueprint.za8ad0657.bool.sh
Custom domains
If you prefer to assign your own domain to the application, you can customize it from the "Domain" section within the application settings.
You can customize the domain of your application in different ways, depending on what you want to achieve:
- You want to use your own domain for your application
- You want to modify the subdomain assigned to your application by Qovery (i.e. change
p80-zdf72de72-z709e1a88-gtw.za8ad0657.bool.shintomy-app-domain.za8ad0657.bool.sh). See this section to know more about these domains.
In both cases, you can assign the new custom domain by pressing the Add Domain button.
For each custom domain, a green checkmark will appear if the domain is correctly configured. You can perform another check by clicking on the checkmark. If you're behind a CDN, we will only check if your custom domain resolves to an IP address.
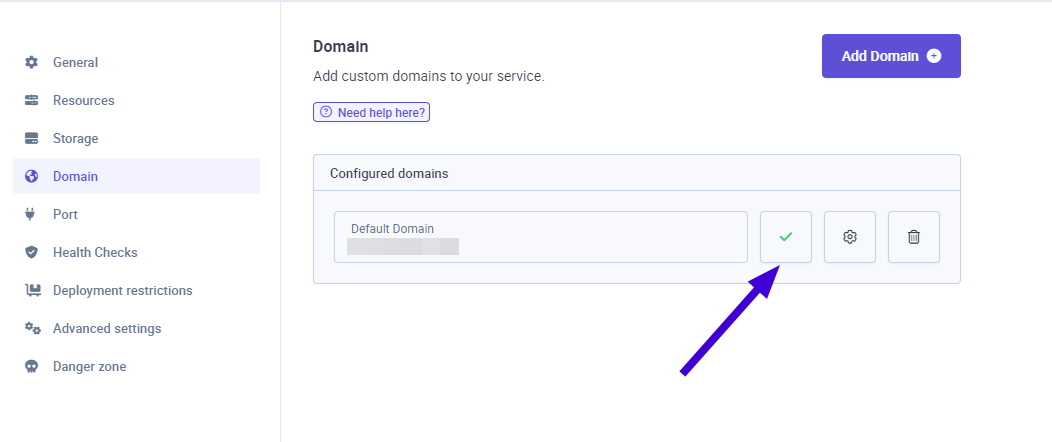
If there's an issue with a domain, a global error message will be displayed, and you can view the error details by hovering over the red cross. After correcting your configuration, you can perform another check by clicking on the red cross.

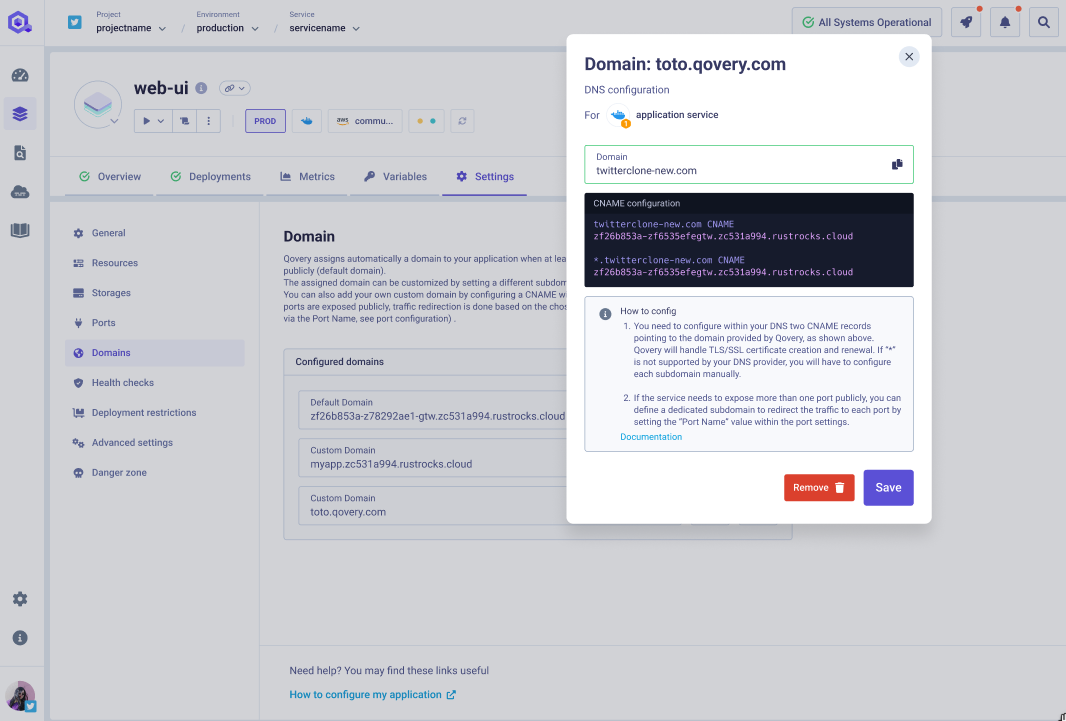
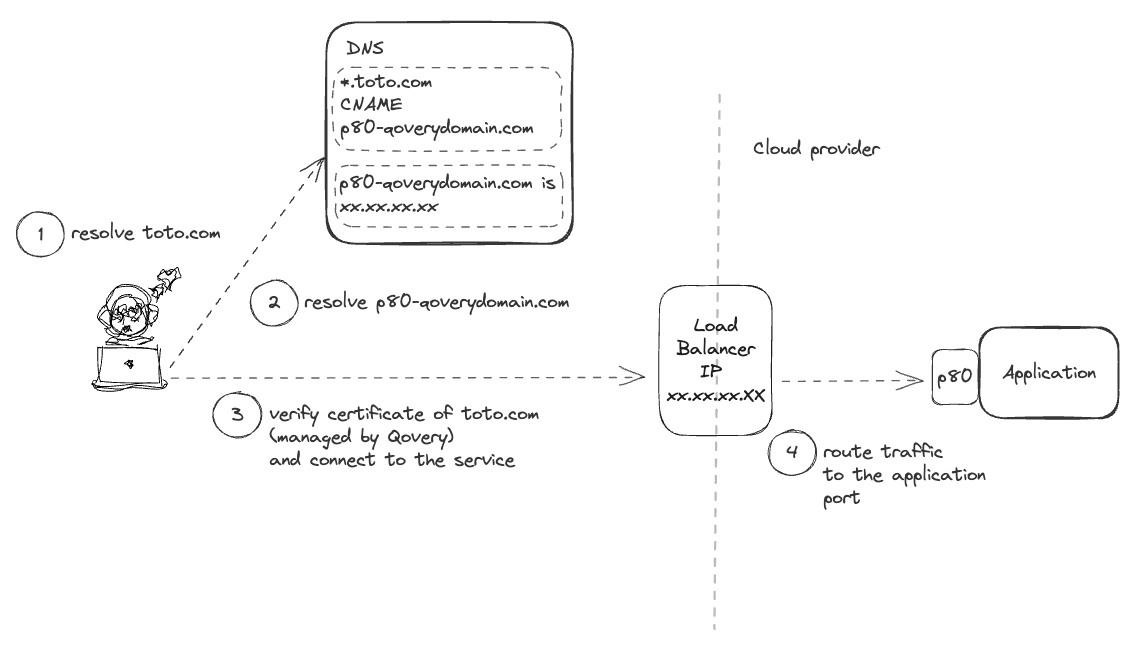
Configuring your own domain
Once the domain is added within the Qovery console (Example: mydomain.com), you need to configure within your DNS two CNAME records pointing to the domain provided by Qovery, as shown in the UI (example: mydomain.com CNAME za7cc1b71-z4b8474b3-gtw.zc531a994.rustrocks.cloud and *.mydomain.com CNAME za7cc1b71-z4b8474b3-gtw.zc531a994.rustrocks.cloud).
Having a wildcard domain entry (example: *.mydomain.com) configured on your DNS will avoid you to modify the Qovery setup every time you want to add a new subdomain. If wildcard is not supported by your DNS provider, you will have to configure each subdomain manually.
If a service needs to expose more than one port publicly, you can define a dedicated subdomain to redirect the traffic on the right port by setting the “Port Name” value within the port settings.
After re-deploying the service, Qovery will automatically handle the TLS/SSL certificate creation and renewal for the configured domain.
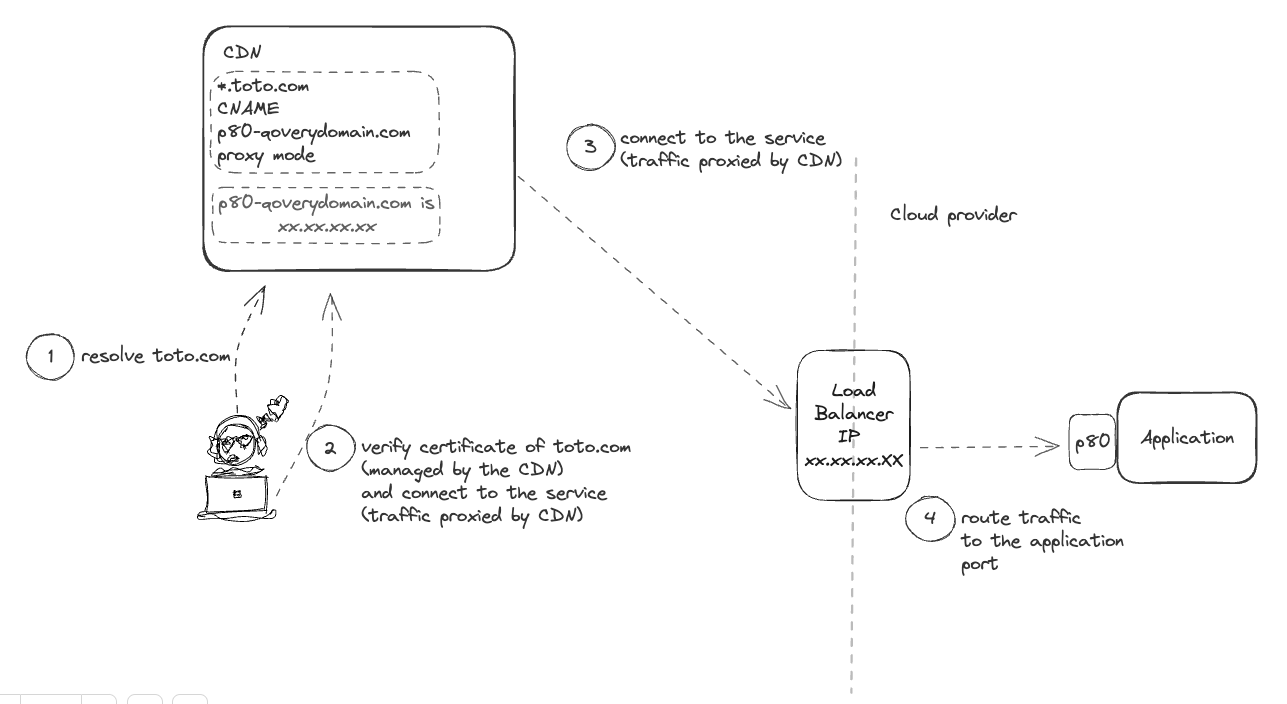
Special case - domain behind a CDN
If your service is behind a CDN using a proxy mode (i.e. the traffic is routed through the CDN to Qovery), make sure to enable the option Domain behind a CDN and disable the option "Generate certificate" on the domain setup. Since the certificate of your domain is directly managed by the CDN, Qovery won't be able to do that for you and it will raise warnings on your application status.
If you are using Cloudflare to manage your CDN, we can also manage automatically your custom domain configuration via a wildcard domain setup for the whole cluster. Check our documentation here
Change the auto assigned sub-domain
You can specify a different sub-domain for your application as long as it belongs to the assigned cluster domain (see Qovery provided domains). Example:
- your current domain is zdf72de71-z709e1a85-gtw.za8ad0659.bool.sh (so your assigned cluster domain is
za8ad0659.bool.sh) - you can enter a new custom domain
myfrontend.za8ad0659.bool.sh(since it is a subdomain of the cluster domain)
The application will now be accessible from both the default and the new custom domain.
Connecting to a database
To know how to access your database from your application, have a look at the database section.
Connecting to another application
To know how to access your database from your application, have a look at the database section.
Environment Variable
To learn how to set up environment variables in your projects and applications, navigate to configuring Environment Variables section.
Secrets
To learn how to set up secrets in your projects and applications, navigate to configuring Secrets section.
Logs
To learn how to display your application logs, navigate to logs section
SSH
To connect to your application via SSH, please use the via the Qovery SSH command available on our CLI.
Clone
You can create a clone of the service via the clone feature. A new service with the same configuration (see below for exceptions) will be created into the target environment.
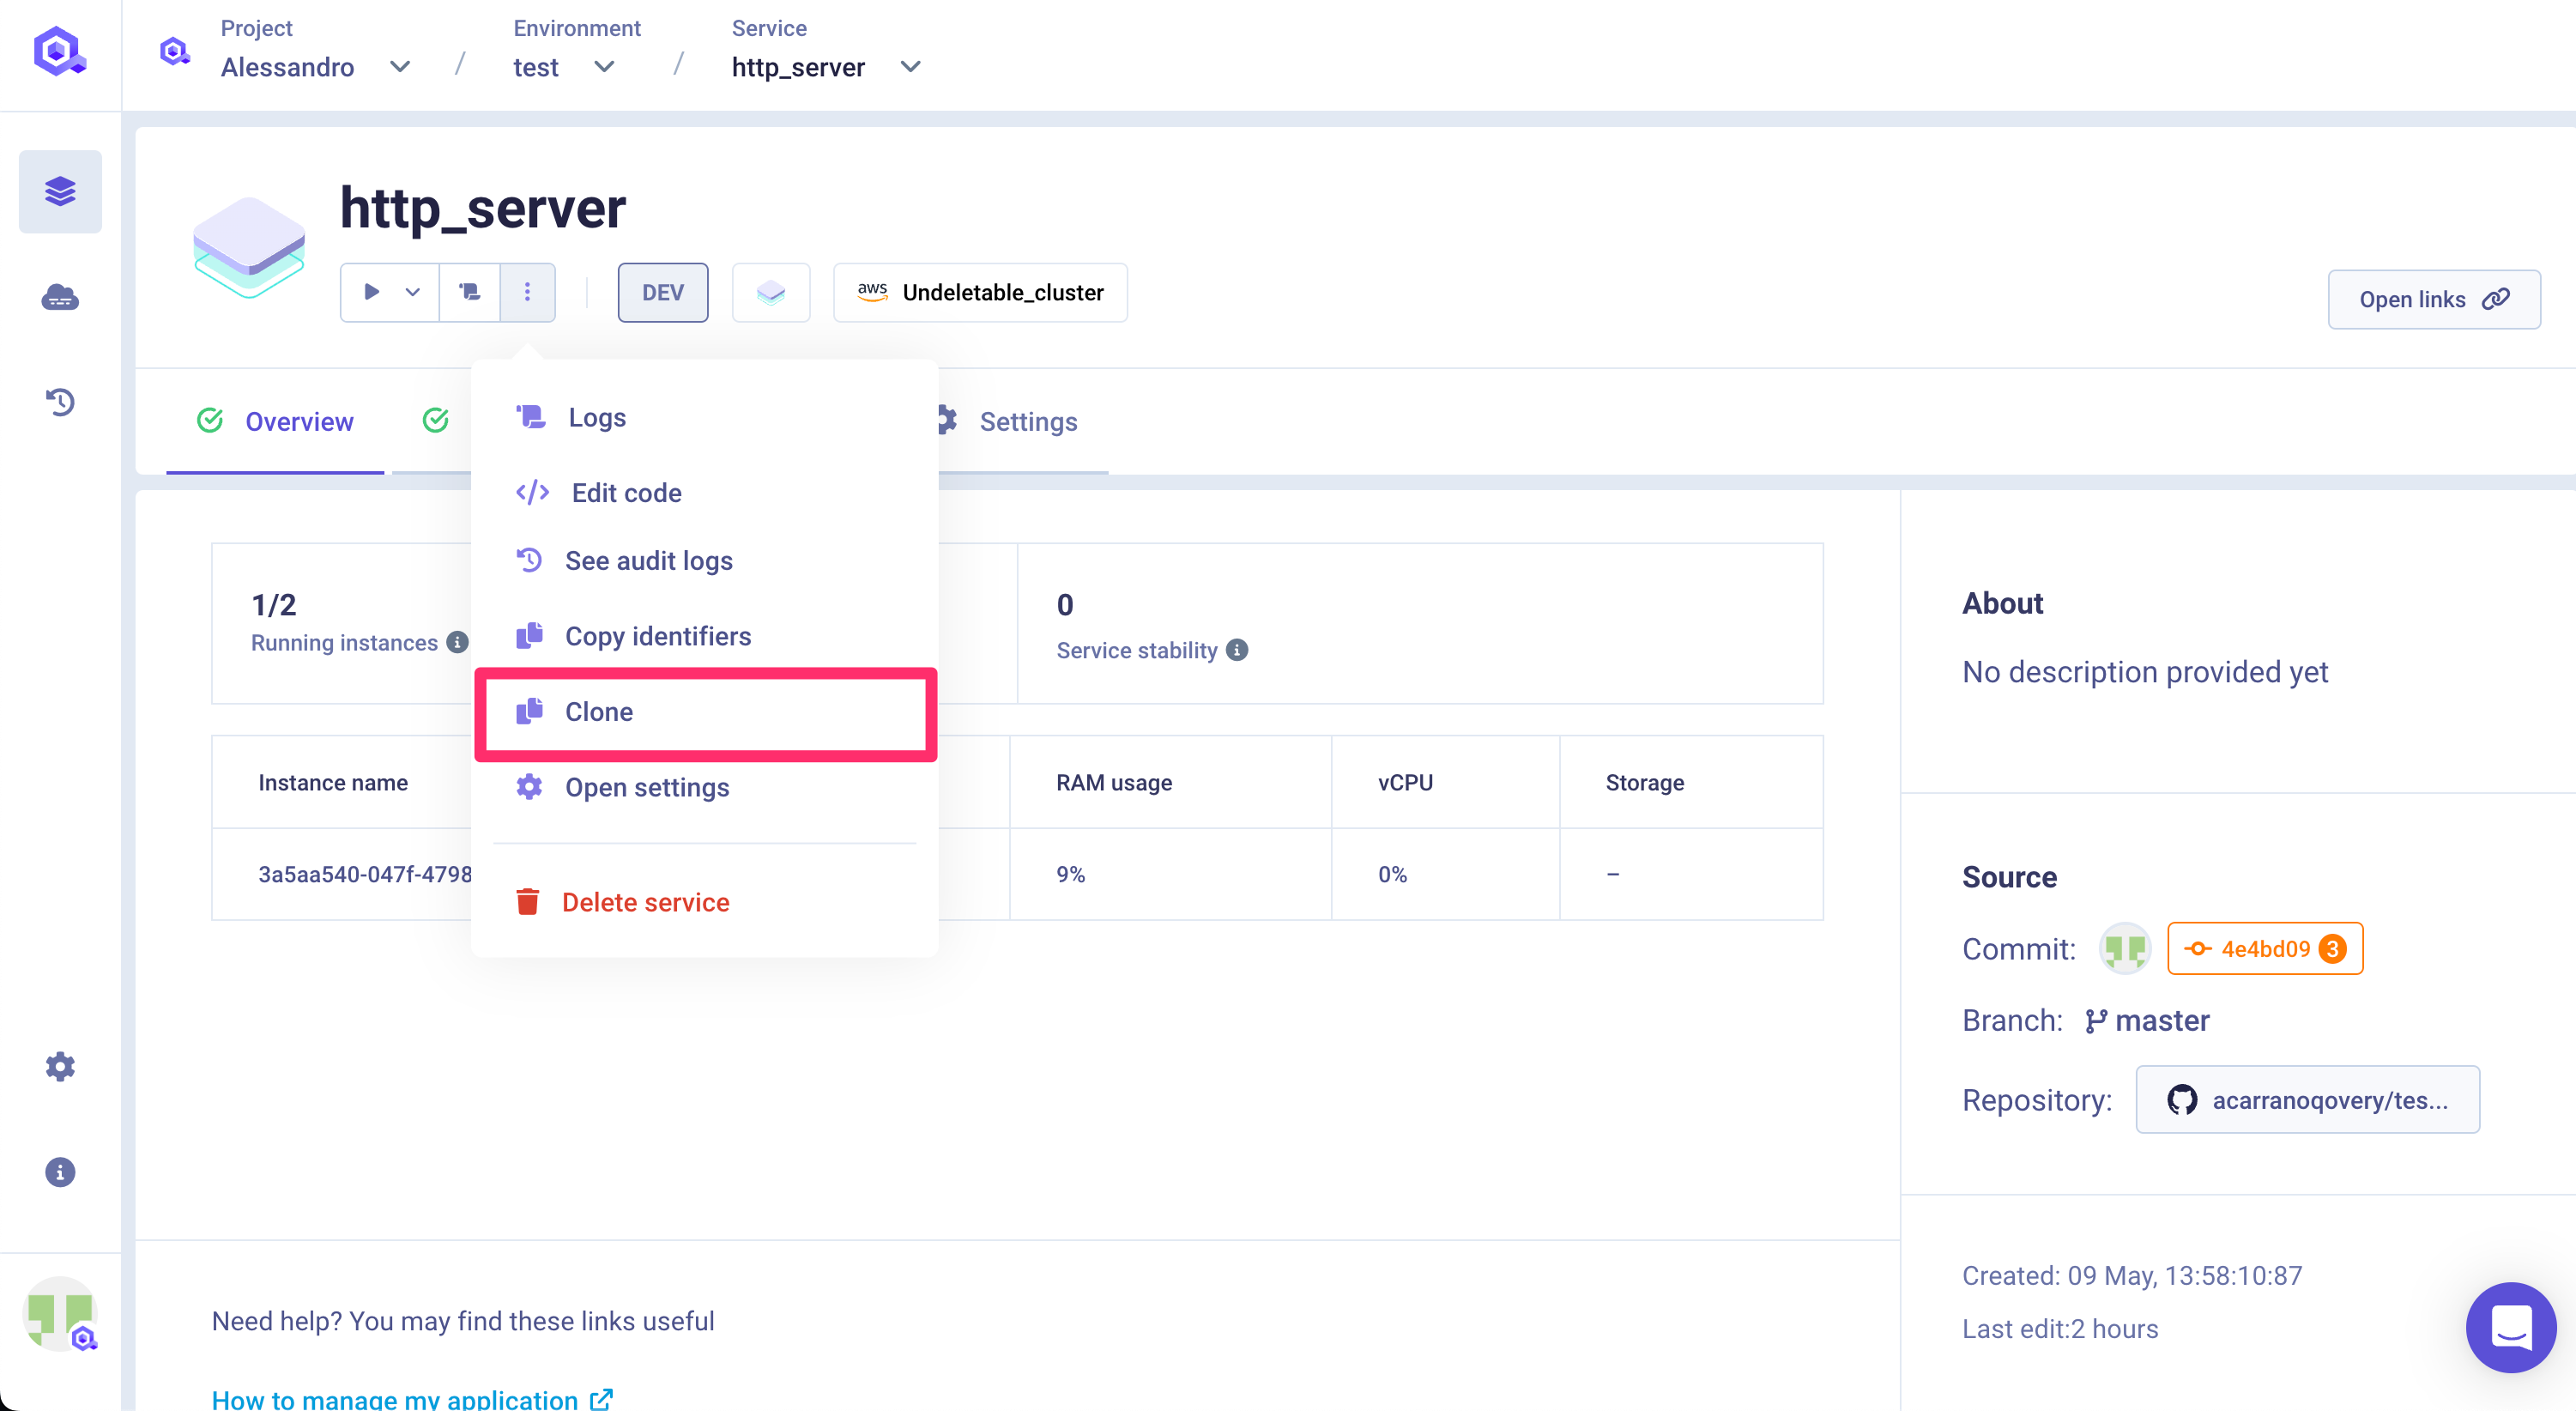
The target environment can be the same as the current environment or even another one in a completely different project.
Important information
Not every configuration parameter will be copied within the new service for consistency reasons. The configuration is fully or partially copied depending on the target environment:
- same environment:
- custom domain: this setup is not copied into the new service (to avoid collision)
- another environment:
- custom domain: this setup is not copied into the new service (to avoid collision)
- environment variable: aliases defined on environment variables are not copied (since the aliased env var might not exist)
- deployment pipeline: stage setup is not copied (since the target stage might not exist)
- number of instances: if the target environment runs on a Qovery EC2 cluster, the max number of instances is set to 1 (Qovery EC2 constraint)
Please check the configuration of the new service before deploying it.
Advanced Settings
You can further customize the service behaviour via the service advanced settings. Check this documentation to know more.
Delete an Application
Choose your application
In the application overview, click on the
3 dotsbutton and remove the application.