Helm
Before you begin, this documentation assumes the following:
You have created an Environment.
A helm is one of the service types that can be deployed within an Environment. Via the helm service you can deploy any helm chart from a git repository or helm repository directly on the kubernetes cluster.
Qovery allows you to create and deploy helms from two different sources: Git Repository or Helm Repository
Deploying from a Git Repository
In this configuration, Qovery will pull the chart from the chosen repository and install it on your kubernetes cluster.
Deploying from a Helm Repository
In this configuration, Qovery will pull the chosen helm repository a chart and install it on your kubernetes cluster.
To improve security and avoid deploying charts from non-authorized repositories, we have decided to restrict the list of Helm Repositories you can use during the setup process. Only an administrator with the right permissions can manage it from the Helm Repository Management page
Create a Helm
Go into the chosen environment and press the "New Service" button and then the "Create helm" button
Select the following fields:
- Helm chart Name: give a name to your helm
- Description (Optional): write a text to describe your helm service
- Helm chart Source: Chose between Git Repository or Helm Repository, depending on the source location of your application
If you want to deploy a helm from a Git Repository you will have to select:
- Git Repository: Select the git provider and the git repository hosting your code (it can be hosted on GitHub, GitLab or Bitbucket).
- Branch: Select branch that Qovery should use to deploy your helm
- Root Helm Path: base folder in which the helm chart resides in your repository
If you want to deploy a helm from a Helm Repository you will have to select:
Helm repository: select the helm repository storing the helm chart. Note: only pre-configured registry are available in this list, check the Helm Repository Management page for more information.
Chart name: the name of the helm to be deployed with this application (example: jenkins)
Chart version: the version of the chart to be deployed with this application (example: 1.0.0).
Helm arguments: specify the helm arguments to be used during the helm install/upgrade.
Helm timeout: specify the value to wait for Kubernetes commands to complete. This defaults to 5mins.
Allow cluster-wide resources: Allow this chart to deploy resources outside of the environment namespace. You must have the full-access permissions on the cluster, the right is present by default in
Admin,DevopsandOwnerroles. Example: if you want to create a new CRD or a new ClusterRole, check this flag.
Auto Deploy
Available only if you have selected a git repository as helm source. See the Deploying with auto-deploy feature section.
By default, the
values.yamlnext to yourchart.yamlis used to configure your helm chart but you can create an override in the next two sections.In the override as file section, define the location of the file containing the override you want to define for the values of this chart.
Git Repository
If you want to override it from another already existing values file from a Git Repository you will have to select:
- Git Repository: Select the git provider and git repository hosting your code (it can be hosted on GitHub, GitLab or Bitbucket).
- Branch: Select branch that Qovery should use to deploy your helm
- Overrides path: the path of the values files (example: ci/values_ci.yaml). You can specify multiple paths by separating them with a semi-colon.
Raw YAML
If you want to override it with a raw yaml you will have to click on
Create override. A new editor modal will be opened, to let you write your yaml override. The default values.yaml content will be displayed on the right to help you to respect the structure.if you want to specify one by one your overrides or define additional overrides on top of the one available in your override file, you can pass them as arguments. These will be passed to the helm command via the
--set,--set-stringor--set-jsonarguments.Add a new variable by declaring:
- Variable: the variable name
- Value type:
- Select
Genericto pass configuration from the command line - Select
Stringif you want to pass a string type (and avoid weird numeric conversions like 021341 interpreted as a number and thus the 0 is removed) - Select
Jsonto set json values (scalars/objects/arrays) from the command line
- Select
- Value
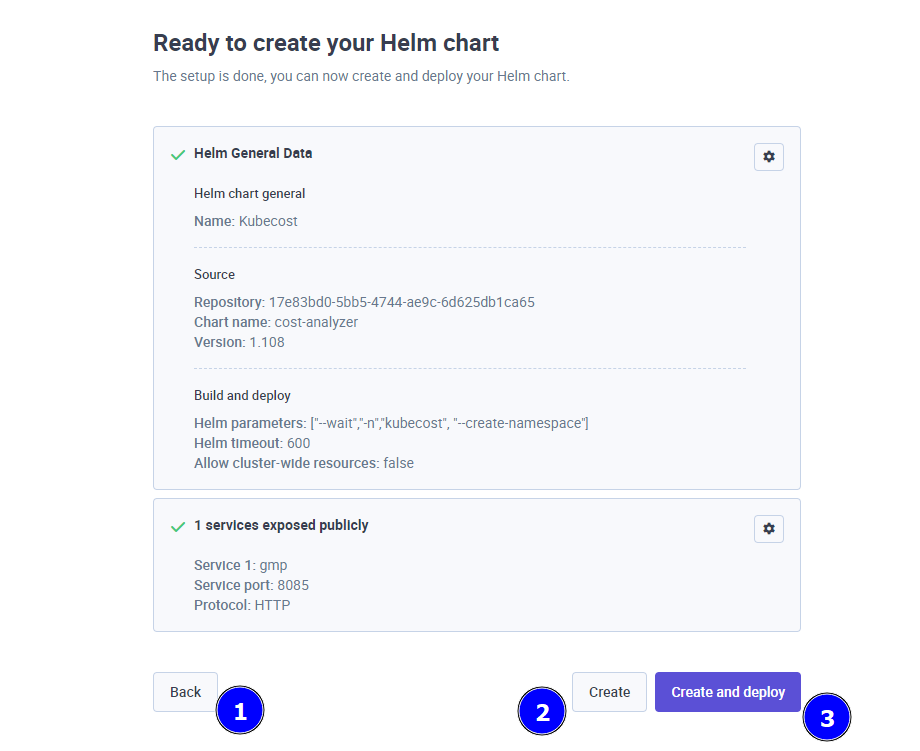
You will find a recap of your helm setup and you can now decide to:
- Go back to one of the previous steps and change your helm settings (1)
- Create your helm without deploying it (2)
- Create and deploy your helm (3)
Deployment Management
Have a look at the Deployment Management section for more information.
Configuration
Once created, you can access the configuration of a helm at any time via the Settings tab available on the helm section
You can find below the description of each of the tabs available in this section
General
General settings section allows you to set up the name and the source of your helm (git repository or helm repository) .
Git Repository
If your heml is from a git repository, within this section you can:
- Modify the git provider where your code is stored (it can be hosted on GitHub, GitLab or Bitbucket).
- Modify the branch that Qovery should use for deploying your application
- Modify
Root Helm Path- base folder in which the helm chart resides in your repository
Helm Repository
If your helm is deployed from a helm repository, within this section you can modify:
- Helm repository: select the helm repository storing the helm chart. You can add a new container registry by clicking on
New helm repository. - Chart name: the name of the helm to be deployed with this application (example: jenkins)
- Chart version: the version of the chart to be deployed with this application (example: 1.0.0).
Arguments
For both kind of helm source, within this section yoiu can modify:
- Helm arguments: specify the helm arguments to be used during the helm install/upgrade.
- Helm timeout: specify the value to wait for Kubernetes commands to complete. This defaults to 5mins.
Auto Deploy
See the Deploying with auto-deploy feature section.
Values
Within this section you can modify the values override defined within the creation flow.
Override as file
Define the location of the file containing the override you want to define for the values of this chart.
Select the source of your override:
Git Repository If you want to override it from another already existing values file from a Git Repository you will have to select:
- Git Repository: Select the git provider and git repository hosting your code (it can be hosted on GitHub, GitLab or Bitbucket).
- Branch: Select branch that Qovery should use to deploy your helm
- Overrides path: the path of the values files (example: ci/values_ci.yaml). You can specify multiple paths by separating them with a semi-colon.
Raw YAML
If you want to override it with a raw yaml you will have to click on Create override. A new editor modal will be opened, to let you write your yaml override. The default values.yaml content will be displayed on the right to help you to respect the structure.
On both file types you can use your environment variables in your chart. Check the section below.
Override as arguments
if you want to specify one by one your overrides or define additional overrides on top of the one available in your override file, you can pass them as arguments. These will be passed to the helm command via the --set, --set-string or --set-json arguments.
Add a new variable by declaring:
- Override type: select the type of your variable. For more information, have a look at the Helm documentation
- Variable: the variable name
- Value
You can use your environment variables in your chart. Check the section below.
Using the environment variables in your chart
Qovery allows you to use the following macros within your override file. These macros will be automatically replaced by Qovery during the deployment phase, allowing you to access additional functionalities.
Access to the Qovery environment variables
Macro: qovery.env.<ENV_VAR_NAME>
It allows you to access the value of an environment variable or secret stored within Qovery. This is helpful when your deployed helm chart needs to access a secret or an environment variable available in Qovery.
Example:
On Qovery we have created a database and created two aliases for the database url (DB_URL) and, the database password (DB_PASSWORD). Here an example on how the helm chart can access these environment variables and let your service point to the right database:
postgres:url: qovery.env.DB_URLpassword: qovery.env.DB_PASSWORD
Ports
Within this section you can define the port exposed publicly. You can edit the existing ports or declare new ones by specifying:
- Service name: this is the kubernetes service name in your helm chart
- Namespace (only if Allow cluster-wide resources was enabled): this is the kubernetes namespace used by your helm chart to deploy the pods behind the chosen service
- Service port: this is the port exposed internally by your service for the other services
- Protocol: you can select the protocol used by your service. Today Qovery supports the following protocols:
- HTTPS (Select this protocol if you need to run Websockets)
- gRPC
- External port: it is the port that can be used to access this service over the internet (when exposed publicly). Note that for HTTP and gRPC the port is set by default to 443.
- Port Name: it is the name assigned to the port. When multiple ports are exposed publicly, its value is used to route the traffic to the right port based on the called subdomain (which will contain the port name value). Since each port is exposed on the port 443, having a different subdomain is the only way to have multiple ports exposed over the internet. If not set, the default value is
p<portNumber>(see Qovery Provided Domain section for more information)
Important Informations
- Connections on public ports are automatically closed after 60 seconds. If you want to implement long living connection (like for websockets) please make sure to use the rigth ingress timeouts in the advanced settings section
Domains
Within this section you can customize the domain used to reach your helm services.
You can customize the domain of your helm services in different ways, depending on what you want to achieve:
- You want to use your own domain for your helm services
- You want to modify the subdomain assigned to your helm services by Qovery (i.e. change
p80-zdf72de72-z709e1a88-gtw.za8ad0657.bool.shintomy-app-domain.za8ad0657.bool.sh).
In both cases, you can assign the new custom domain to your helm services press the Add Domain button.
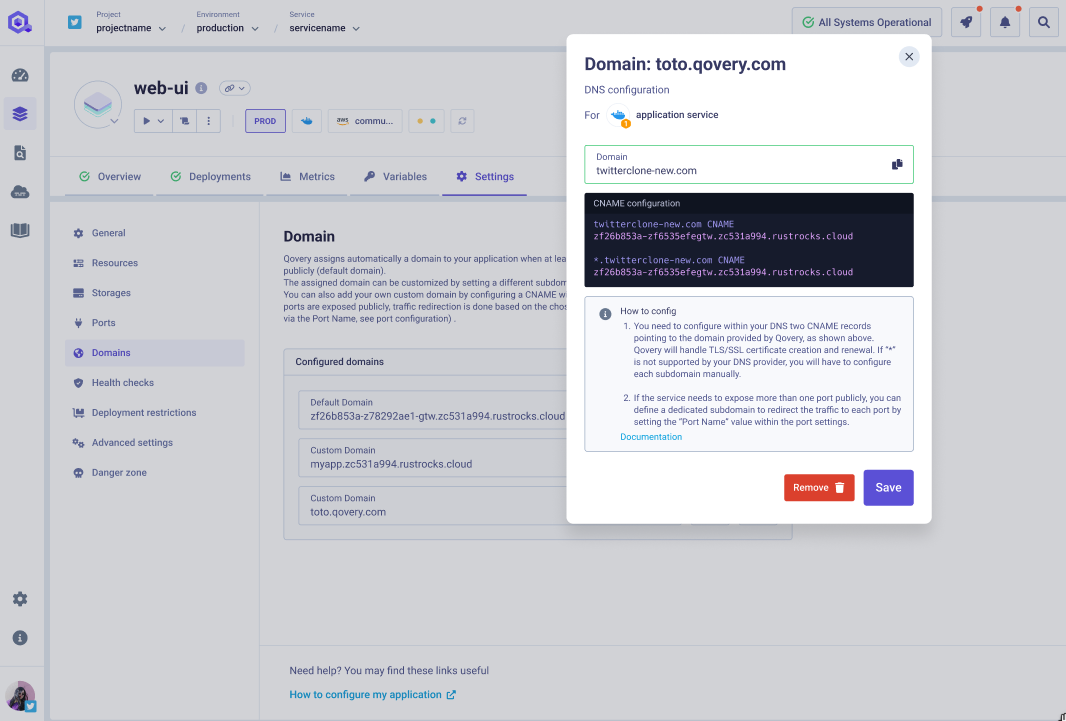
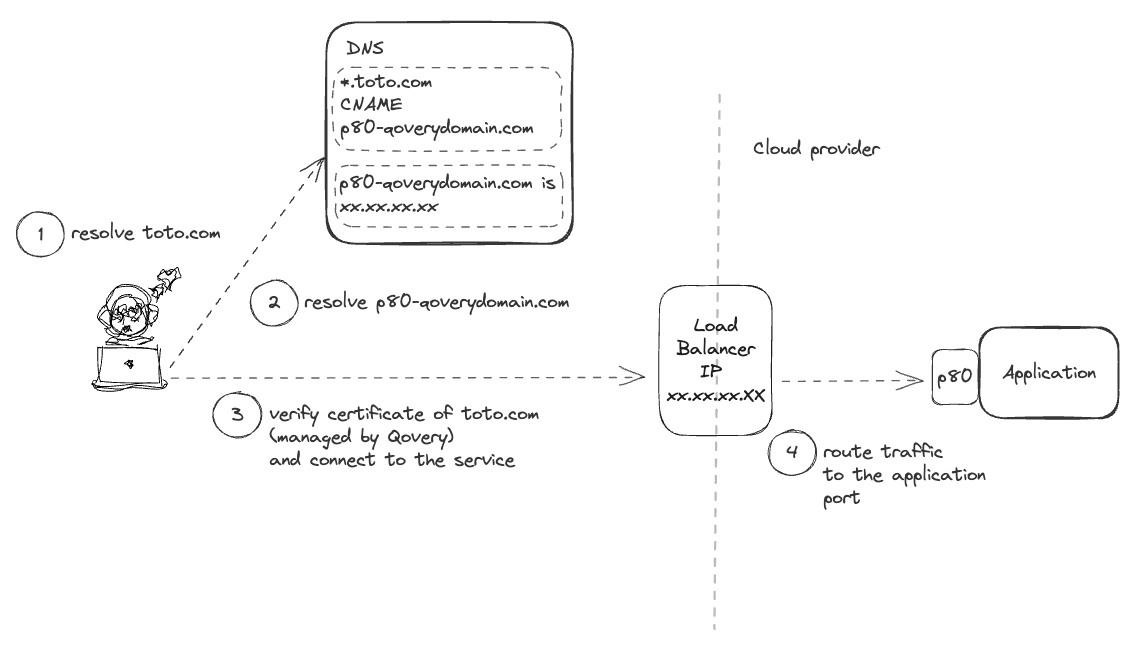
Configuring your own domain
Once the domain is added within the Qovery console (Example: mydomain.com), you need to configure within your DNS two CNAME records pointing to the domain provided by Qovery, as shown in the UI (example: mydomain.com CNAME za7cc1b71-z4b8474b3-gtw.zc531a994.rustrocks.cloud and *.mydomain.com CNAME za7cc1b71-z4b8474b3-gtw.zc531a994.rustrocks.cloud).
Having a wildcard domain (example: *.mydomain.com) configured on your DNS will avoid you to modify the Qovery setup every time you want to add a new subdomain. If wildcard is not supported by your DNS provider, you will have to configure each subdomain manually.
If the service needs to expose more than one port publicly, you can define a dedicated subdomain to redirect the traffic on the right port by setting the “Port Name” value within the port settings.
From this point, Qovery will automatically handle the TLS/SSL certificate creation and renewal for the configured domain.
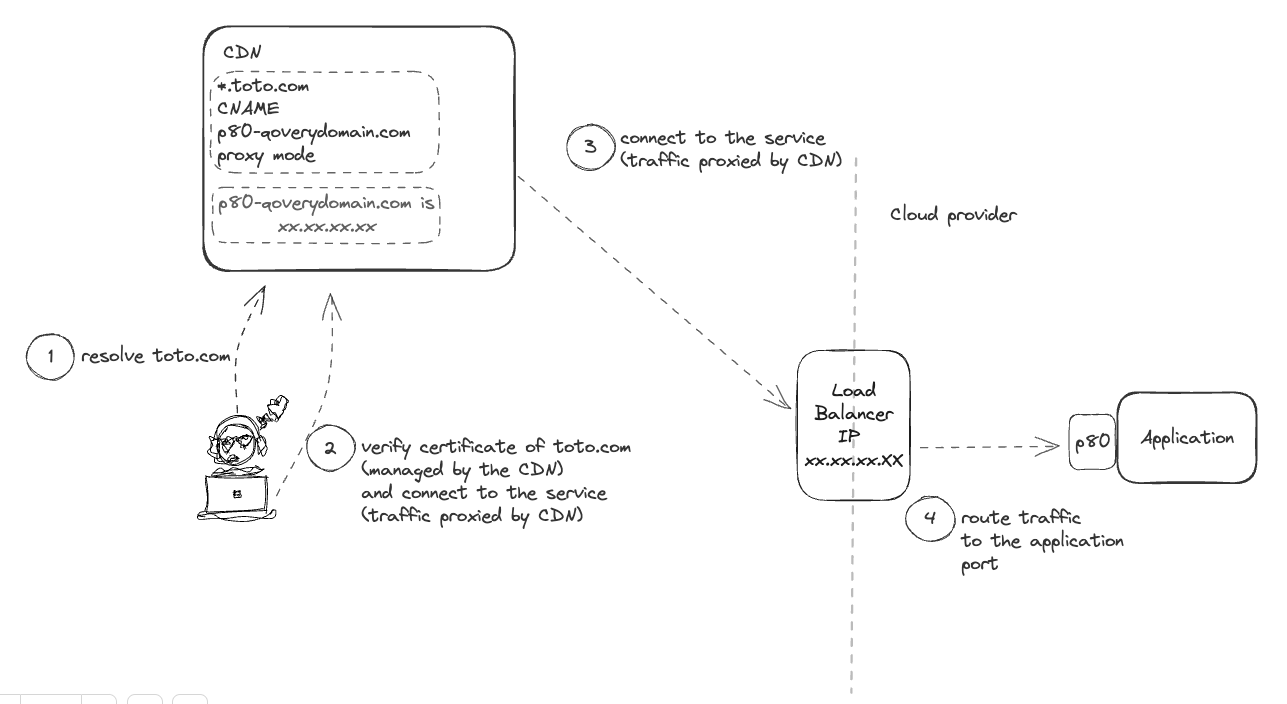
Special case - CDN in proxy mode
If your service is behind a CDN using a proxy mode (i.e. the traffic is routed through the CDN to Qovery), make sure to disable the option "Generate certificate" on the domain setup. Since the certificate of your domain is directly managed by the CDN, Qovery won't be able to do that for you and it will raise warnings on your application status.
Change the auto assigned sub-domain
You can specify a different sub-domain for your helm services as long as it belongs to the assigned cluster domain (see Qovery provided domains). Example:
- your current domain is zdf72de71-z709e1a85-gtw.za8ad0659.bool.sh (so your assigned cluster domain is
za8ad0659.bool.sh) - you can enter a new custom domain
myfrontend.za8ad0659.bool.sh(since it is a subdomain of the cluster domain)
The helm services will now be accessible from both the default and the new custom domain.
Connecting from the internet
Your helm services can be reached from the internet by publicly exposing at least one of its ports (See the Ports section to know more). Once this is done, Qovery will generate for you a domain to reach your application from the internet. You can also customize the domain assigned to your application and manage by yourself this assignment via the Domain section.
Qovery provided domains
For each port publicly exposed, a domain is automatically assigned by Qovery to your helm services. Qovery will manage for you the networking and the TLS configuration for these domains.
Example: p80-zdf72de72-z709e1a88-gtw.za8ad0657.bool.sh or <service_name>-p80-zdf72de72-z709e1a88-gtw.za8ad0657.bool.sh for helm services.
Note:
- each service deployed on the same cluster will have the same root domain assigned (example:
za8ad0657.bool.sh) - the first characters of the domain (before the
-) is based on the portName given to the port associated with this domain (See the port section) - a default domain (without the portName) is assigned to the
default port(See the port section). Examplezdf72de72-z709e1a88-gtw.za8ad0657.bool.sh
Special Case - Preview Environment
For each port exposed publicly, an additional domain will be created with the following pattern portName-prId-srvName-envSourceName.cluster_domain:
- portName: is the port name, as explained above
- prID: is the id of the PR that has generated the preview environment
- srvName: is the name of the service
- envSourceName: is the name of the blueprint environment that has created the current preview environment
domain example: p80-123-frontend-blueprint.za8ad0657.bool.sh
Custom domains
If you prefer to assign your own domain to the helm services, have a look at the Domain section to know more.
Logs
To learn how to display your helm logs, navigate to logs section
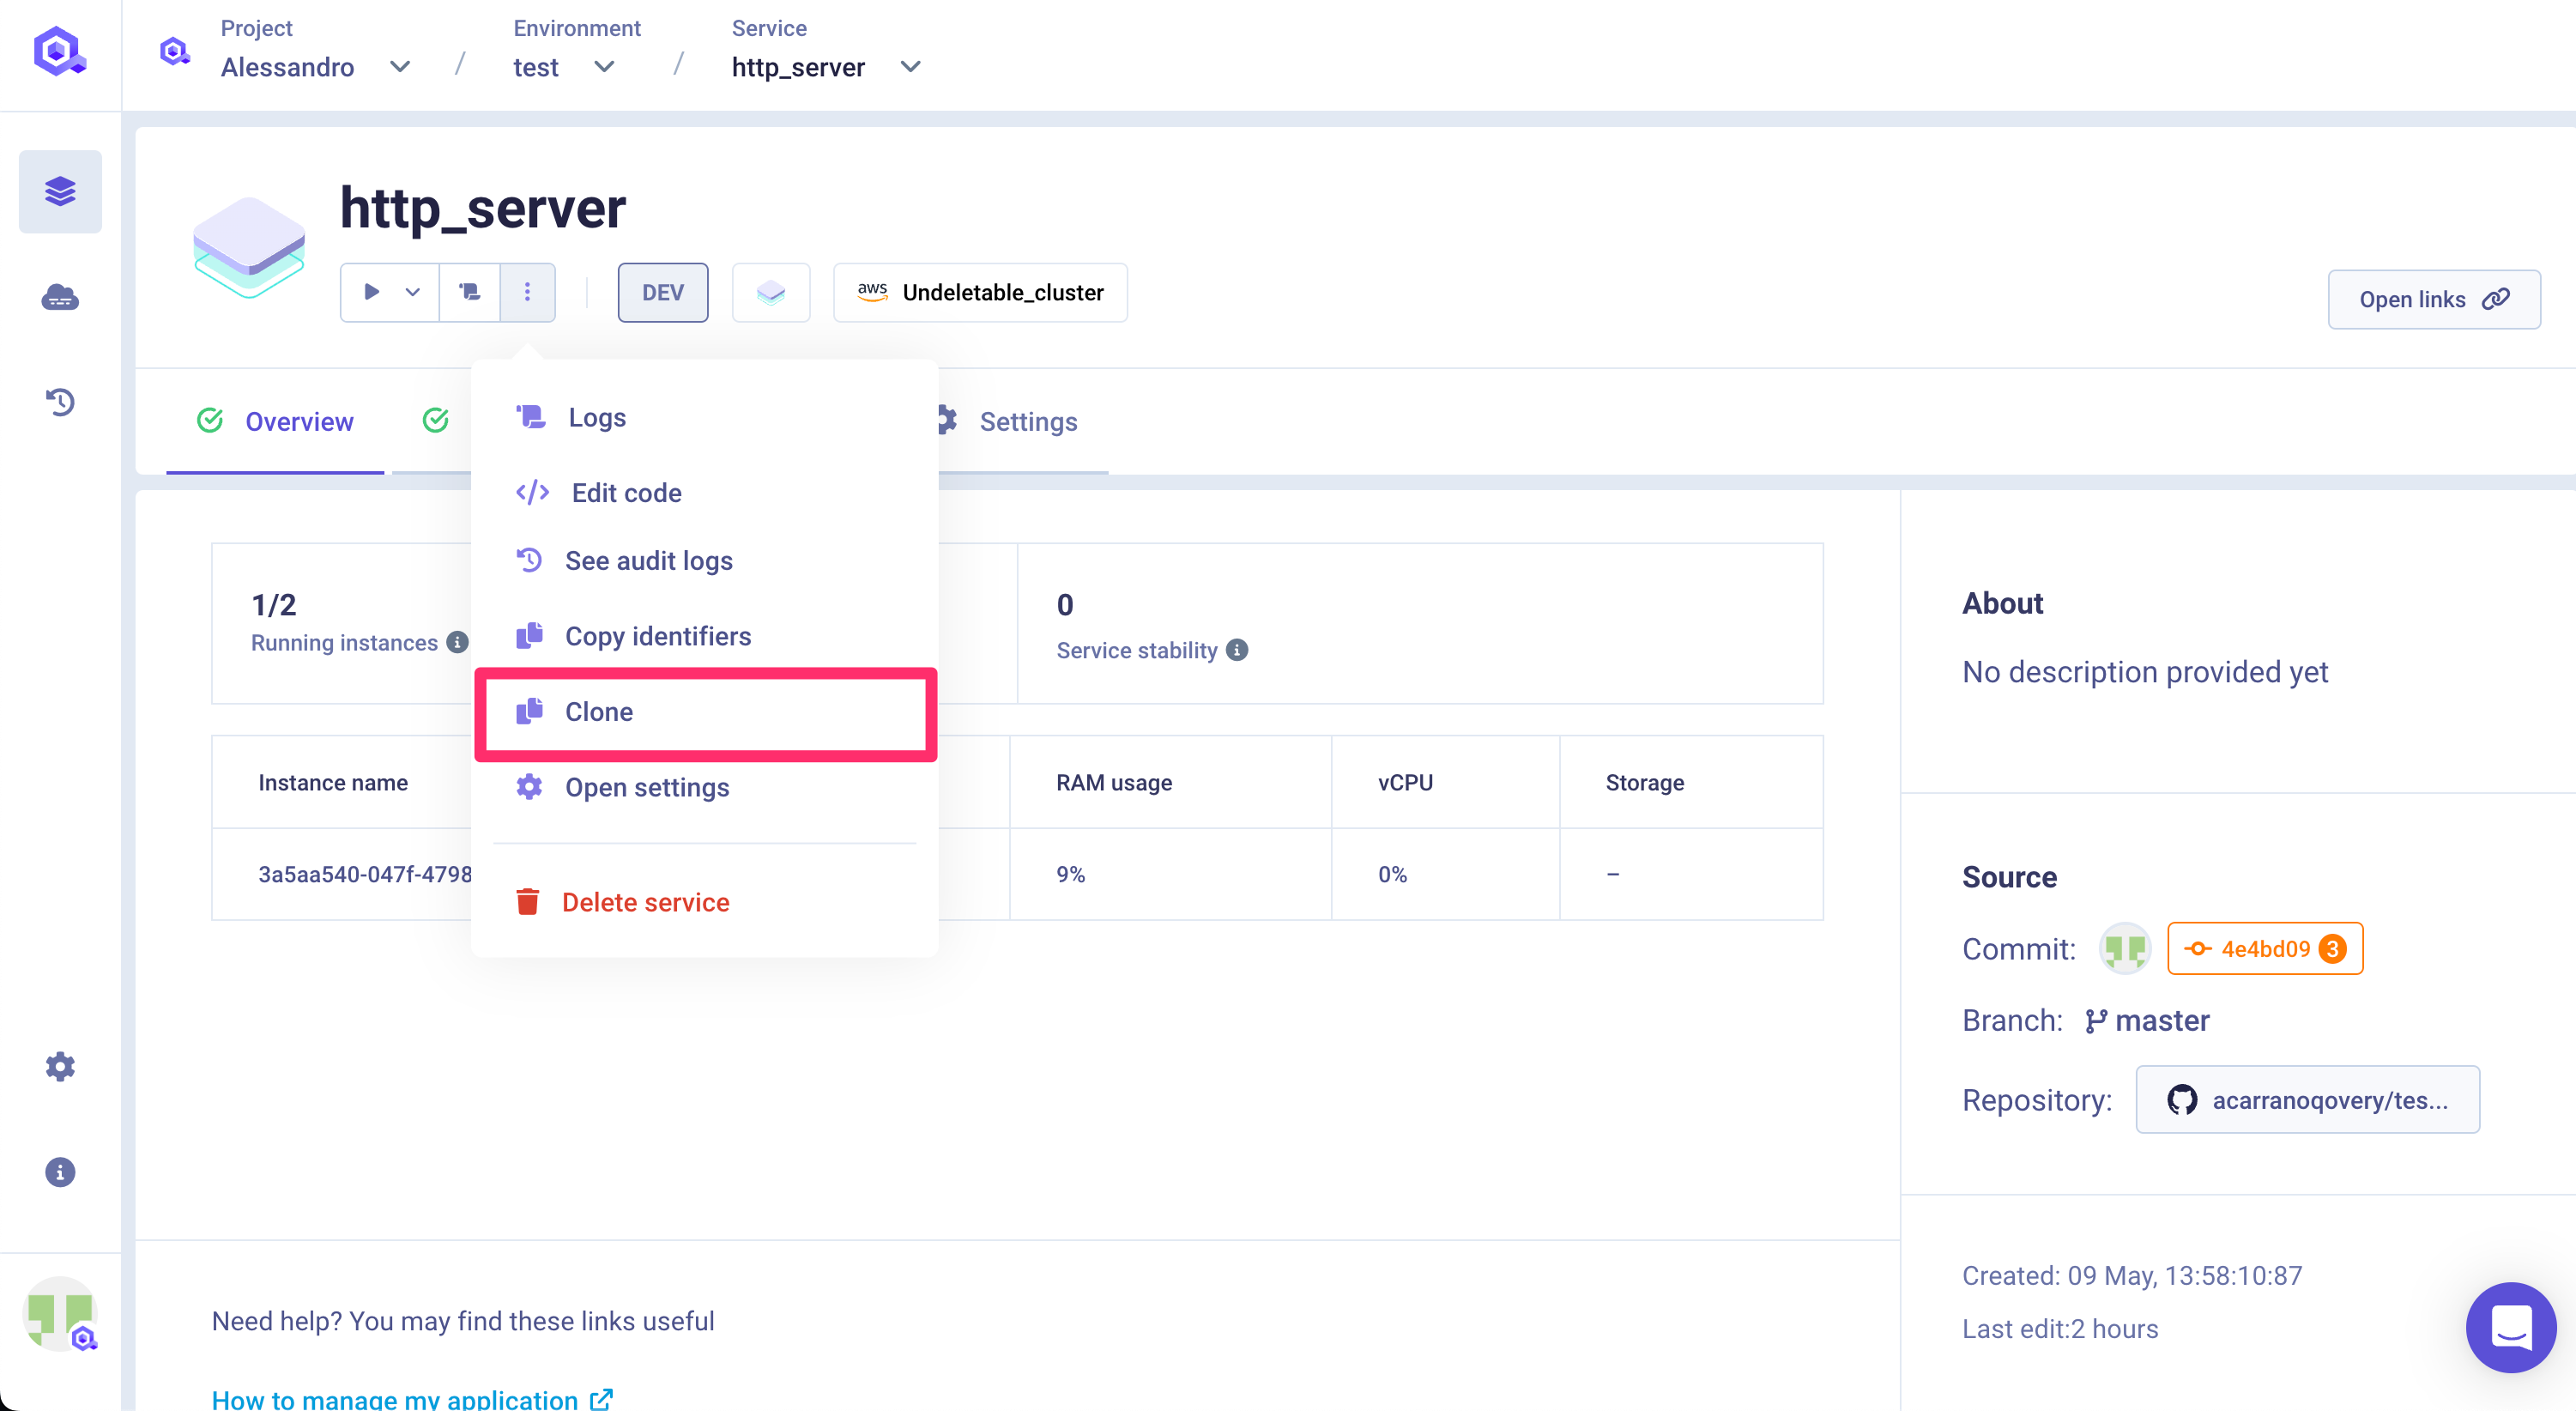
Clone
You can create a clone of the service via the clone feature. A new service with the same configuration (see below for exceptions) will be created into the target environment.
The target environment can be the same as the current environment or even another one in a completely different project.
Important information
Not every configuration parameter will be copied within the new service for consistency reasons. The configuration is fully or partially copied depending on the target environment:
- same environment:
- custom domain: this setup is not copied into the new service (to avoid collision)
- another environment:
- custom domain: this setup is not copied into the new service (to avoid collision)
- environment variable: aliases defined on environment variables are not copied (since the aliased env var might not exist)
- deployment pipeline: stage setup is not copied (since the target stage might not exist)
- number of instances: if the target environment runs on a Qovery EC2 cluster, the max number of instances is set to 1 (Qovery EC2 constraint)
Please check the configuration of the new service before deploying it.
Advanced Settings
You can further customize the service behaviour via the service advanced settings. Check this documentation to know more.
Delete a Helm
Choose your helm
In the helm overview, click on the
3 dotsbutton and remove the helm.