This guide describes how to migrate your application running on Heroku to AWS with Qovery. It covers all required steps you need to take to deploy your application on AWS and transfer your data from Heroku Postgres to the database managed by AWS via Qovery.
We have created a new AI agent capable of migrating from Heroku to AWS, GCP, Scaleway or Azure in a few clicks. Check our announcement here.
Before you begin, this guide assumes the following:
- You are familiar with Heroku basics, have a Heroku account and access to Heroku CLI
- You have sign in on Qovery
- You have set up your AWS account with Qovery
Migration Steps
- Create your Dockerfile
- Create resources on Qovery
- Configure Environment Variables and Secrets
- Copy data from your Heroku databases to your AWS databases
- Deploy your apps
- FAQ by Heroku users
1. Create your Dockerfile
Qovery supports two ways to build and run your application coming from Heroku:
Are you familiar with Dockerfile? If not, I do recommend reading this article.
Here we will create our Dockerfiles to build and run our applications. Qovery will handle the build and the run of your applications, but need to have at least a Dockerfile to do it.
Find Dockerfile template
Pick one Dockerfile template according to the programming language or framework you are using for your app:
- Rails
- NodeJS
- React
- VueJS
- NextJS
- Golang
- Flask
- Django
- Laravel
- Symfony
- Spring
- Rust
Here is the Dockerfile for your Rails application listening on the PORT 3000
# syntax=docker/dockerfile:1FROM ruby:2.7RUN apt-get update -qq && apt-get install -y nodejs postgresql-clientWORKDIR /myappCOPY Gemfile GemfileCOPY Gemfile.lock Gemfile.lockRUN bundle installCOPY . .EXPOSE 3000# Configure the main process to run when running the imageCMD ["rails", "server", "-b", "0.0.0.0", "-p", "3000"]
Dockerfile for Sidekiq
Here is the Dockerfile for your Rails app running as a worker mode with Sidekiq.
# syntax=docker/dockerfile:1FROM ruby:2.7RUN apt-get update -qq && apt-get install -y nodejs postgresql-client # add mysql client if you need toWORKDIR /myappCOPY Gemfile GemfileCOPY Gemfile.lock Gemfile.lockRUN bundle installCOPY . .CMD ["bundle", "exec", "sidekiq"]
Copy template
Copy your Dockerfile at the root of your project. By convention, you can name your file Dockerfile. If you already have a Dockerfile, feel free to name it Dockerfile.qovery. If you are using multiple Dockerfile for Qovery, feel free to give a name like Dockerfile-sidekiq.qovery.
For our example of migrating a Rails app and a Rails Sidekiq app, I will have at the root of my project a Dockerfile.qovery and a Dockerfile-sidekiq.qovery.
Test your Dockerfile
Before you begin, this page assumes the following:
You need to install Docker to test your Dockerfile
To test your Dockerfile we will locally our container. You just need to run the following commands:
docker build -f Dockerfile.qovery .
If everything goes well you should get the finale image ID at the end of the output.
[+] Building 19.0s (16/16) FINISHED=> [internal] load build definition from Dockerfile 0.0s=> => transferring dockerfile: 37B 0.0s=> [internal] load .dockerignore 0.0s...=> [7/7] COPY . . 0.2s=> exporting to image 0.0s=> exporting layers 0.4s=> writing image sha256:a0f90a6ec8bc4036a7b268479a0c0773ca324ba2de11fdef31309650743f4055 0.0s
To run your image you can run:
docker run a0f90a6ec8bc4036a7b268479a0c0773ca324ba2de11fdef31309650743f4055
If your app required a database to starts, then it can be normal that it fails to start. Otherwise, if your app is supposed to start and does not, then you will need to fix the issue and rebuild your app with docker build -f Dockerfile.qovery .
Any error while building your container image? 2 solutions:
- Read the error message and try to understand from where the problem is coming from. You can "Google" the error if it is not related to your code.
- Open a thread on our forum if you don't find the answer there, we will be happy to assist you.
Environment variables at the build time
Does your app use some environment variables at the build time? Then you will need to modify your Dockerfile to includes the environment variables. Let's imagine your app uses the environment variable CONTENT_API_KEY, then you will need to add the following instructions in your Dockerfile:
...ARG CONTENT_API_KEYENV CONTENT_API_KEY $CONTENT_API_KEY...
The value of the CONTENT_API_KEY environment variable will be taken from the specified environment variables in Qovery.
Add your Dockerfile to Git
Now, add your new Dockerfile to git with the following commands:
git add Dockerfile.qoverygit commit -m "Add Qovery Dockerfile"git push origin
Loop
If you have multiple applications to deploy, create a Dockerfile for each of them.
2. Create resources on Qovery
Application
Steps:
- Connect to the Qovery console.
- Create your Organization and your Project.
- Create an environment with the name
production(it can be changed after). - Create an application and give it a name (you can give the name of your repo if you have no idea)
- Select your app repository from your GitHub, GitLab or Bitbucket.
- Select the branch you want to deploy.
- Specify the local listening port of your application.
- Click on "create"
Congrats! Your application is created 🎉
If you deploy an app from a mono-repository, we have a must-read guide for you here.
Database
Here are the steps to deploy your database:
Before you begin, this page assumes the following:
- You have created an application before
Steps:
- Go to your
productionenvironment. - Add your database by clicking on "Add" > "Database".
- Select the database (PostgreSQL, MySQL, MongoDB, Redis..) and the version you want to deploy.
- Select Managed or Container mode for your database.
- Select
Publicaccessibility (setPrivateif you don't want to restore your data from an existing Heroku database).
Congrats! Your database is created as well 🎉
If you use MongoDB Atlas, or an existing database on AWS that you want to connect to your application deployed by Qovery. Check out our tutorial about VPC peering and how to securely connect to your existing database.
3. Configure your Environment Variables and Secrets
Qovery makes the difference between an environment variable and a secret. Basically, a Secret is similar to an Environment Variable but the value is encrypted and can't be revealed. Both are injected as environment variables during the build and the run of your applications. More info here
To extract your environment variables from Heroku, we recommend using the Heroku CLI and exporting all the environment variables and secrets in an .env (dot env) file. Qovery supports the import of a dot env file via the Qovery web interface and the Qovery CLI.
Export your environment variable via the Heroku CLI with the command:
# To install Heroku CLI: https://devcenter.heroku.com/articles/heroku-cliheroku configGREETINGS: hello worldSTRIPE_API_KEY: xxx-yyy-zzzIS_PRODUCTION: true
Then you can create your environment variables via the web interface (watch the video below)
Or via the Qovery CLI:
# auth yourselfqovery auth# selection the app where you want to import your environment variablesqovery context set# import your Heroku environment variablesheroku config --app <your_heroku_app_name> --json | \qovery env parse --heroku-json > heroku.env && \qovery env import heroku.env && \rm heroku.envQovery: dot env file to import: 'heroku.env'? Do you want to import Environment Variables or Secrets? Environment Variables? What environment variables do you want to import? [Use arrows to move, space to select, <right> to all, <left> to none, type to filter][x] GREETINGS=hello world[ ] STRIPE_API_KEY=xxx-yyy-zzz> [x] IS_PRODUCTION=trueQovery: ✅ Environment Variables successfully imported!
Connect your frontend app to your backend app
To connect your frontend app your backend app we will create an environment variable alias.
Here is how to create a frontend app:
And now how to connect your frontend app with your backend app:
You can also take a look at this forum reply to learn how to do it.
Connect your backend app to your database
Same as connecting your frontend app to your backend app, you can create an environment variable alias DATABASE_URL for the built-in secret finishing with _DATABASE_URL_INTERNAL.
4. Copy data from your Heroku databases to your AWS databases
Coming soon with Replibyte
5. Deploy your apps!
We are finally ready to deploy my applications on AWS!
Watch the final result 😎
FAQ by Heroku users
How to create a custom domain?
Check out the documentation on how to configure your custom domain.
How to monitor my apps?
We do recommend using Datadog or any other monitoring products for monitoring your apps deployed by Qovery. Check out our tutorial on how to install Datadog.
Do you have Heroku "Review App" equivalent?
Yes, it's what we call Preview Environment
How to rollback?
Check out the app rollback documentation
How auto-scaling works?
Check out the app auto-scaling documentation
How to manage database migration?
Check out our forum reply
Is it possible to get a shell / connect to my app?
Absolutely, you can connect directly to your application with a shell by clicking on the Qovery cloud shell button (1):
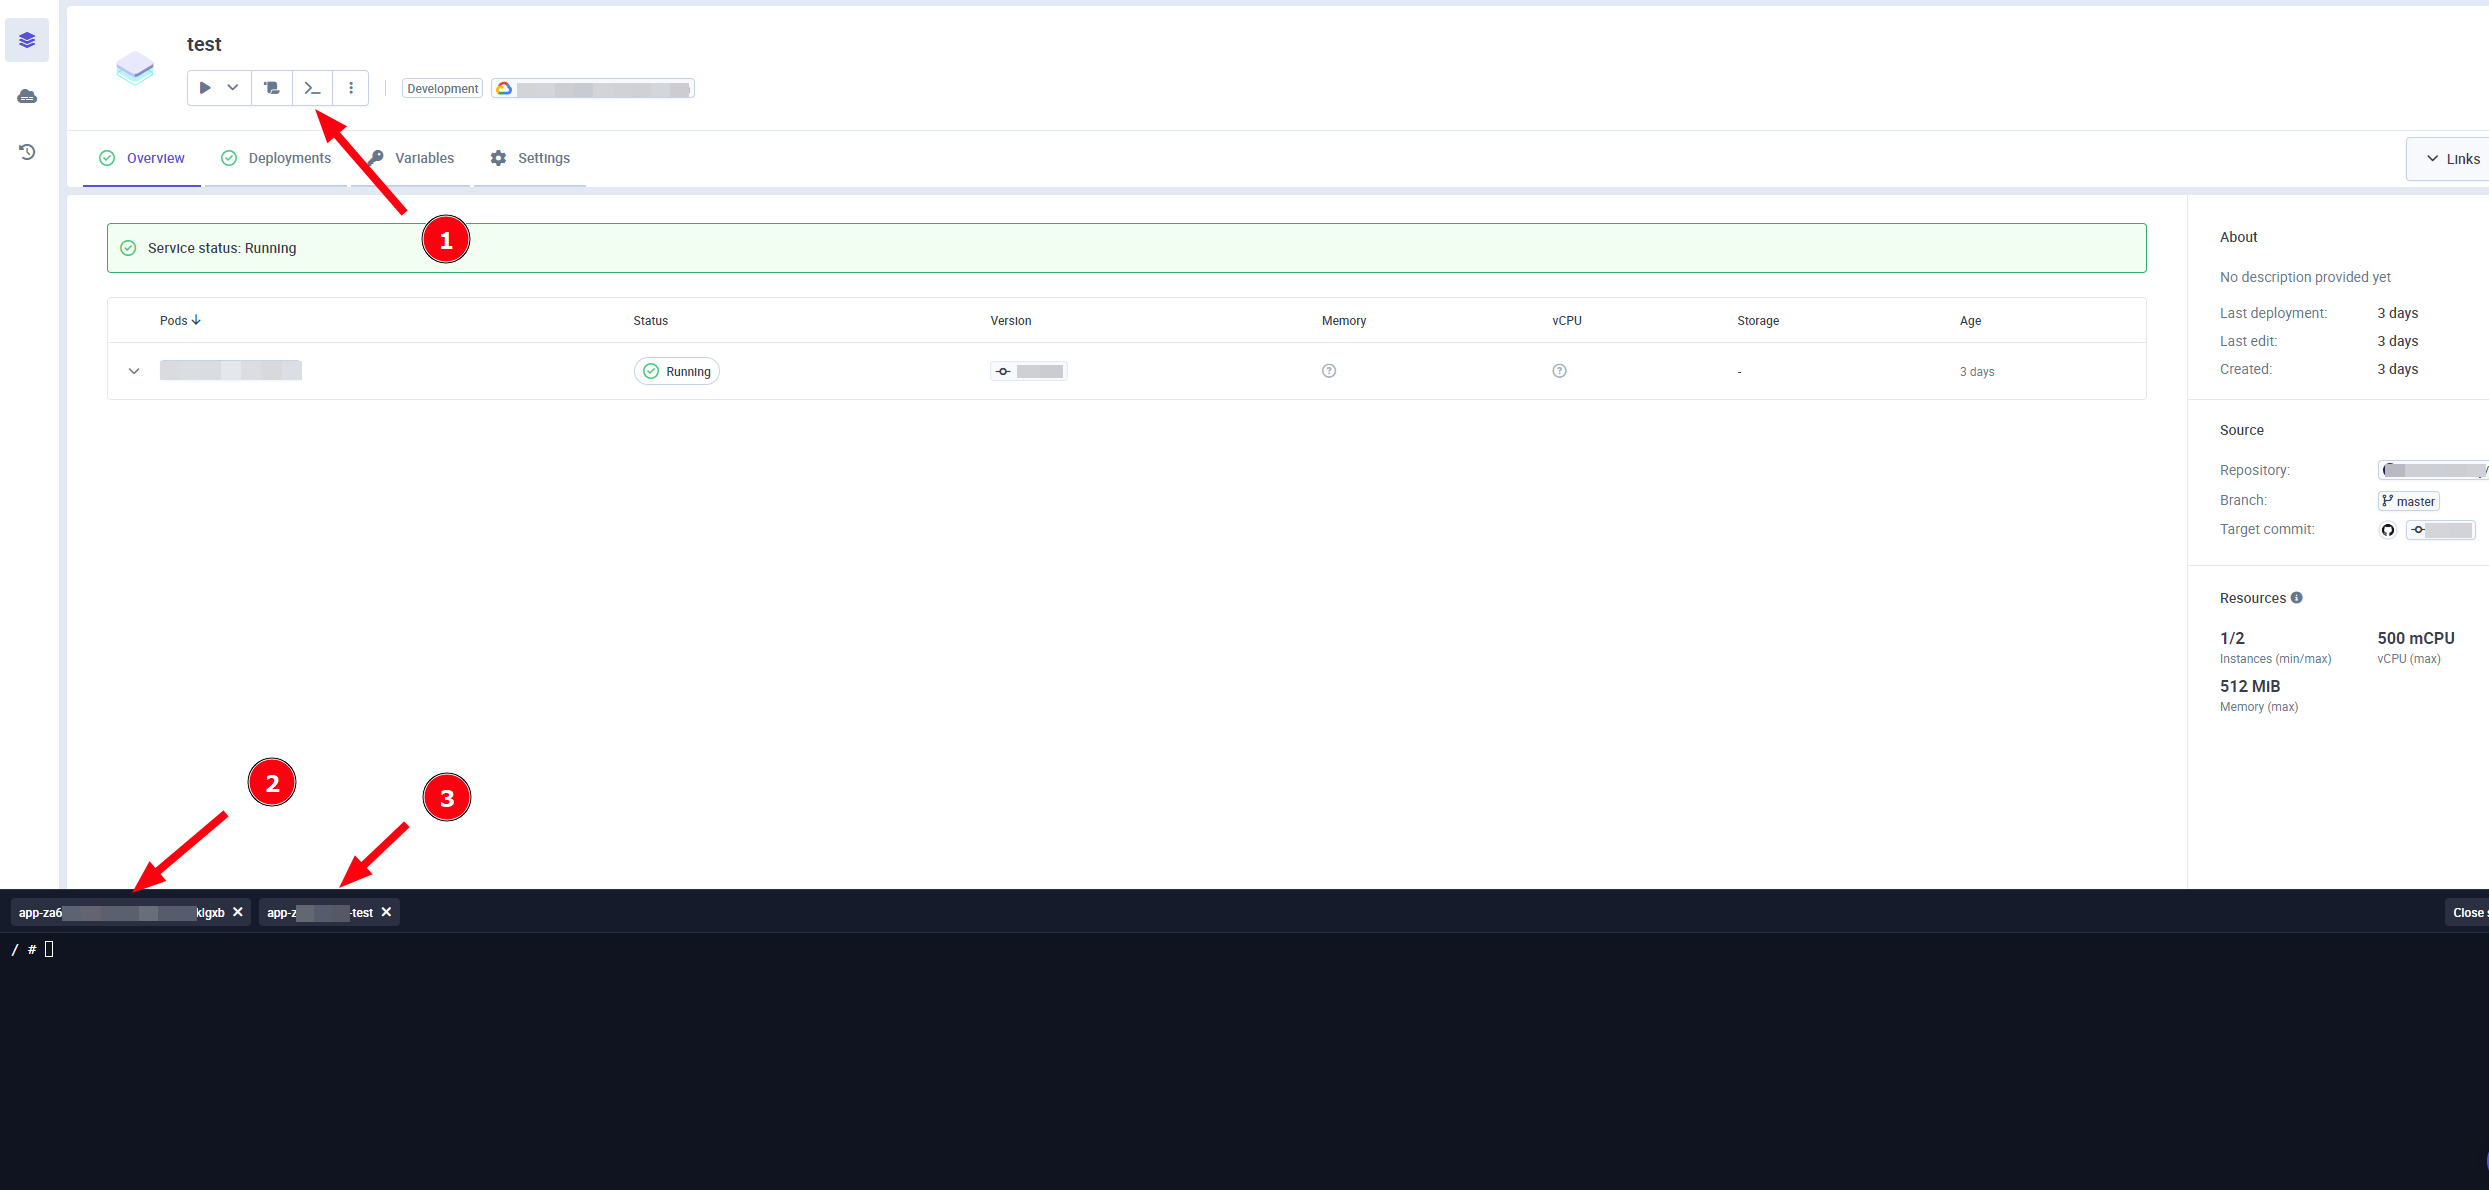
Then you just have to select the pod (2) and the container (3).
You can also check out our CLI and the qovery shell command.
Can I use Terraform and Infrastructure as Code?
Absolutely, we have a Qovery Terraform provider available.
How can I connect my app to MongoDB Atlas?
If you use MongoDB Atlas check out our tutorial about VPC peering and how to securely connect to your existing MongoDB Atlas database.
How can I connect my app to an AWS service not managed by Qovery?
If you want to connect your app to an AWS service not managed by Qovery, check out our tutorial about VPC peering and how to securely connect to this AWS service.
If you have a common question about Qovery, we have a more general FAQ section available.
Wrapping up
Congrats! You have migrated from Heroku to AWS. Feel free to check out our forum and open a thread if you have any question.