SSO
Qovery allows you to configure a SAML or OIDC connection with your IDP.
How to enable SAML or OIDC in your organization ?
- Contact your CSM to enable the feature:
- We will provide you a unique
$CONNECTION_NAMEthat you will need to configure your IDP - You will need to provide us required information to setup the configuration on Qovery side
- When the configuration is done on your side and on Qovery side, we plan a session to validate the authentication flow
- Once your users are provisioned using SAML or OIDC inside your organization, you will need to remove old users and transfer your organization ownership
Configure Your IDP
SAML
Configure Your SAML Application
- Create your SAML application: check
SAML 2.0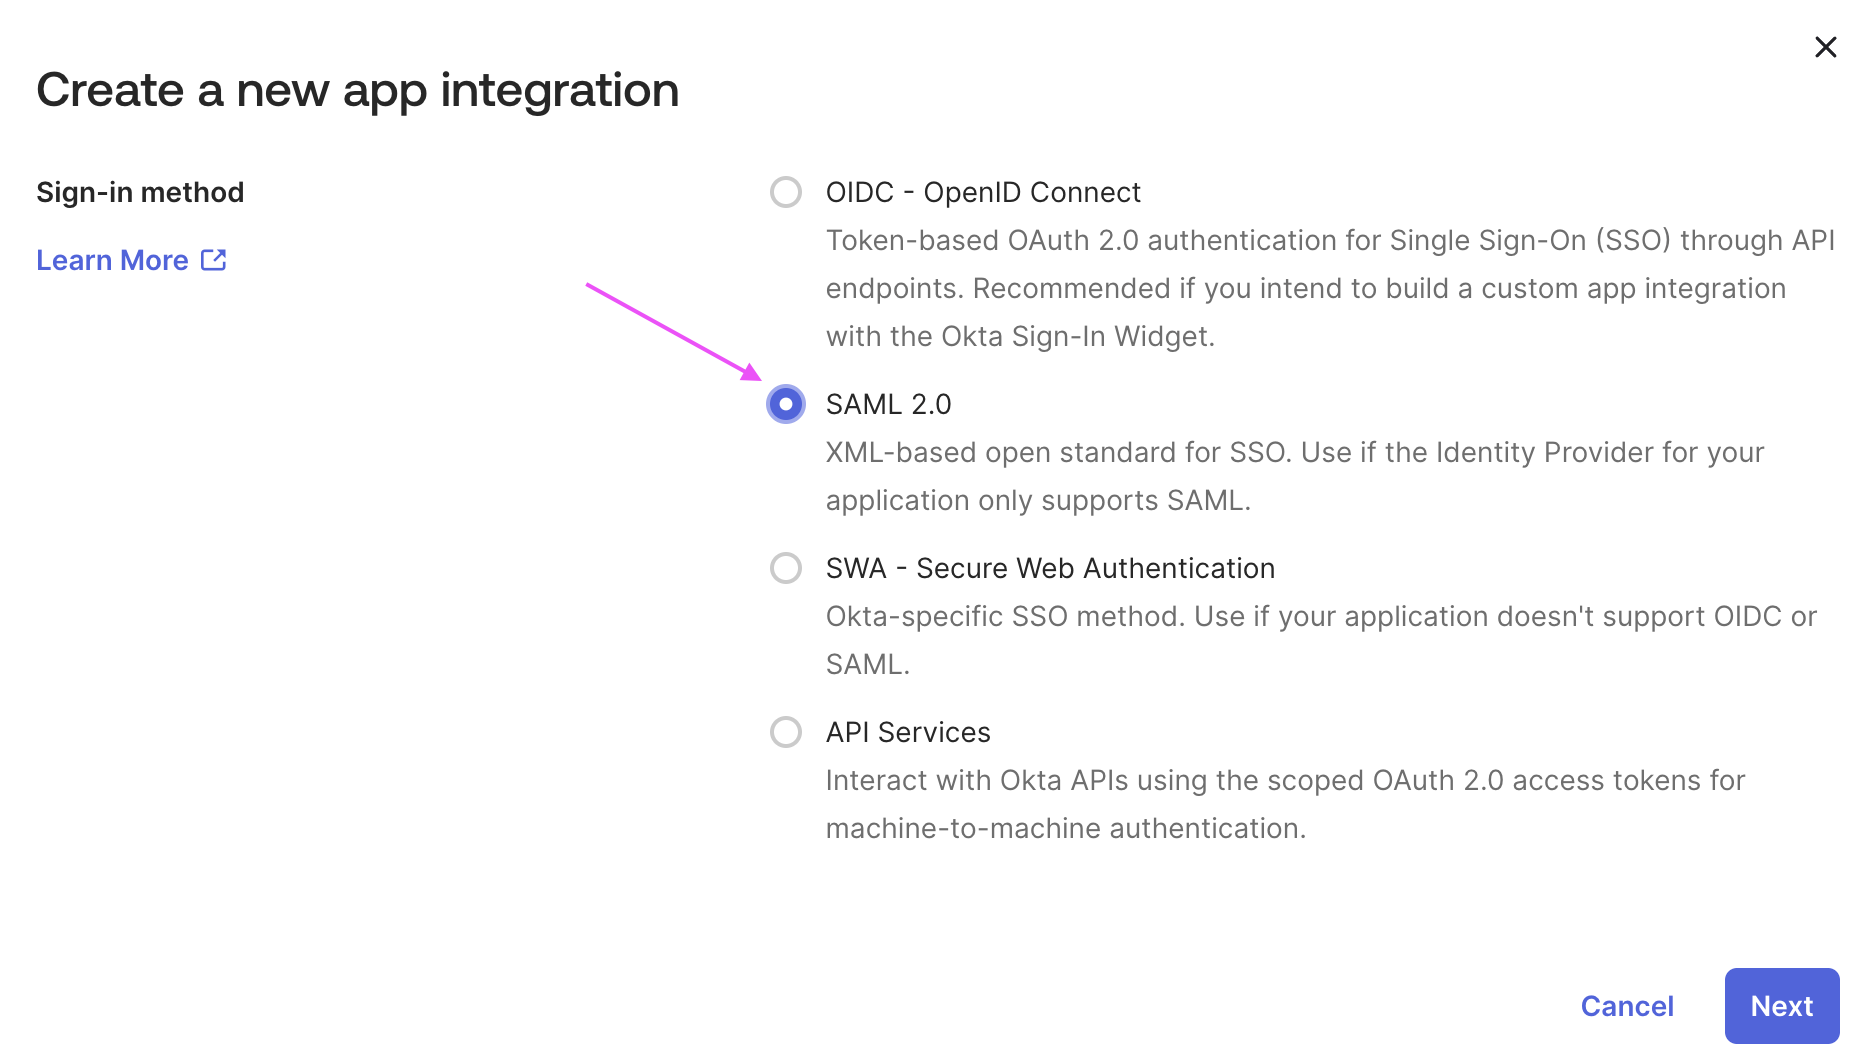
Qovery Authentication Information
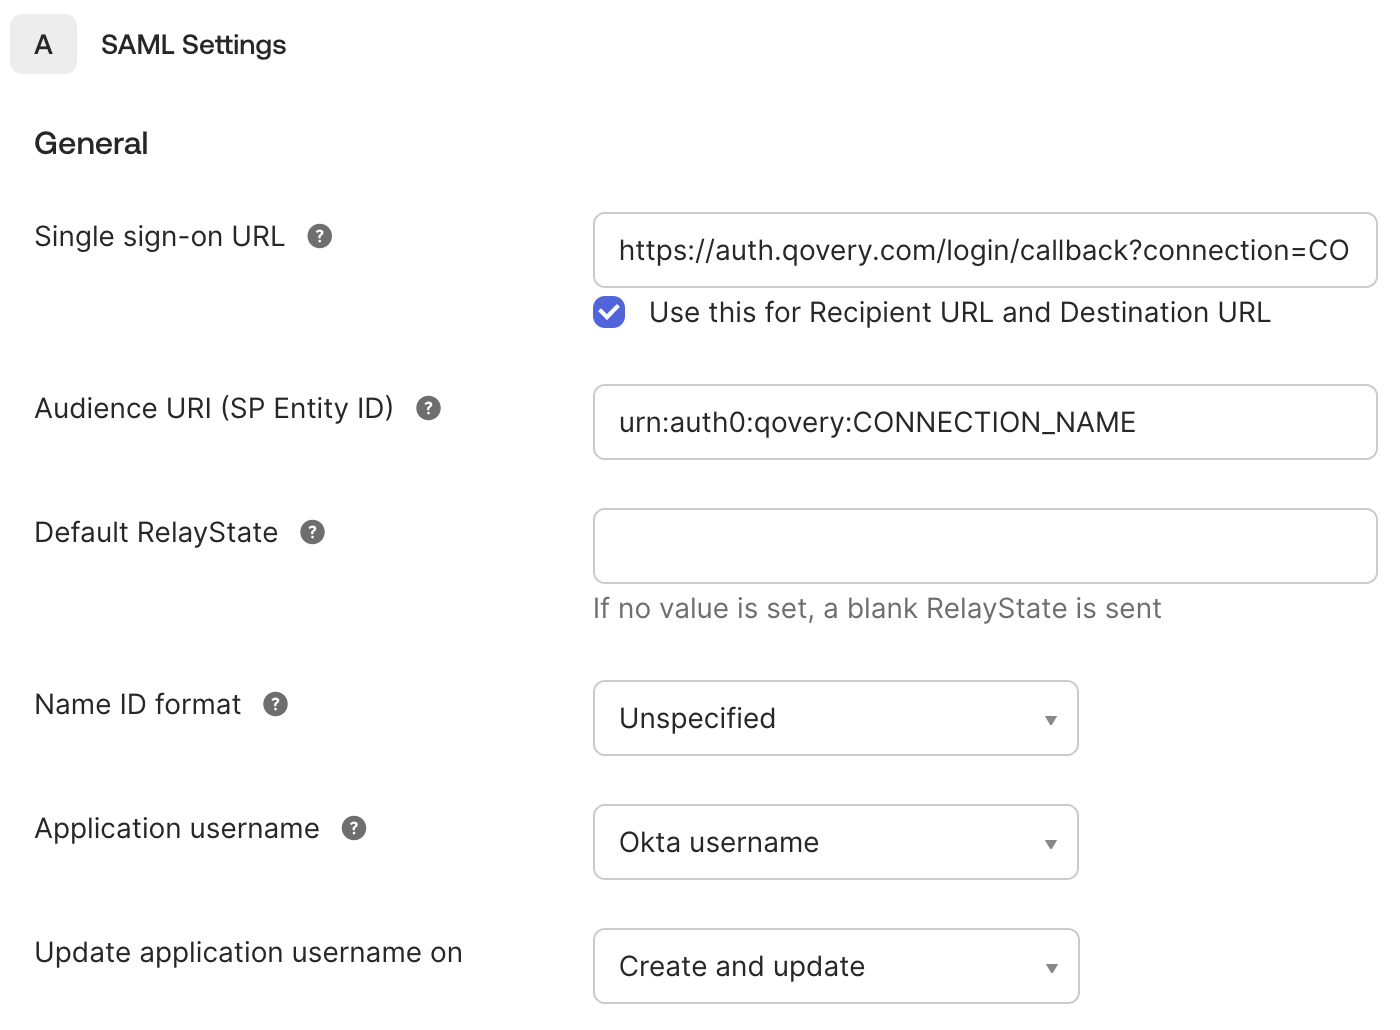
In SAML Settings > General section
Set the "Single sign-on URL" to
https://auth.qovery.com/login/callback?connection=$CONNECTION_NAMEEnable the "Use this for Recipient URL and Destination URL" checkbox
Set the "Audience URI" to
urn:auth0:qovery:$CONNECTION_NAMELeave the other fields in this section at their default values
Configure Attribute Statements
In Attribute Statements section
- Add attribute
emailto point to your user email property, i.euser.emailin Okta - Add attribute
nameto point to your user full name property, i.euser.displayNamein Okta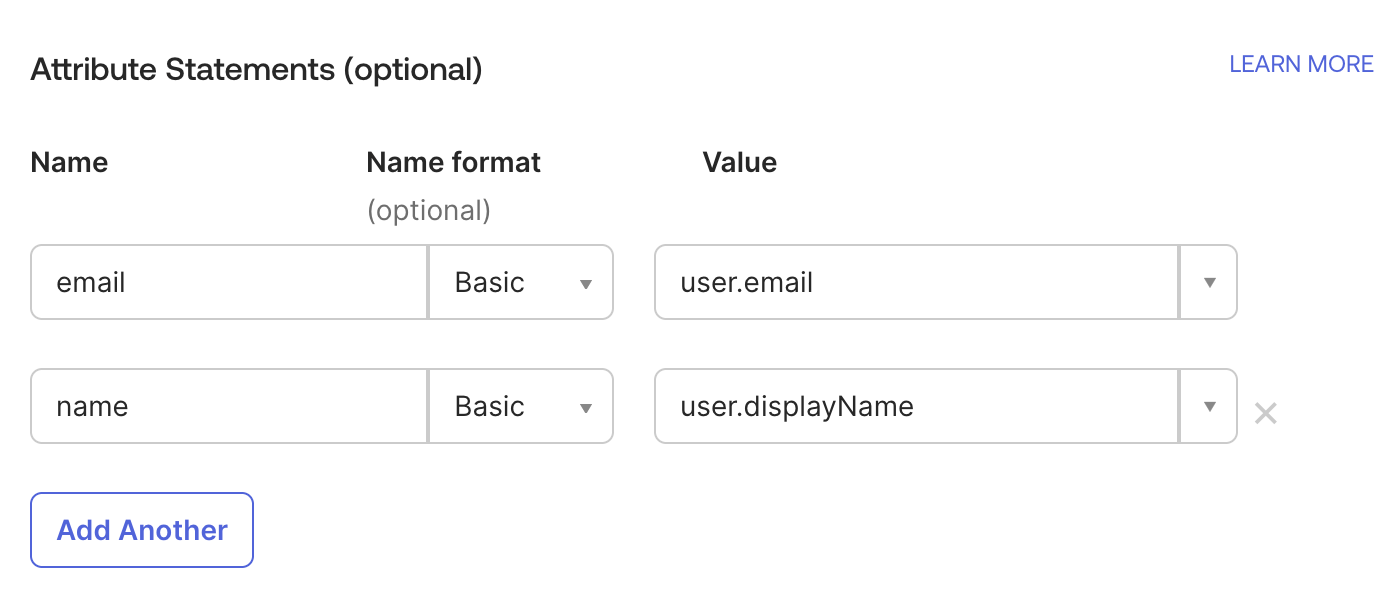
(Optional) Configure Group Attribute Statements
If you want to automatically assign a Qovery role according to your users' group (see configure group synchronization), you need to expose this information:
- Add attribute
groupsto match the targeted IDP groups you want to expose, i.e.*to expose all groups assigned to your users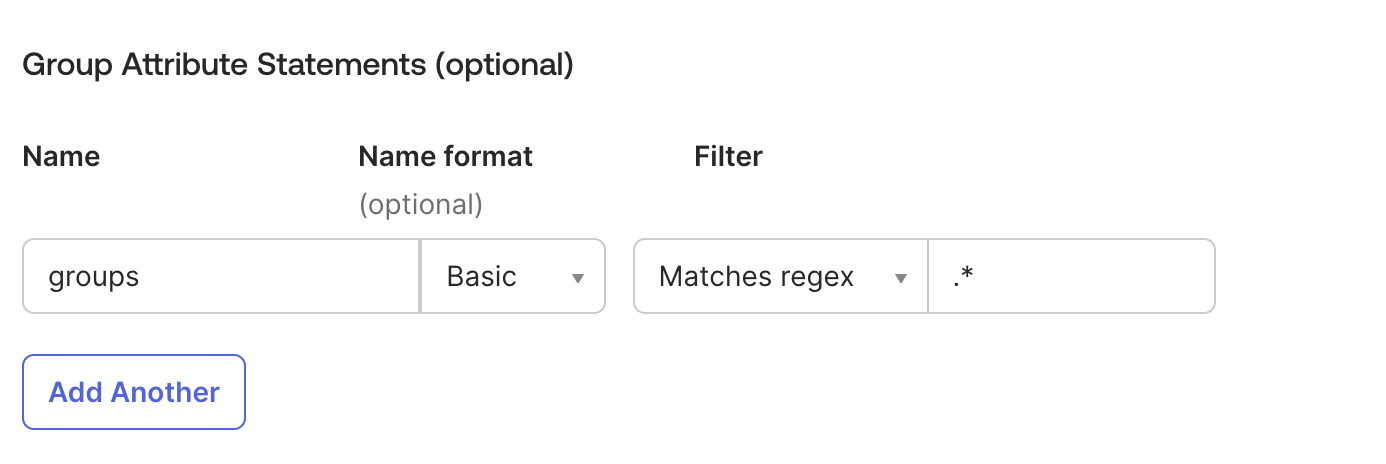
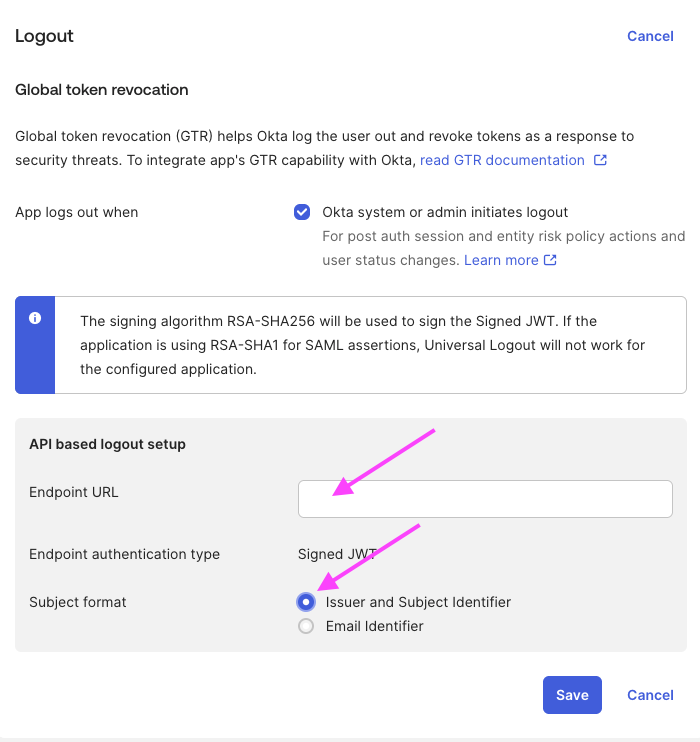
(Optional) Enable Global Token Revocation
In Logout section:
- Set the "Endpoint URL" to
https://qovery.eu.auth0.com/oauth/global-token-revocation/connection/$CONNECTION_NAME - Set "Subject format" to "Issuer and Subject Identifier"
SAML Information To Share
Required
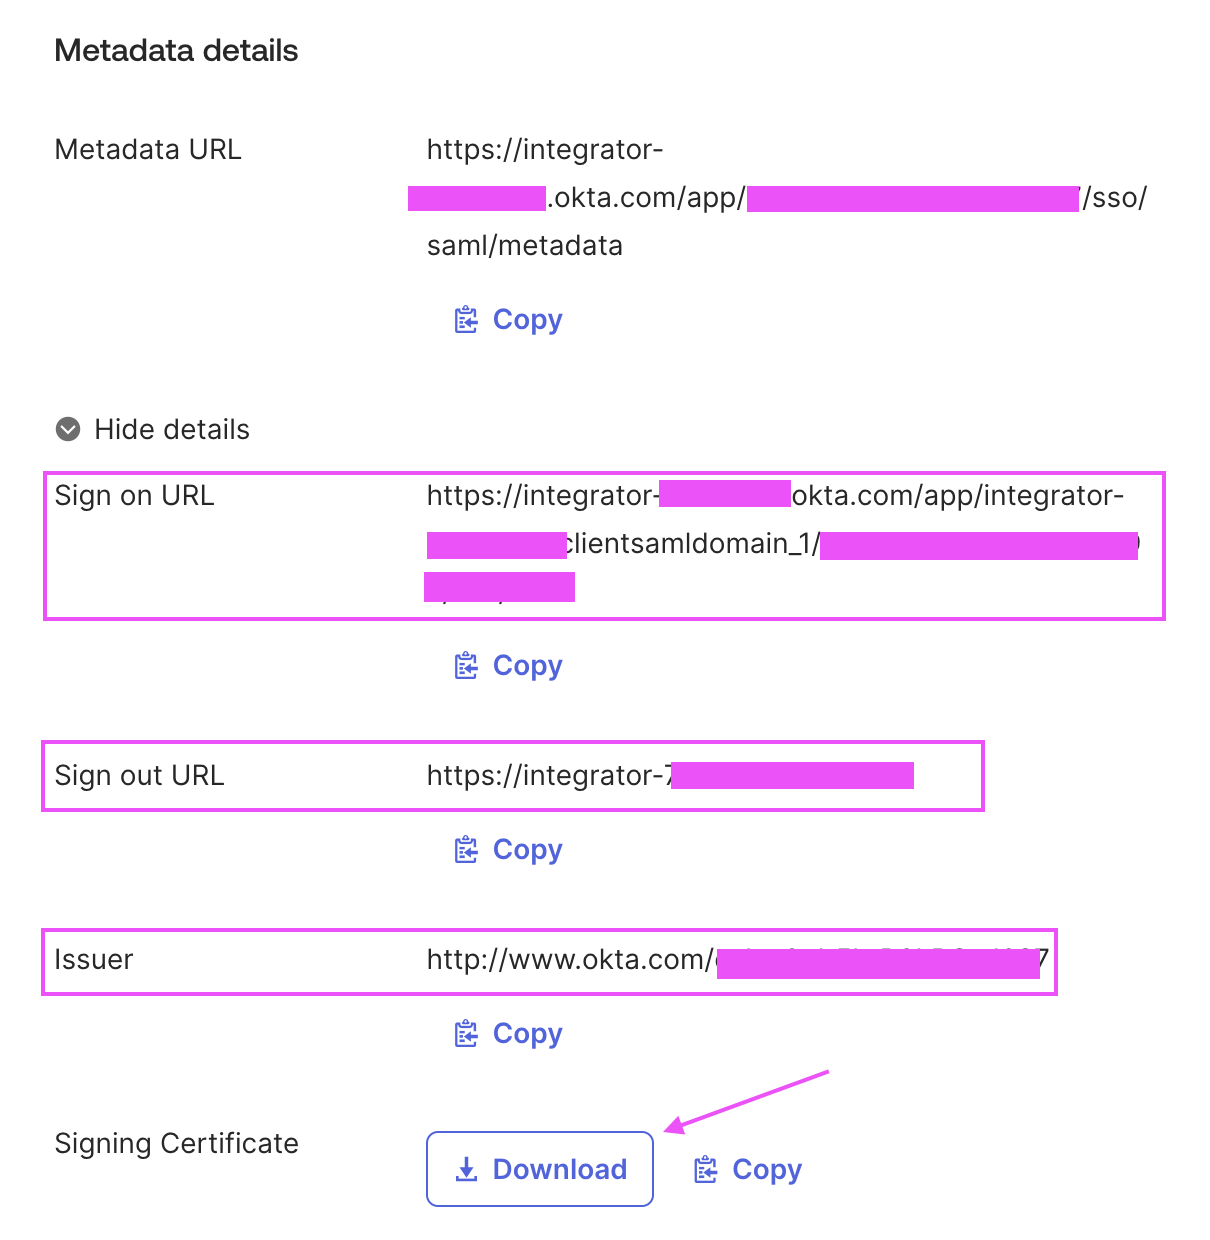
Go to "Sign On" tab
Gather the following required information:
- Sign on URL
- Signing Certificate
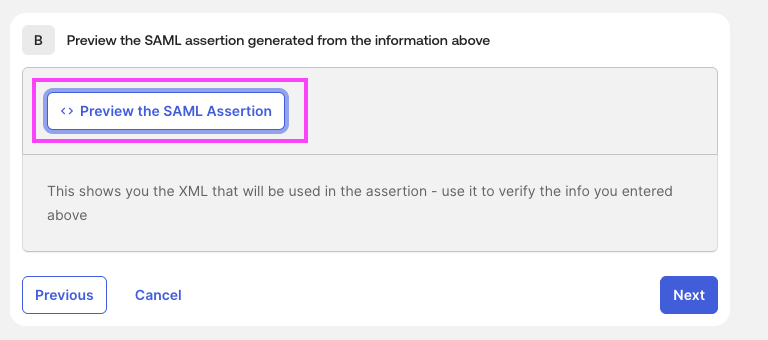
Go to General section and edit "SAML Settings" section
Click on "Preview the SAML Assertion": it will generate an XML file that you will need to share.
(Optional) Enable Global Token Revocation
If you want to enable global token revocation, you’ll need to also share those information:
- Issuer
- Sign out URL
- Subject (you need to follow those instructions for Okta)
OIDC
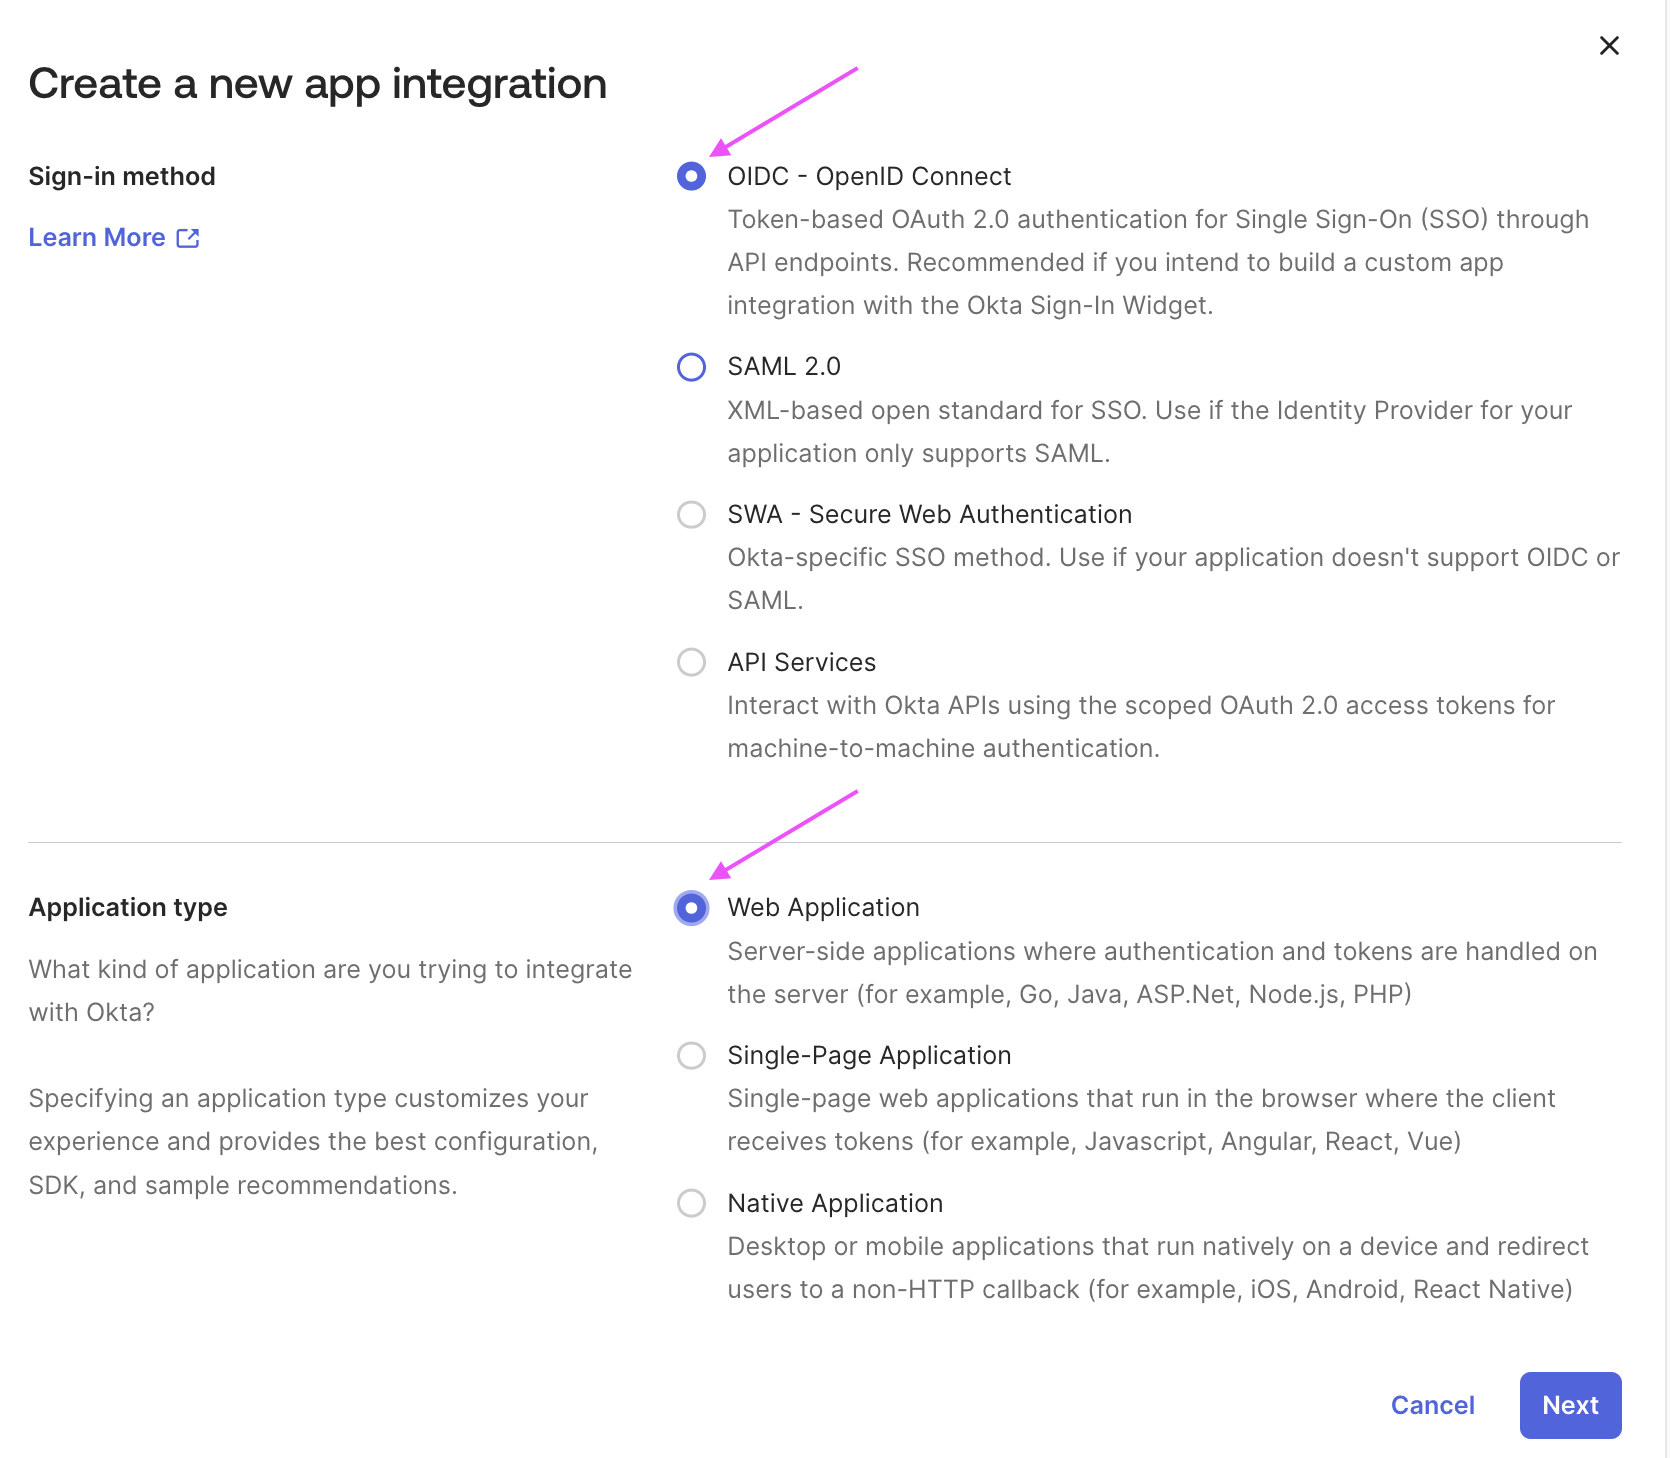
Configure Your OIDC Application
- Create your OIDC application: choose
OIDC - OpenID ConnectandWeb Application
Qovery Authentication Information
In General tab > General Settings section
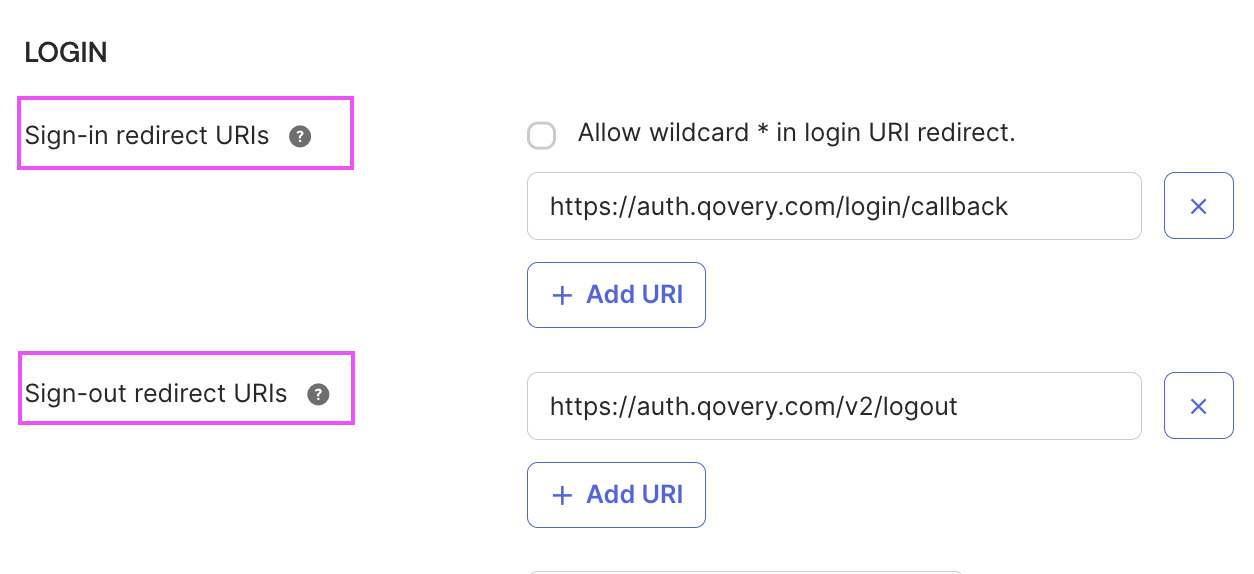
- Set the "Sign-in redirect URIs" to
https://auth.qovery.com/login/callback - Set the "Sign-out redirect URIs" to
https://auth.qovery.com/v2/logout
In General tab > Client Credentials section, set the "Client authentication" to Client secret.
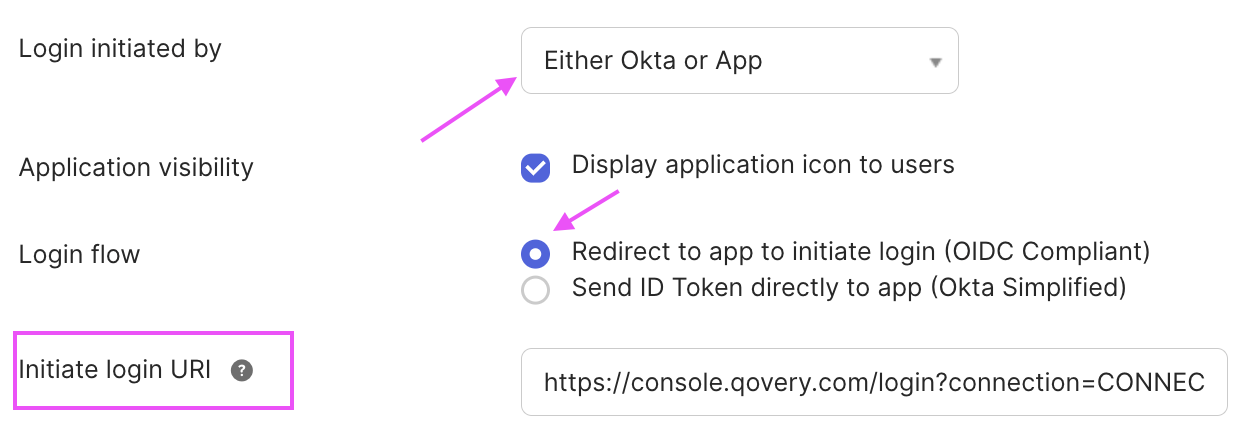
(Optional) To make your application available to your users assigned, you'll need the Initiate Login URI: https://console.qovery.com/login?connection=CONNECTION_NAME
(Optional) Expose Groups
If you want to automatically assign a Qovery role according to your users' group (see configure group synchronization), you need to expose them.
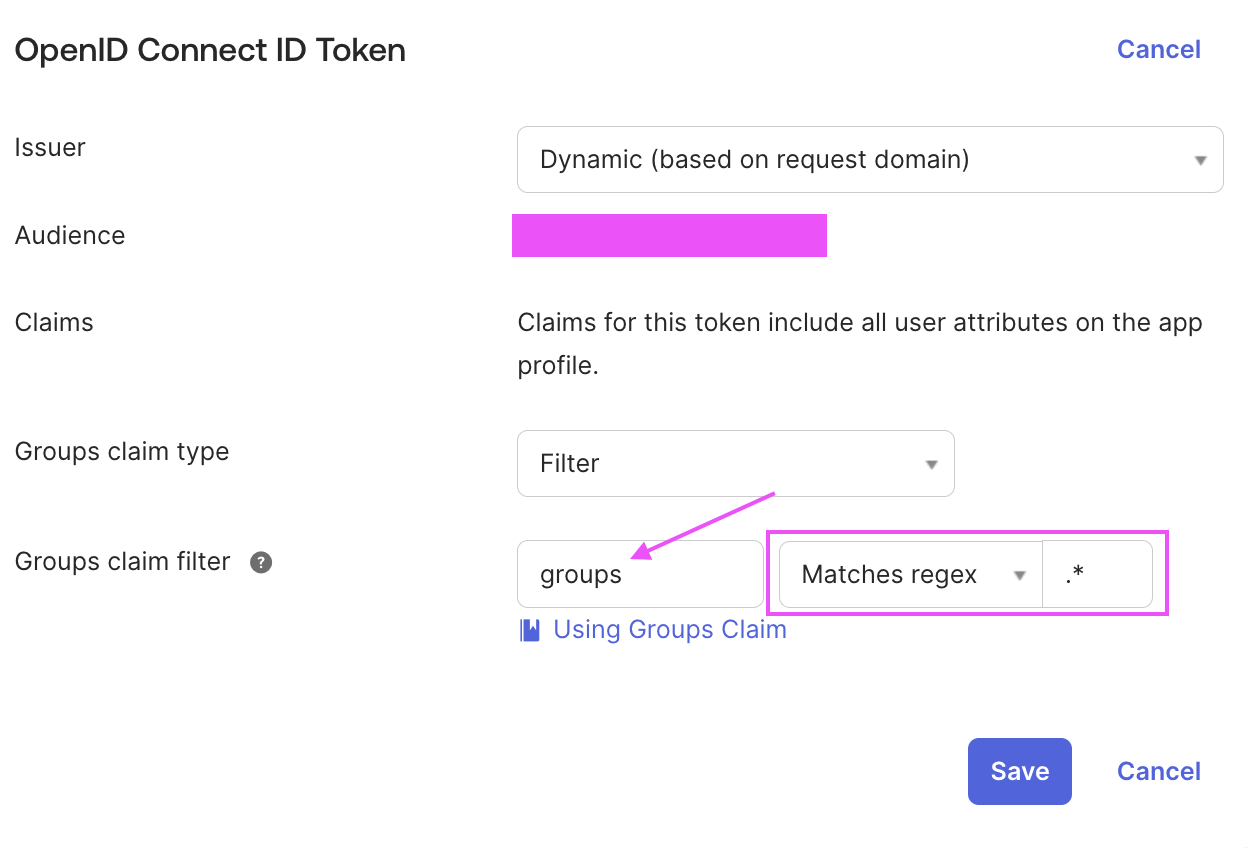
Go to Sign On > OpenID Connect ID Token:
- Add a
groupsclaim - You can filter on the groups you want to expose or not, i.e
.*to expose all groups assigned to your users
(Optional) Enable Global Token Revocation
In Logout section:
- Set the "Endpoint URL" to
https://qovery.eu.auth0.com/oauth/global-token-revocation/connection/$CONNECTION_NAME - Set "Subject format" to "Issuer and Subject Identifier"
OIDC Information To Share
Required
Qovery needs the following information to configure properly your OIDC application:
- Your Client ID
- Your Client Secret
- Your OIDC discovery metadata, i.e on Okta
https://{yourdomain}/.well-known/openid-configuration
Configuration Qovery Side
Before this step, you have validated your SAML / OIDC authentication flow with your CSM.
You can use the CLI to configure your connection:
qovery enterprise-connection get
It should give you the following output:
# Connection Name: $CONNECTION_NAME# Connection SettingsDefault Role | Enforce Sync Groupviewer | ✗ false# Group MappingsQovery Role | Your IDP Groups
Configure The Default Role
This is the Qovery role that will be associated to your IDP users when they log in to Qovery.
You can indicate either a Qovery provided role
or a custom role:
qovery enterprise-connection update --connection=$CONNECTION_NAME --default-role="Devops" # Qovery provided roleqovery enterprise-connection update --connection=$CONNECTION_NAME --default-role="My Custom Role" # Your custom role
Configure Group Synchronization
It is used to tell Qovery to always synchronize the Qovery role with your IDP users group.
You need to configure Group Mappings when setting Enforce Sync Group to true.
qovery enterprise-connection update --connection=$CONNECTION_NAME --enforce-sync-group=true
You can create a mapping table to associate the expected Qovery role based on your user IDP group.
For example, you can set group mappings to apply the following rules:
- I want that every user who has the IDP groups "Administrators" or "DevSecOps" to be associated with the "admin" provided Qovery role
qovery enterprise-connection group-mappings add --connection=$CONNECTION_NAME \--qovery-role="admin" --idp-group-names="Administrators,DevSecOps"
I want that every user having the IDP groups "Devs" to be associated with the "Developers" custom Qovery role
qovery enterprise-connection group-mappings add --connection=$CONNECTION_NAME \--qovery-role="Qovery Devs" --idp-group-names="Devs"
The output should be the following:
Qovery Role | Your IDP GroupsQovery Devs | Devsadmin | Administrators ; DevSecOps
User Provisioning
Users are not auto-provisioned into Qovery, they need to log in at least once to Qovery using the SAML or OIDC authentication flow to be present in your organization.
Qovery defines a user according to both their email and their authentication provider. This means that when your users will use the new SAML / OIDC authentication flow, they will be considered as new users in your organization. You will need to manually remove the old users that were using classic SSO log in.
Transfer Organization Ownership
Don't forget to transfer your organization ownership to the new user that will be using SAML / OIDC authentication flow.