CLI
Qovery provides a very easy to use CLI (Command Line Interface) designed to fit the developer workflow perfectly.
The purpose of the CLI is to integrate seamlessly with your development workflow:
- Write code
- Commit
- Qovery - deploy a new version of your application
- Qovery CLI - check the status of your application
- Qovery CLI - debug your application
- Repeat
First usage
Install
- Linux
- MacOS
- Windows
- Docker
- *nix
- Arch Linux
- Manual
To download and install Qovery CLI on any Linux distribution:
$ curl -s https://get.qovery.com | bash
Sign up
# Sign up and sign in command$ qovery auth
Your browser window with Qovery sign-up page will open. Follow the instructions to sign up and sign in.
Help
You can see all the commands available by executing:
$ qovery help
$ qovery helpA Command-line Interface of the Qovery platformUsage:qovery [command]Available Commands:application Manage applicationsauth Log in to Qoverycluster Manage clusterscompletion Generate the autocompletion script for the specified shellconsole Opens the application in Qovery Console in your browsercontainer Manage containerscontext Manage CLI contextcronjob Manage cronjobsdatabase Manage databasesenv Manage Environment Variables and Secretsenvironment Manage environmentshelm Manage helmshelp Help about any commandlifecycle Manage lifecycle jobslist-pods List the pods of a service with their podslog Print your application logsport-forward Port forward a port to an application containerproject Manage Projectservice Manage servicesshell Connect to an application containerstatus Print the status of your applicationtoken Generate an API tokenupgrade Upgrade Qovery CLI to latest versionversion Print installed version of the Qovery CLIFlags:-h, --help help for qovery--verbose Verbose outputUse "qovery [command] --help" for more information about a command.
Context
Context command lets you configure the CLI to work with your chosen application. Before executing other commands, you need first to set up the context.
The context is then remembered and used by the CLI. You can configure a new context anytime by running the qovery context set command.
Most of the commands support an inline context set allowing you to directly pass the URL of the application you wants to interact with.
Example:
$ qovery shell https://console.qovery.com/organization/51927012-8377-4e0f-84cf-7f5f38a0154b/project/a6545d50-69a3-4966-89cc-4c0bfb6d3448/environment/c9ac549b-a855-4d3b-b652-d68d5f1fea11/application/820ca0a3-08bf-42c1-8ad2-540714ad657f/general# this is the url of my back-end applicationOrganization | My orgaProject | R&D / BackendEnvironment | prodServiceLevel | back-endServiceType | application$ ls...
Set New Context
To set a new context, type qovery context set:
$ qovery context setQovery: Current context:Organization | QoveryProject | testEnvironment | developmentApplication | websiteQovery: Select new contextOrganization:✔ QoveryProject:✔ adminEnvironment:✔ mainApplication:✔ appQovery: New context:Organization | QoveryProject | adminEnvironment | mainApplication | app
Print Current Context
$ qovery contextQovery: Current context:Organization | QoveryProject | adminEnvironment | mainApplication | appQovery: You can set a new context using 'qovery context set'.
Log
Log command allows you to display the application logs.
$ qovery logTIME MESSAGEJul 15 08:46:13.019717 at /usr/src/app/autoFunctions/levels.js:17:16Jul 15 08:46:13.019721 at Array.forEach (<anonymous>)Jul 15 08:46:13.019724 at Timeout._onTimeout (/usr/src/app/autoFunctions/levels.js:15:14)Jul 15 08:46:13.019728 at listOnTimeout (internal/timers.js:557:17)# ... the rest of logs
By default, the last 1000 logs is displayed.
Follow Logs
To make the CLI follow your logs, use -f flag:
$ qovery log -fTIME MESSAGEJul 15 08:46:13.019717 at /usr/src/app/autoFunctions/levels.js:17:16Jul 15 08:46:13.019721 at Array.forEach (<anonymous>)Jul 15 08:46:13.019724 at Timeout._onTimeout (/usr/src/app/autoFunctions/levels.js:15:14)Jul 15 08:46:13.019728 at listOnTimeout (internal/timers.js:557:17)# ... the rest of logs
This will make the CLI follow your application logs and append any new logs till you use CTRL+C.
Status
Status command lets you print the basic status of your application.
$ qovery status15 Jul 21 10:55 CESTApplication | BackendStatus | RUNNING
Console
Console command quickly opens the Qovery Console in your browser to let you display more information about your application.
$ qovery consoleQovery: Opening https://console.qovery.com/platform/organization/your-org/projects/your-proj/environments/your-env/applications/your-app/summary
Shell
Shell command allows you to open a connection and execute commands directly on the container running application.
$ qovery shell/ # lsbin media srvdev mnt sysdocker-entrypoint.d opt tmpdocker-entrypoint.sh proc usretc root varhome run wwwlib sbin
Pass a command
To pass a command, you can use the --command or -c argument followed by your command.
$ qovery shell --command lsbin media srvdev mnt sysdocker-entrypoint.d opt tmpdocker-entrypoint.sh proc usretc root varhome run wwwlib sbin
To pass several arguments, you can separate them with a comma or send different --command.
qovery shell --command ls --command -l
qovery shell --command ls,-l
qovery shell -c ls,-l
$ qovery shell --command ls --command -ldrwxr-xr-x 2 root root 4096 Nov 30 09:32 bindrwxr-xr-x 5 root root 360 Dec 21 09:46 devdrwxr-xr-x 1 root root 41 Dec 20 20:13 docker-entrypoint.d-rwxr-xr-x 1 root root 1620 Dec 20 20:13 docker-entrypoint.shdrwxr-xr-x 1 root root 25 Dec 21 09:46 etcdrwxr-xr-x 2 root root 6 Nov 30 09:32 homedrwxr-xr-x 1 root root 61 Dec 20 22:11 libdrwxr-xr-x 5 root root 44 Nov 30 09:32 mediadrwxr-xr-x 2 root root 6 Nov 30 09:32 mntdrwxr-xr-x 2 root root 6 Nov 30 09:32 optdr-xr-xr-x 209 root root 0 Dec 21 09:46 procdrwx------ 1 root root 26 Dec 21 10:38 rootdrwxr-xr-x 1 root root 23 Dec 21 09:46 rundrwxr-xr-x 2 root root 4096 Nov 30 09:32 sbindrwxr-xr-x 2 root root 6 Nov 30 09:32 srvdr-xr-xr-x 13 root root 0 Dec 21 09:46 sysdrwxrwxrwt 2 root root 6 Nov 30 09:32 tmpdrwxr-xr-x 1 root root 66 Nov 30 09:32 usrdrwxr-xr-x 1 root root 19 Nov 30 09:32 vardrwxr-xr-x 2 root root 59 Dec 21 09:45 www
Shell in a dedicated pod
If your application is running on several pods, you can shell directly in a dedicated one by using the --pod or -p argument followed by your pod name.
$ qovery shell --pod app-5f65fb5c4-frontend-5f65db5c4b-q4w11
NOTE: you can get the list of pods by running the qovery list-pods command.
Shell in a dedicated container
If you have several containers in your pod, you can shell directly in a dedicated one by using the --container argument followed by your container name.
$ qovery shell --container app-5f65fb5c4-frontend
Port-forward
Port-forward command allows you to port-forward all the traffic on your local machine to a remote resource available on a Qovery environment. This mechanism allows developers to create a secure, encrypted tunnel from their local machine to the application or databases hosted in the cloud.
$ qovery port-forward -p 8000:80 #your_local_port:your_remote_portInfo: Current context:Organization | Qovery ProdProject | R&D / FrontendEnvironment | prodService | consoleType | applicationInfo: Continue with port-forward command using this context ?Please type "yes" to validate context: yesListening on 127.0.0.1:8000 => 80
The port-forward feature works with any application, Cronjob, Lifecycle job or database (Container or Managed) deployed with Qovery.
Im this example, you can now connect on http://localhost:8000 to access your application.
Port-forward a dedicated pod
If your application is running on several pods, you can port-forward to a dedicated one by using the --pod argument followed by your pod name.
$ qovery port-forward -p 8000:80 -pod app-5f65fb5c4-frontend-5f65db5c4b-q4w11
NOTE: you can get the list of pods by running the qovery list-pods command.
Port-forward on a managed database
Before connecting to your database, it is important to review the requirements from the Cloud Provider's documentation. A common mistake is to overlook this documentation, which can lead to hours of troubleshooting.
In this example we'll refer to the DocumentDB (MongoDB) documentation from AWS. As noted, you need to use TLS to connect to the database. First, download the TLS certificate:
wget https://truststore.pki.rds.amazonaws.com/global/global-bundle.pem
Next, run the Qovery port forward command, which you can obtain directly from the console:
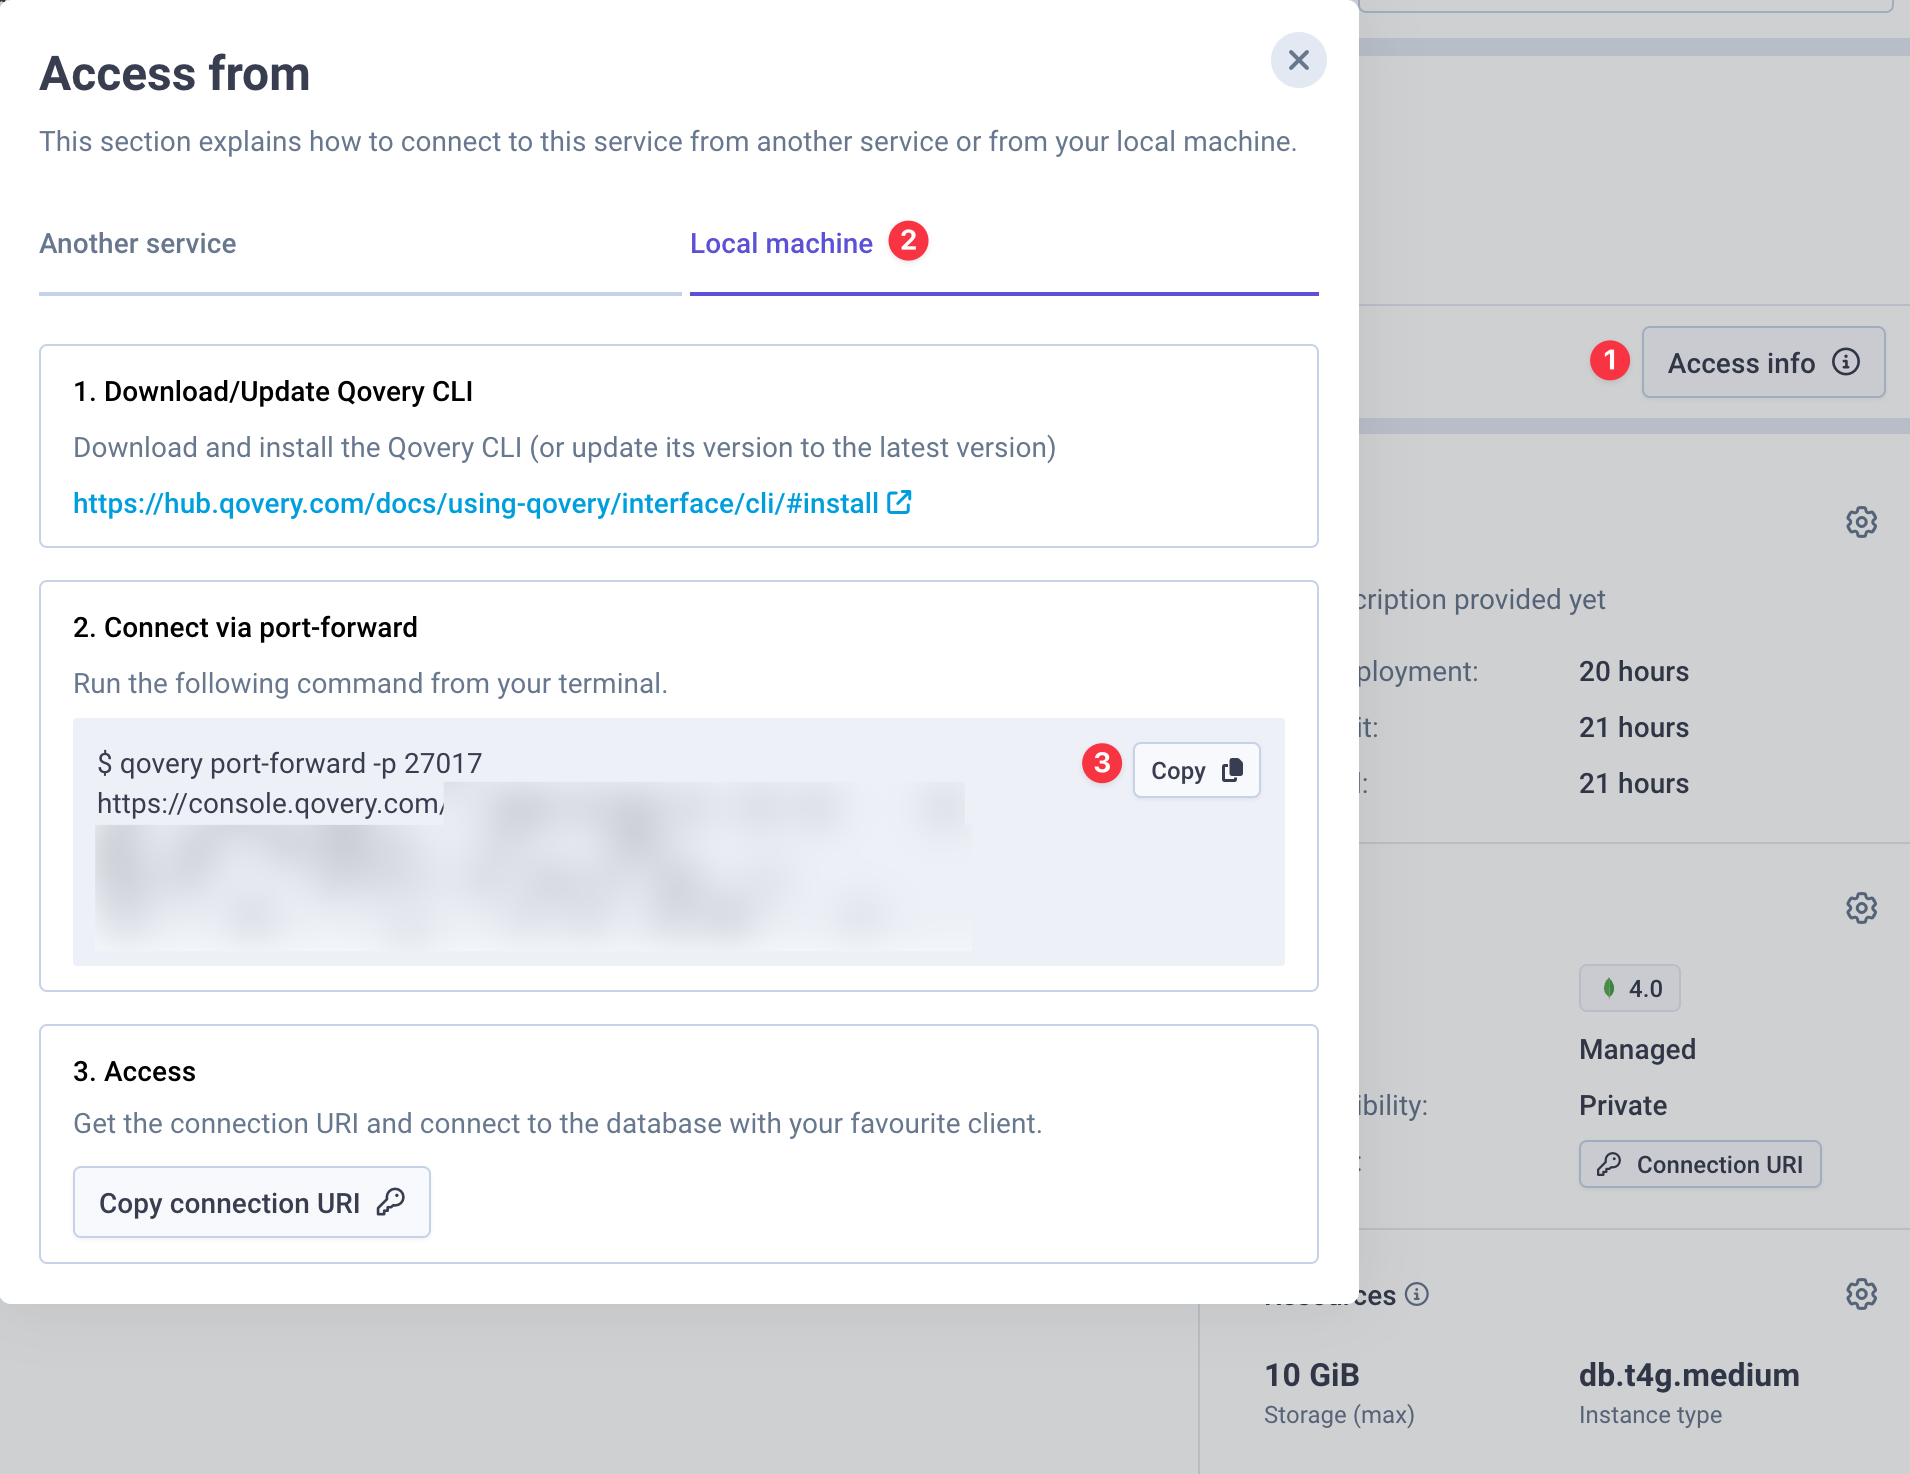
Finally, validate the connectivity with the following command:
mongosh --tls --host localhost:27017 --tlsCAFile global-bundle.pem --tlsAllowInvalidHostnames true --username <sample-user> --password <password>
Generate API token
To use the Qovery API you will need to generate an authentication token. To generate an API token you can install the CLI and type
$ qovery tokenQovery: Select organizationOrganization:✔ My OrganizationChoose a token nameToken name: RomaricChoose a token descriptionToken description: used for Github ActionsQovery: ---- Never share this authentication token and keep it secure ----Qovery: qov_4LnEg2wFxxxxxHObGSQ22rjBZZyyyySgyR6Y_2500882691Qovery: ---- Never share this authentication token and keep it secure ----
To use your token and list your organizations.
curl -X GET -H 'Authorization: Token qov_4LnEg2wFxxxxxHObGSQ22rjBZZyyyySgyR6Y_2500882691' https://api.qovery.com/organization
Check out our API documentation
Managing services, environments and projects
The CLI allows you to manage and deploy the environment and services within your organization
### application, container, lifecycle, cronjob These commands allow you to manage all these services via the CLI. You can run the following actions on these services:
- cancel: Cancel the service deployment
- delete: Delete a service
- deploy: Deploy a service
- list: List the service of the specified type
- redeploy: Redeploy a service (already deployed before)
- stop: Stop a service
- update: Update a service (service name, git branch, auto-deploy, ...)
Each action allows you to specify additional parameters to define the service you want to modify (you can find them via the --help command)
Example: Listing applications and triggering a deployment
$ qovery application listName | Type | Status | Last Updatebackend | Application | STOPPED | 2023-02-02 14:48:05.339652 +0000 UTCfront-end | Application | STOPPED | 2023-02-09 14:04:38.079792 +0000 UTC$ qovery application deploy -n "backend"Deploying application backend in progress..$ qovery application listName | Type | Status | Last Updatebackend | Application | RUNNING | 2023-02-13 12:59:23.228231 +0000 UTCfront-end | Application | STOPPED | 2023-02-09 14:04:38.079792 +0000 UTC
Example: Enable the auto-deploy feature for an application
$ qovery application update --application backend --auto-deploy trueApplication backend updated!
Environment
The command environment allow you to manage a specific environment via the CLI. You can run the following actions on environments:
- cancel: Cancel an environment deployment
- clone: Clone an environment
- delete: Delete an environment
- deploy: Deploy an environment
- list: List environments
- redeploy: Redeploy an environment
- stage: Manage deployment stages
- stop: Stop an environment
Each action allows you to specify additional parameters to define the service you want to modify (you can find them via the --help command)
Example: Manage deployment stages and triggering deployment
~ $ qovery environment stage list# deployment stage 1: "DATABASE DEFAULT"Rename me to avoid default/legacy orderingType | NameDATABASE | RedisDATABASE | DB# deployment stage 2: "JOB DEFAULT"Rename me to avoid default/legacy ordering<no service># deployment stage 3: "CONTAINER DEFAULT"Rename me to avoid default/legacy orderingType | NameCONTAINER | Rabbitmq# deployment stage 4: "APPLICATION DEFAULT"Rename me to avoid default/legacy orderingType | NameAPPLICATION | BackendAPPLICATION | FrontendAPPLICATION | Pablo Backend AppAPPLICATION | API gateway~ $ qovery environment deployEnvironment is deploying!
Projects
You can list the organization's projects by using the following command:
qovery project list
Access your cluster
To access your Qovery managed cluster, follow these steps:
- Managed cluster
- Self-Managed cluster
- Export your kubeconfig file by running the command below, replacing
your-cluster_idwith your actual cluster ID:
qovery cluster kubeconfig --cluster-id <your-cluster_id>
- Set the KUBECONFIG environment variable to the path of the kubeconfig file obtained from the previous command:
export KUBECONFIG=<path_to_kubeconfig_file>
- You can now use tools like
k9sorkubectlto access and manage your cluster:
Using k9s
Launch the k9s terminal UI to interact with your Kubernetes cluster:
k9s
Using kubectl
Here are a few examples of common kubectl commands:
kubectl get pods #List all pods in the default namespace
kubectl describe pod <pod_name> #Get detailed information about a specific pod
Lock cluster updates
The lock cluster command prevents any update or deployment from being initiated on a cluster while it is locked. Once a cluster is locked, no new updates can be processed until it is unlocked.
Lock cluster
qovery cluster lock --cluster-id <your-cluster_id> --reason <reason> --ttl-in-days <days>
Note that the TTL can not be greater than 5 days.
Unlock cluster
qovery cluster unlock --cluster-id <your-cluster_id>
List clusters locked
You can list all the cluster locked withing an organization by running this comamnd:
qovery cluster locked --organization-id <org-id>
Managing the Deployment Pipeline
In the following sections we will describe how to modify the Deployment Pipeline.
List stages
You can list all the stages of your environment by using the following command:
qovery environment stage list
Add a stage
You can add a new stage by using the following command:
qovery environment stage create -n <name> -d <description>
Note that the stage will be added at the end of the pipeline (the highest number)
Modify a stage
You can modify a stage by using the following command:
qovery environment stage edit -n <original name> --new-name <new name> --new-description <new description>
Delete a stage
You can modify a stage by using the following command:
qovery environment stage delete -n <name>
Change stage for a service
You can modify the stage associated to a service by using the following command:
qovery environment stage move -n <service name> --stage <stage name>
Static token
You can use a static token to authenticate to Qovery CLI. Which is useful for CI/CD pipelines.
Environment variables available to set static token:
QOVERY_CLI_ACCESS_TOKENQ_CLI_ACCESS_TOKEN
export QOVERY_CLI_ACCESS_TOKEN=xxxqovery log --organization MyOrg --project MyProject --environment MyEnv --application MyApp# you will see the log output
Support
Do you have any issues with Qovery CLI? Open an issue.