Service Deployment Troubleshoot
Within this section you will find the common errors you might encounter when deploying your services with Qovery
Generic
Liveness/Readiness failed, connect: connection refused
If you encounter this kind of error on the Liveness and/or Readiness probe during an application deployment phase:
Readiness probe failed: dial tcp 100.64.2.230:80: connect: connection refusedLiveness probe failed: dial tcp 100.64.2.230:80: connect: connection refused
That means your application may not able to start, or has started but takes too many time to start.
Here are the possible reasons for starting issues you should check:
The declared port on Qovery (here 80), does not match your application's opening port. Check your application port, and set the correct port to your application configuration.
Ensure your application is not listening onto localhost (127.0.0.1) or a specific IP. But set it to all interfaces (0.0.0.0).
Your application takes too long to start and the liveness probe is flagging your application as unhealthy. Try to increase the Liveness
Initial Delayparameter, to inform Kubernetes to delay the time before checking your application availability. Set it for example to 120.
0/x nodes are available: x insufficient cpu/ram
If you encounter this kind of error during an application deployment phase:
0/1 nodes are available: 1 Insufficient cpu (or ram).
That means that we cannot reserve the necessary resources to deploy your application or database on your cluster due to an insufficient amount of CPU or RAM. Moreover, the cluster auto-scaler cannot be triggered since it has already reached the maximum number of instances for your cluster (valid only for Managed Kubernetes clusters).
Here are the possible solutions you can apply:
Reduce the resources (CPU/RAM) allocated to your existing/new service. Have a review of the deployed services and see if you can save up some resources by reducing their CPU/RAM setting. Remember to re-deploy the applications when you edit the resource. Have a look at the resource section for more information.
Select a bigger instance type for your cluster (in terms of CPU/RAM). By increasing it, it will unlock the deployment of your application (since new resources have been added). Check your cluster settings, and change the instance type of your cluster.
Increase the maximum number of nodes of your cluster. By increasing it, it will allow the cluster autoscaler to add a new node and allow the deployment of your application (since new resources have been added). Check your cluster settings, and increase the maximum number of nodes of your cluster. Note: If you are using a self-managed cluster, this operation cannot be performed through the Qovery console.
Please note that application resource consumption and application resource allocation are not the same. Have a look at the resource section for more information
My app is crashing during deployment, how do I connect to investigate?
Goal: You want to connect to your container's application to debug your application
First, try to use qovery shell command from the Qovery CLI. It's a safe method to connect to your container and debug your application.
If your app is crashing in the first seconds, you'll lose the connection to your container, making the debug almost impossible, then continue reading.
Your app is crashing very quickly, here is how to keep the full control of your container:
Temporary delete the application port from your application configuration. This to avoid Kubernetes to restart the container when the port is not open.
Into your Dockerfile, comment your
EXECorENTRYPOINTand add a way to make your container sleep. For example:#CMD ["npm", "run", "start"]CMD ["tail", "-f", "/dev/null"]Commit and push your changes to trigger a new deployment (trigger it manually from the Qovery console if it's not the case).
Once the deployment done, you can use qovery shell command to connect to your container and debug.
Can't get my SSL / TLS Certificate
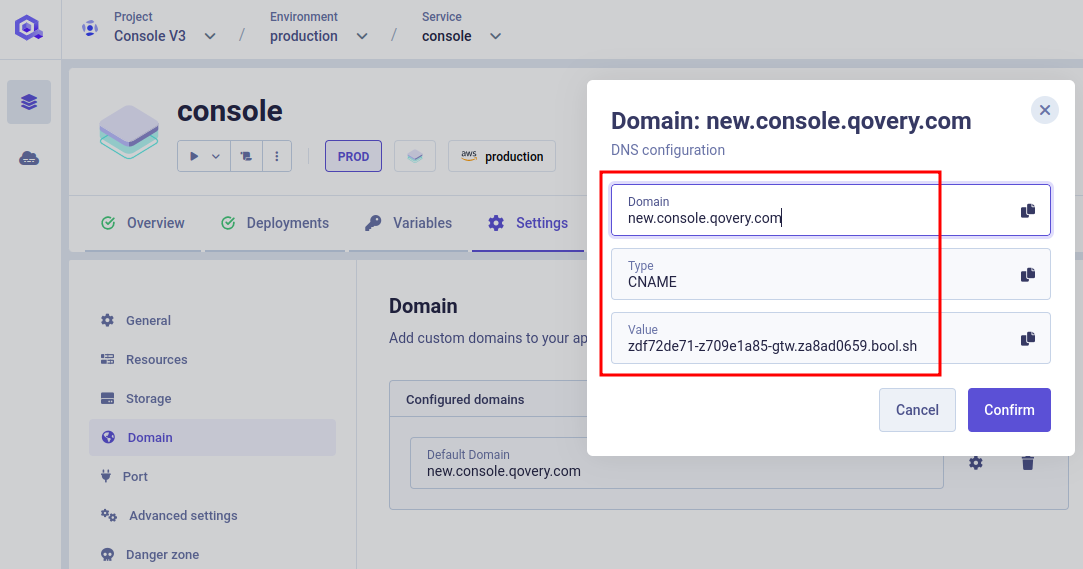
When a custom domain is added to an application, it must be configured on your side according to the instructions displayed:

Qovery will verify whether your custom domain is properly configured. If you're behind a CDN, we will only check if your custom domain resolves to an IP address.
If you want to verify by yourself that your custom domain is well configured you can use the following command: dig CNAME ${YOUR_CUSTOM_DOMAIN} +short. On the domain above, we can check the configuration is correct on Google DNS servers:
$ dig CNAME new.console.qovery.com +short @8.8.8.8zdf72de71-z709e1a85-gtw.za8ad0659.bool.sh.
It should return the same value as the one configured on Qovery. Otherwise, be patient (some minutes depending on DNS registrars) and ensure the DNS modification has been applied. Finally, you can check the content of the CNAME with:
$ dig A new.console.qovery.com +short @8.8.8.8zdf72de71-z709e1a85-gtw.za8ad0659.bool.sh.ac8ad80d15e534c549ee10c87aaf82b4-bba68d8f58c6755d.elb.us-east-2.amazonaws.com.3.19.99.118.188.137.104
We can see the destination contains other elements, indicating that the CNAME is pointing to an endpoint and correctly configured.
The SSL / TLS Certificate is generated for the whole group of custom domains you define:
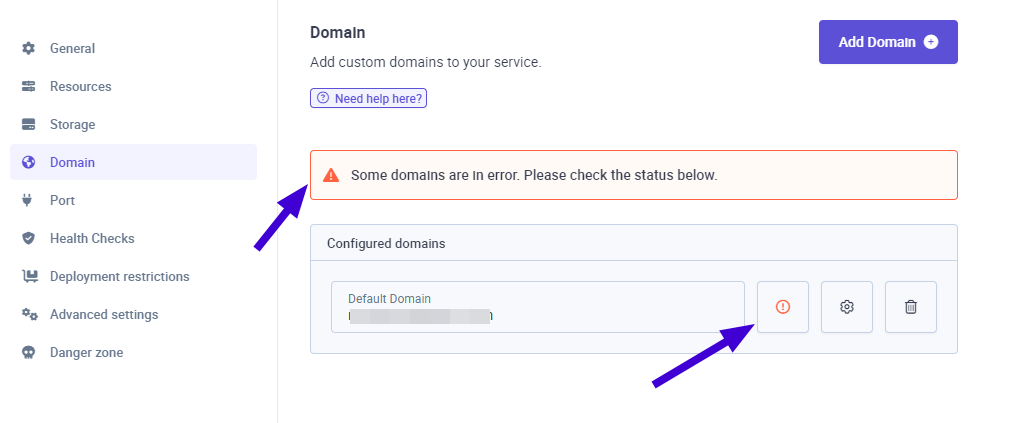
- if one custom domain is misconfigured: the certificate can't be generated. A general error is displayed in your service overview.
- if the certificate has been generated once, but later one custom domain configuration is changed and misconfigured: the certificate can't be generated again
If you experience some invalid certificate, here is how you can fix the issue:
Identify the misconfigured custom domain(s) in your application domain settings. We check each of your domains. If one or more have errors, a red cross will appear with an error message on hover.

Fix or delete them. After correcting your configuration, you can perform another check by clicking on the red cross.
Redeploy your impacted application(s).
Git Submodules - Error while checkout submodules
Error Message:
Error message: Error while checkout submodules from repository https://github.com/user/repo.git.Error: Error { code: -1, klass: 23, message: "authentication required but no callback set" }
There are limitations with the support for Git Submodules. Only public Submodules over HTTPS or private with embedded basic authentication are supported.
Solution: Follow our Git Submodules guide to make your application working with Git Submodules on Qovery.
Container image xxxxxx.xxx.xx failed to build: Cannot build Application "zXXXXXXXXX" due to an error with docker: Timeout
This error shows up in your deployment logs when the application takes more time to build than the maximum build allowed time (today 1800 seconds).
If your application needs more time to build, increase parameter build.timeout_max_sec within your application advanced settings and trigger again the deployment.
Lifecycle Jobs / Cronjobs
Joib failed: either it couldn't be executed correctly after X retries or its execution didn't finish after Y minutes
This errors occurs in the following two cases:
Job code execution failures The pod running your lifecycle job is crashing due to an exception in your code or OOM issue. Have a look at the Live Logs of your Lifecycle job to understand from where the issue is coming from your code.
Job execution timeout
The code run in your job is taking more time than expected and thus it's execution is stopped. If your code needs more time to be excecuted, increase the Max Duration value within the Lifecycle Job configuration page
Database
SnapshotQuotaExceeded - while deleting a managed DB
This errors occurs because Qovery creates a snapshot before the delete of the database. This to avoid a user mistake who delete a database accidentally.
To fix this issue, you have 2 solutions:
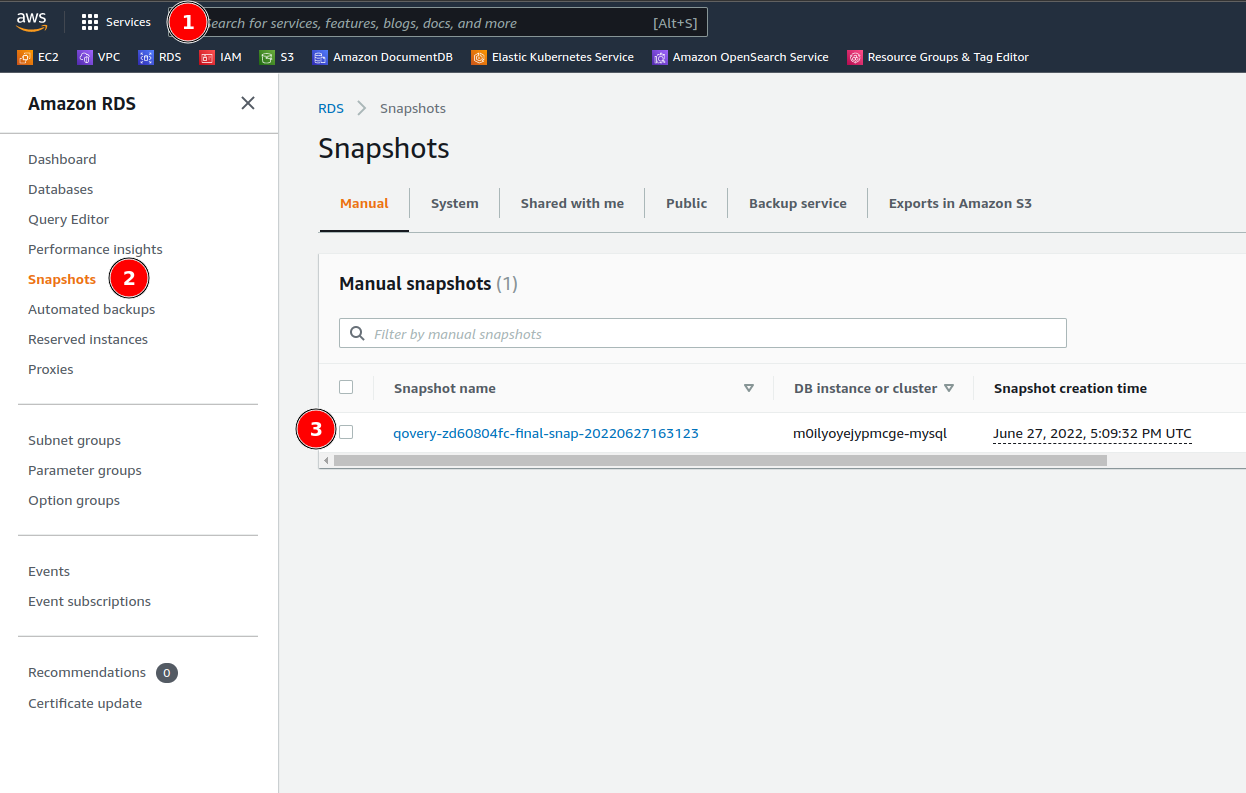
You certainly have useless snapshots, from old databases or old ones you don't want to keep anymore. Delete them directly from your Cloud Provider web interface. Here is an example on AWS:
- Search for the database service (here RDS)
- Select the Snapshots menu
- Select the snapshots to delete

Open a ticket to the Cloud Provider support, and as to raise this limit.